


🛠️ Work smarter, not harder — your ultimate portable powerhouse!
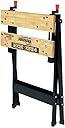
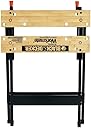
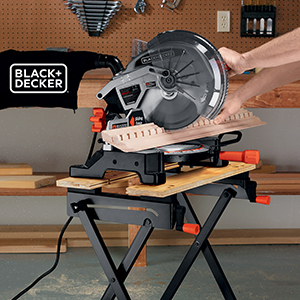
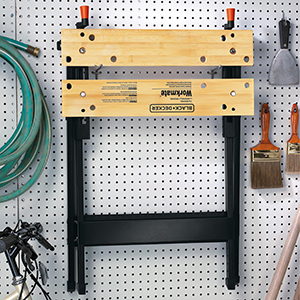
The BLACK+DECKER Workmate WM125 is a portable workbench engineered for professionals and DIY enthusiasts alike. With a robust 350-pound capacity, durable steel frame, and wooden vise jaws that resist warping, it offers versatile clamping through four adjustable swivel pegs. Weighing just under 15 pounds, it folds flat for easy storage and features slip-resistant feet for stable, safe use. Perfect for managing complex projects on the go, it combines strength, flexibility, and portability in one sleek package.


| Material | Steel,Wood |
| Brand | BLACK+DECKER |
| Product Dimensions | 5"D x 5"W x 35"H |
| Color | Black |
| Item Weight | 14.85 Pounds |
| Finish Type | Brushed |
| Base Type | Casters |
| Frame Material | Alloy Steel |
| Load Capacity | 350 pound |
| Assembly Required | Yes |
| UPC | 028877364858 |
| Minimum Height | 12.7 Centimeters |
| Global Trade Identification Number | 00028877364858 |
| Manufacturer | BLACK+DECKER |
| Part Number | WM125 |
| Item Weight | 14.85 pounds |
| Item model number | WM125 |
| Is Discontinued By Manufacturer | No |
| Size | One Size |
| Style | Portable Workbench |
| Finish | Brushed |
| Pattern | Solid |
| Shape | Rectangular |
| Power Source | hand_powered |
| Torque | 1400 Inch Pounds |
| Item Package Quantity | 1 |
| Maximum Weight Capacity | 350 Pounds |
| Head Style | Flat |
| Measurement System | Metric |
| Special Features | Lightweight |
| Included Components | WM125 Project Center | (4) Swivel Pegs |
| Batteries Included? | No |
| Batteries Required? | No |
| Warranty Description | 2 year warranty. |
U**E
Good deal, instructions useless, watch the video (There are several good ones) Tips on assembly!
Note: I'm a 63 yr old Handy-Lady, and well used to getting my hands dirty, and make furniture and other woodworking projects. Like many people I was wary of getting this workbench set up. I actually bought this in May and left it till I needed it - September 9 - to assemble it. I forgot the return window for Amazon had closed, so I was really nervous when I examined the box, which had obviously been opened and resealed. And even more so when I found one of the plastic bags of parts was opened. But, I looked up the Black and Decker assembly video for the WB125 and setup my iPad to watch as I assembled it First - and I am one of those people - I arranged all the parts and hardware exactly as shown in the video, and was pleased that nothing was missing. TIP #1: Make sure you have the 2 cross-braces identified as the shorter one goes on the inside legs, the longer one on the outside legs - the holes won't line up if you make the same mistake I did. TIP #2: Yes! Use locking washers - 8 x M6 lock washers - on these cross-brace attachments to make sure it is as sturdy as possible TIP #3: There are 4 slides included for the vise. These are actually 2 sets of 2 and are not identical. The first set have a protruding knob which fits in the hole in the metal top of the bench. This set is the one used to attached the non-moving part of the vise - the one without the printed logo and product name on it. Everything else went smoothly - watching the video carefully - and I even used the Roll Pins to attach the handles. I had bought - upon the advice of a number of reviewers - but the Roll Pins - with a little force, went through OK. Tip #4: I attached the feet, which fitted well, but also used Flex-Glue, since the feet are flexible plastic. I literally just finished the setup, so I can't say whether this was a good idea, but it seemed logical to me. Once assembled it seems very sturdy and - I used to have one of the original 1970's versions - not quite as solid as the original, but good enough for my home projects. At $40 (incl. tax - and it's now even cheaper) I am very pleased with the workbench. VIDEOS: Search YouTube for WB125 Assembly and you should get the one from the Black and Decker Product Manager. But also search for "How To Put Together A Black+Decker WorkMate 125 Portable Workbench" by user, 'Help at my Home'. He runs through some of the confusing aspects of assembly and the various parts and pieces that might get your frustrated. _______ Hammer On!! -Kim
D**N
Great addition to garage workshop
Small, with a strong grip of the vise, 4 plastic dogs included (the fact that they are a bit compressible improves the grip). Standard aluminum dogs fit the holes. A bit tricky to assemble but completely doable using instructions (not as straightforward as IKEA's, but doable, nevertheless). Does anyone expect it to be sturdy? If anyone does, checking with common sense is advised. But placing a foot on the crossbar is enough to fix it in place and make manipulations which do not include excessive force to the side. Yes, if I put all my strength to the fixed plank sideways, this poor contraption will bend, but... it is not designed to withstand this. With this in mind, my first three days working on it with tools and efforts, which are consistent with its design, were pleasant. I did what I needed - chiseling, drilling, cutting 2x4 (!) with a saw etc. No complaints. It can be stored flat, and it will be when my main workbench will come fully functional. This small piece can be a reserve or take-out workplace.
J**N
Good Product, But An Ordeal to Assemble
I like that the product folds up and is very versatile, and can be used like a sawhorse for tasks like cutting up an old fence to repurpose wood. Assembly, however, was a half-day ordeal because the printed instructions were woefully bad and even left out a crucial washer (spacer) in the parts list for the very first assembly step. The Black and Decker and independent videos, recommended by some reviewers, were less bad, and made assembly possible with some improvisation. I will explain in a little more detail, as the videos seemed to cheat (skipping over steps to show things as finished), and it can be tempting to just return the item in frustration, or throw it out the nearest window into a trash bin. The printed instructions and videos say you need the little plastic bolt tightener provided, and it works great. They also tell you to use a hammer and flat-head screw driver, but the product uses phillips screws and a rubber mallet will be a better choice to bang things into place without causing damage. Unless you have very strong hands like the guy in the video, you will need a pliers and mallet to assemble the handle. There is one step at the very end where you need the hammer to bang a pin into the handle, but they do not mention that it helps to have pliers to squeeze the tip of the pin so that it fits. The Black and Decker video claims at the outset to show you every step, but it lies. The video goes too fast and skips steps. I found it best to download a copy of the video, and then refer back to it each step of the assembly, and then disassemble and reassemble each step of the assembly to get things right. Makes things slow. I was tempted to give the product 3 stars or less, on account of the difficult assembly. The printed instructions omit the black washer from the parts list, which guarantees having to disassemble step one and start over after watching the video, where the washer is called a “spacer”. I had to freeze the video and replay it a few times, as the spacer flashes by in a nano-second and it is hard to see where it goes. In fact, every step of the way I had to freeze the video to see how the parts were placed, as nothing is marked and it is easy to get things turned around. When I got to the handles which go onto a metal sliding rod, one of the independent videos recommended disassembly because the Black and Decker video assembly just did not work. Indeed, I found this out for myself. An orange plastic knob just pops into the black handle near the end of the B&D video; but I needed pliers to compress the end of the orange knob and a rubber mallet to hammer it in safely. This after a disassembly to remove the sliding metal rod, to prevent it spinning around (the videos do a cheat on this, or perhaps have a second person out of sight holding it). The video at the very end also shows hammering a pin into the handle, which is just not possible (at least for me) because the rod will spin and you cannot line up the holes if it is assembled first. So, I used a pliers to squeeze the tip of the pin and then held down the handle and attached metal rod on a work table so it would not spin while I hammered in the metal pin. Then I used a rubber mallet to gently hammer the handle and attached metal rod backwards from the front of the assembly to the back. It is not meant to be done that way, but one of the independent videos found that was the only way they could assemble it, too. Improvisation every step of the way. An ordeal, but the competing assembled products were rated as junk by most reviewers. So...
G**8
5 Stars IF you are aware of their assembly video
There is a video from Black and Decker which shows you how to install the bench, link is below: EDIT: Amazon wouldn't let me post the link, but if you search Youtube for "Black and Decker workmate 125 assembly" you will find it. As lots of other people pointed out, the installation instructions are terrible, which is the main downside to this product. But if you watch the video (and pause it at key points to look at the workmate in various stages of assembly) you shouldn't have a problem. A few other important things to note: - Don't use the stupid cotter pins to hammer in the handles! Its really hard to get them in properly and you risk hurting yourself or bending the handle out of shape with the hammer. As another reviewer pointed out, use #6-32 1 & 1/4 nuts and bolts instead. Buy a pack of 6 ( 99 cents from home depot), you will need the other 4 to resolve the next issue.... - The rubber feet will fall off constantly, which is annoying. To fix that you can drill holes through the feet and legs so that you can install nuts and bolts to hold them on (see picture). Drilling a 9/64 hole will be enough to make the #6-32 bolts fit in. I know.... it would have been nice if Black & Decker just manufactured the thing this way, and just provided you with the $0.99 pack of bolts. But even with these shortcomings, it still deserves 5 stars when you factor in extremely low price tag ($29), and more importantly, the fact that once it is assembled properly, its a solid product. More versatile and useful than many other things which cost much more.
S**Y
I've Had a Clone, Now I'm Ready for the Real Thing.
This Black and Decker Workmate portable workbench replaces a clone model that's sold by a large hardware chain. The real Workmate is far superior, in my opinion. It's sturdier, the table surface is more robust, and it feels less brittle than the clone. Assembly went fairly smooth, although the instruction manual has some steps out of order and the illustrations don't match the text. They could stand to have another round of editing. There were no missing parts, so I didn't need to contact B&D's customer service. This is handy unit to have, as it can be used as a vice or simply as platform for a variety of homeowner projects. The day I assembled it, I needed to cut a 3" PVC rain pipe with a Saws-All, and the Workmate kept the pipe secure, despite the vibration induced by the electric saw's reciprocating blade. When I finished, I dusted it off with a shop brush, then folded it up and stored it away for the next job. This was a father's day gift that I picked out for myself. I'm glad I did.
I**T
Look for the YouTube video to assemble.
The "Instruction Manual" needs to be rewritten. 1. You need a Phillips head screwdriver, not a "flat bladed screwdriver" 2. There is no picture for the first bullet point of Step 4. It says "as shown". There is no picture showing this. 3. When pushing the red handle (L) onto handle arms (K), it's very, very hard to push in. I think my palms will be bruised. On the second one, I placed a wood block on (L) and hammered it into (K) 4. When hammering the pins (G) into the handle (K), you find out how sturdy the Workmate is. I can't use a hammer so this step went slow. I felt like I was beating it up, but it withstood my hammering. I finally got one pin all the way through but as shown in the picture, I couldn't get the second one to be flush. It took me 1.5hrs to assemble.... it was easy except for pushing the handle together and beating the pins in. That's what slowed me down and they sent an extra bolt (C) and nut (A). I WOULD'VE GIVEN IT ONLY 4 STARS IF I HADN'T FOUND THE YOUTUBE VIDEO. THE BENCH GETS 5 STARS... THE ASSEMBLY INSTRUCTIONS GETS 2.... NO, ONLY 1 STAR.
W**K
It's a hassle!
It's what I wanted: a lightweight, foldable edge tool sharpening stand. However, it's a hassle to buy and assemble. The first one I ordered had a bent "axle" pin where the right legs cross. So bent that it could not be assembled. It did not appear to be damaged in transit but the box end was re-taped as if the damaged part had been re-packaged. The second one had several issues. The instructions are not clear, ranging from saying to use a flat-tip screwdriver to tighten the Phillips #2 screws to claims of "as shown" not shown. The sheet-metal parts did not go together easily--not the best quality control in manufacture. On the front brace, the screw holes did not line up, and I had to drill them out. The screws for the bamboo top would not thread in easily. I put some oil on them and worked them in and out until they could be tightened. Its hard to see, but these screws are too long and almost contact the horizontal top adjustment screws. I was afraid to tighten them down. All said, assembly is not rocket science, and you can figure it out with a little head scratching, some persistence, and a few more tools than indicated in the instructions.
C**N
Works well, amazing value for the price
This workbench costs less than most sawhorses, and yet it's far more versatile and functional than anything else within a mile of its price point. It's a workbench, a vise, a sawhorse, and a de facto router table, spindle sander table, or really any other sort of table you like based on which power tool you choose to grip upside down in the center of it! Even better, it's lightweight and portable, and yet constructed of (almost entirely) quality materials. There are a few things about it I could nitpick. The handles feel flimsy, the top starts to feel a bit loose when cranked outward to its fullest extent, and the assembly instructions, which start out simple enough, take a steep drop in intelligibility at around step 4. (I can only assume that the technical writer responsible got to this point in the drafting process, received a text message from his wife asking for a divorce, got black-out drunk, and then finished writing the manual in an alcoholic stupor.) Anyway, there's a Black and Decker Youtube video which ameliorates the issue tremendously. Other reviews here have some good suggestions for DIY improvements you can make to improve the workbench. Personally, I used machine screws to attach the handles (rather than hammering pegs in), used super glue to affix the rubber feet permanently, and acquired some inexpensive saddlebag-style sand bags to weigh the work bench down. (This last tip is important for performing actions that produce a great deal of lateral force, like hand planing with a block planer, as the table is fairly light weight and liable to shift around under these circumstances.)
Trustpilot
2 days ago
5 days ago