
DOWNLOAD THE APP


Customer Services
Copyright © 2025 Desertcart Holdings Limited
DOWNLOAD THE APP


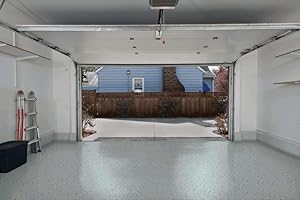
🚗 Transform your garage into a high-gloss powerhouse—durability meets style!
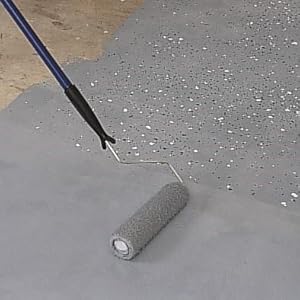
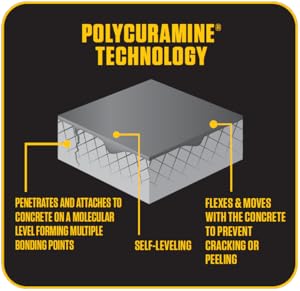
Rust-Oleum 60003 Rocksolid Polycuramine Garage Floor Coating is a premium, self-leveling concrete coating designed for interior floors. It offers 20 times the strength of epoxy, a quick cure time with walk-on readiness in 8-10 hours, and a stunning high-gloss terrazzo finish that resists cracking, chemical spills, and hot tire pickup. This low-odor, low-VOC kit covers up to 250 sq. ft., making it ideal for single-car garages and workshops seeking a durable, showroom-quality floor upgrade.


| ASIN | B00PP7F8XM |
| ASIN | B00PP7F8XM |
| Batteries Included? | No |
| Batteries Required? | No |
| Color | Gray |
| Coverage | 200-250 square feet per kit |
| Customer Reviews | 4.1 4.1 out of 5 stars (221) |
| Customer reviews | 4.1 4.1 out of 5 stars (221) |
| Date First Available | 10 March 2016 |
| Date First Available | 10 March 2016 |
| Department | unisex-adult |
| Finish | Gloss |
| Included components | Polycuramine Burst Pouch, Foam Roller, Concrete Etch, Decorative Color Chips, Stir Stick, Instructions |
| Is Discontinued By Manufacturer | No |
| Item Package Quantity | 1 |
| Item Weight | 3.4 Kilograms |
| Item model number | 60003 |
| Item model number | 60003 |
| Manufacturer | Rust-Oleum |
| Manufacturer | Rust-Oleum |
| Material | Liquid |
| Part number | 60003 |
| Product Dimensions | 20.32 x 20.32 x 23.5 cm; 3.4 kg |
| Product Dimensions | 20.32 x 20.32 x 23.5 cm; 3.4 kg |
| Size | 2.81 Quart (Pack of 1) |
| Special Features | Crack Resistant |
| Specific uses | Interior |
| Style | 6 Piece Set |
R**G
30 years ago, I applied an industrial epoxy finish to this floor and it now needed a refresh. The RockSolid Polycuramine coating was an excellent option for the refresh. I prepped the existing floor with a 40-grit sand and acetone wipe-down. I ordered this kit in Gloss Gray and had it two days later, and had it applied within two hours of delivery. It cured quickly with minimal odor. The ONE recommendation (or tip) I didn't see elsewhere is to have something available during installation to clamp the epoxy bag once you snip the corner (spring clothespin, binder clip, etc.). Since this product is self-leveling, it is low viscosity and it will leak onto the floor from the snipped bag unless mitigated with a clip or otherwise (it is applied directly from the bag and not in a roller pan). The gloss is outstanding, reflects light very well, and the overall impression is "bright, clean, fresh", per my wife. I really enjoy the upgrade, it transformed the room!
S**)
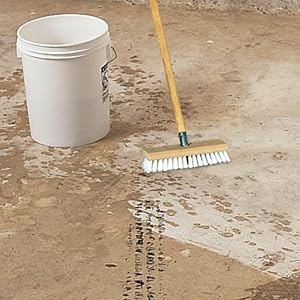
The pictures i attached are from the first of two single car garages i've done this fall, and the smaller of the two. It is 210 square feet. I've read the other reviews and figured i was well prepared for applying this product. I thoroughly cleaned the relatively clean concrete with degreaser, and then the etching acid provided. Ensure you do not add more water than the directions state. I made that mistake on the second garage. After cleaning, etching, and scraping any stuck-on spills like paint and other unidentifiable things, i let it dry for a few days. Working within the suggested temperatures, i mixed the product as directed, and started applying to the edges using some disposable brushes. It was easy to cut in and spread the product. When it came to rolling, i used the provided foam roller with no issue. Remembering the comments about product coverage, i ensured i did not lay it on too thick so as to not run out by the time i got to the other side. As a result, i realized as it cured, that i went too thin at first, and the porous concrete showed thru and seemed darker than the rest. I found myself with excess product on at the other end of the garage, making it a thicker coat at the garage opening. The second garage i did is 235 square feet. Taking the learnings from the first, i was more mindful of how far this stuff goes. I was able to apply a more even coat, but really wish i had more on this one. The two car kit would have been better. I had just enough to coat this one. Both of these locations are rentals, so we weren't looking for perfect. Other things about this product are already stated in the instructions. Such as, this product will not fill concrete cracks, stick to or cover oily substances. So fill cracks and scrub the floor. It does stick very well to porous concrete. I had a small silver dollar sized spill on the concrete driveway, and when i scraped it off, it brought the concrete with it. So i know it sticks. If using this stuff at my primary residence, i'd definitely know how many square feet it was, and i'd also opt for getting the clear topcoat. Otherwise, you are walkiing on the chips.
N**Z
I used these to update my 3 car garage. Others have mentioned the extensive prep work that is necessary and I can confirm it’s no joke. However, it’s well worth it. In regards to the coverage my 2 car garage is exactly 400sq feet with a small raised area that accounts for another 16 sq ft or so and the 1 car portion is 200sq ft. I did these on separate days as I’ve never done this before. The 1 car kit barely and I mean barely covered my single garage. We had to squeeze every single drop out of it but the result was the last 1/3 or so of what we did is patchy looking due to the coating being so thin. Still looks decent just looks like amateurs did it which is true. So I took the advice of others and bought an extra 1 car kit to go with the 2.5 kit. I ignored the instructions and mixed all 3 in a bucket and this was perfect. We were able to layer on the perfect amount, cover the small area, and have a little leftover to touch up certain areas with a paint brush. However, there is no way the single 2.5 kit would have given this coverage on its own. Take the advice of myself and others but extra! It looks great. I hope to comment in a year or so about the performance.
R**R
I have a background, as a finishing engineer, with the automotive industry. So, I understand the importance of good preparation and humidity control to obtain the maximum benefit of coating. With this product I’ve done just that, from using a 60 grit cement grinder to watching the temperature and humidity before painting …. See pictures … I had a two-car garage floor to cover with the Rustoleum garage kit 20X. I also purchased the single car garage kit as an extra in case I needed it. The two car kit comes with two bags, I followed instructions and began to use the first bag (keeping an eye on time). Here are my results which left me somewhat disappointed. See accompany photos. 1. Less than twenty minutes I notice that the bag got hot, and it quickly solidified. There was about a little less than 1/3 paint left in the bag. 2. The second bag lasted longer, and I did not have any problems with it. I had approx.. a 3 x 10 ft left to cover. 3. I had to use the third bag the small area, which consequently added to the cost of the project due to the performance of the first batch. Note: if the first batch performed properly I would have save money, and could have use this money for the clear coat. (I purchase clear coat as well). 4. I also noticed that you can see the roller strokes from the overlapping. I appear to be solvent pops … due to the curing process. My observations: it appears that this product has some performance issues that have not been resolved. I purchased Valspar’s product for my shop floor, after seeing your product’s performance, and the results are as expected. Note. I choose not to use your clear coat product on both projects. I used Valspar clear coat instead, because I didn’t want to take the chance. Can you advise me on this? Are there issues with performance? Why did the first bag react different (unfavorable) from the other two. The overlap issue (discoloring) should be a concern. If the first bag would have reacted favorably, I would have save $100. Regards, Steve
O**B
I did my basement laundry room floor myself with Rocksolid 5 months ago in late spring in Chicago. These photos are from today, and the floor still shines like it's wet. Because of the potential problems other reviewers helpfully identified I took the prep work very seriously -- I rented a floor grinder from HomeDepot to remove old paint; filled cracks with Rustoleum product; hand scrapped as needed; etched with Rustoleum concrete etch; and primed with Rustoleum Recoat, the dedicated primer for this job. I called customer service at least 5 times with questions -- excellent customer support from different reps each time Still, I had many stressful moments, especially around set time for the filler and the adhesion of the primer -- so I ran a space heater and a dehumidifier. Like everyone else, I rolled the product on too thick at first, and had to stretch it at the end. No problems though, even as plenty of the flakes got rolled into the liquid rather than sinking in from above. And somehow I'd missed rolling random spots, but Rustoleum sent me a repair kit, which is the same product but in a smaller package. I'm handy and detail focused, but I had never done this particular job before. My results are good but not great. Saved about $1000 over what pros bid for the job in either epoxy or poly. Worth it? I had the time and it feels like a satisfying accomplishment.
Trustpilot
2 weeks ago
3 days ago