


📱 Elevate Your Display Game!
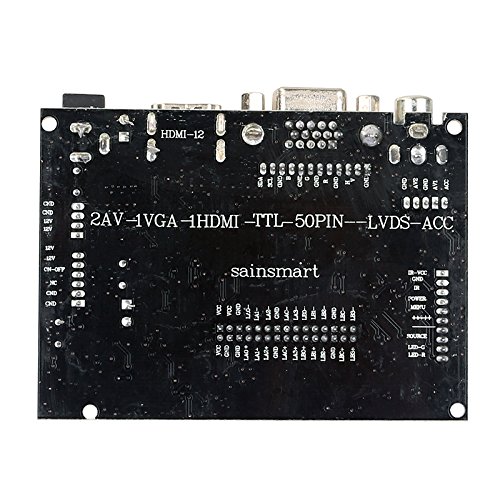
The SainSmart 7" LCD Display is a versatile touch screen monitor featuring a resolution of 800x480, ideal for Raspberry Pi projects. With multiple input options including HDMI and VGA, it offers bright visuals at 250cd/m2, making it perfect for both professional and personal use.
M**S
Five Stars
Great product. Works with my Pi B+ and the Beaglebone Black. This is what I did to get it running with the RPi (the BBB process is pretty much the same):The drivers are already there for the RPi, at least it was for the B+ (which is the one I have).I had to build the kernel to get the screen to work. I did that from an Ubuntu VM running 3.13.0-35-generic 32-bit (VMWare Player).This is what I did:Attach the controller to the RPi and check that it sees the screen, you're looking for an eGalax entry:$ lsusbBus 001 Device 005: ID 0eef:0001 D-WAV Scientific Co., Ltd eGalax TouchScreen$ cd ~$ mkdir src$ cd srcGet the kernel sources:$ wget https://github.com/raspberrypi/linux/archive/rpi-3.12.y.tar.gz$ tar -zxvf rpi-3.12.y.tar.gz$ cd linux-rpi-3.12.yInstall dependencies:$ sudo apt-get install git libncurses5 libncurses5-dev qt4-dev-tools build-essentialInstall toolchain:$ sudo apt-get install gcc-arm-linux-gnueabihfMake sure the source objects are clean:$ make mrproperCreate a folder for the generated kernel:$ mkdir ../kernelGenereate the .config file:$ make O=../kernel/ ARCH=arm CROSS_COMPILE=/usr/bin/arm-linux-gnueabihf- bcmrpi_cutdown_defconfigConfigure the kernel:$ make O=../kernel/ ARCH=arm CROSS_COMPILE=/usr/bin/arm-linux-gnueabihf- menuconfigNavigate to Device Drivers -> Input Device Support -> Touch Screens and select it. Go to USB Touchscreen Driver select it. Go to "eGalax, eTurboTouch CT-410/510/700 device support" and select it. Exit all the way and save the file when prompted.Compile the kernel:$ make O=../kernel/ ARCH=arm CROSS_COMPILE=/usr/bin/arm-linux-gnueabihf- -k -j3The -j3 option enables parallel build. The number should be the number of cores (of the machine where you're compiling) +1.The build took about 10 minutes on my pc. When the build completes, you will have the new kernel in ../kernel created above.Create the kernel image:$ cd ../$ git clone git://github.com/raspberrypi/tools.git$ cd ~/src/tools/mkimage$ ./imagetool-uncompressed.py ../../kernel/arch/arm/boot/ImageBuild the modules$ cd ../../kernel$ mkdir ../modules$ make modules_install ARCH=arm CROSS_COMPILE=/usr/bin/arm-linux-gnueabihf- INSTALL_MOD_PATH=../modules/To replace the kernel, get the latest firmware:$ wget https://github.com/raspberrypi/firmware/archive/next.tar.gz$ tar -zxvf next.tar.gzIn the small partition of the SD card (/boot):- replace the /boot/bootcode.bin in the SD card with ~/src/kernel/firmware-next/boot/bootcode.bin- replace the /boot/kernel.img in the SD card with ~/src/tools/mkimage/kernel.img- replace the /boot/start.elf in the SD card with ~/src/kernel/firmware-next/boot/start.elfIn the big partition of the SD card (/root):- replace the /lib/firmware in the SD card with ~/src/modules/lib/firmware- replace the /lib/modules in the SD card with ~/src/modules/lib/modules- replace the /opt/vc in the SD card with ~/src/kernel/firmware-next/hardfp/opt/vcNow your SD card contains the new image. Safely eject the SD card, plug the touch controller to your RPi, boot it with the SD card, run startx, and check that you can move the cursor.Once I was in the desktop, my touch input was working but it needed to be calibrated.To calibrate, you need to install an X input calibrator and some dependencies:$ sudo apt-get install libx11-dev libxext-dev libxi-dev x11proto-input-dev$ cd ~$ wget http://github.com/downloads/tias/xinput_calibrator/xinput_calibrator-0.7.5.tar.gz$ tar -zxvf xinput_calibrator-0.7.5.tar.gz$ cd configure$ make$ sudo make install$ xinput_calibratorFollow the instructions on the screen. After calibration you should see something like this:Calibrating EVDEV driver for "eGalax Inc. USB TouchController" id=8 current calibration values (from XInput): min_x=1938, max_x=114 and min_y=1745, max_y=341Doing dynamic recalibration: Setting new calibration data: 121, 1917, 317, 1741--> Making the calibration permanent <-- copy the snippet below into '/etc/X11/xorg.conf.d/99-calibration.conf'Section "InputClass" Identifier "calibration" MatchProduct "eGalax Inc. USB TouchController" Option "Calibration" "121 1917 317 1741" Option "SwapAxes" "1"EndSectionFor Raspbian, you have to create the file:$ sudo nano /usr/share/X11/xorg.conf.d/01-input.confAdd in this file the content above, starting with Section "InputClass" line and save the file.Note: Make sure that you don't have sections like MatchProduct "eGalax Inc. USB TouchController" in other files from /usr/share/X11/xorg.conf.d/ folder (highest number files are processed last).Now touchscreen should be calibrated and after reboot it will keep the settings. Yolu can run xinput_calibration again in order to have the pointer to the desired points. You can update the numbers given by the xinput_calibration utility in the usr/share/X11/xorg.conf.d/01-input.conf file in order to have the best calibration at boot.
A**N
This is a good touchscreen for the price
This is a good touchscreen for the price. It took me a couple of days to figure it out. So here is what I have learned trying to configure this on a raspberry pi 2 using HDMI connection:1) The unit comes in pieces like the photos provide on Amazon. You will need to put together the unit following this youtube video: https://www.youtube.com/watch?v=ILBcgpWClD8 Note: you will need to find a power supply that outputs 12 VDC for the display board. I pulled mine from an old router.2) Once you have the hardware hooked up, put the lcd on HDMI mode. Then boot up your pi.3) Check if your pi sees the display and also the USB touchscreen controller by typing on the command line: lsusb This should list the Touchscreen on one of your USB for the pi 24) The touchscreen might be seen but not working yet. For me I grabbed the latest version of the kernel with the drivers (version later than 3.18.11). To update the kernel type on the command line: rpi-updateNote you pi 2 needs to have internet connection. This will download the latest kernels into your /lib/modules directory.5) Reboot your pi to refresh it to the new kernel to access the latest drivers6) Lets say the latest kernel you downloaded was 3.18.13, then after you reboot and login go to the /lib/modules/3.18.13-v7+ directory by typing on the command line: cd /lib/modules/3.18.13-v7+/kernel/drivers/input/touchscreen7) In that directory you will see usbtouchscreen.ko and egalax_ts.koLoad the modules to your kernel by typing on the command line: insmod usbtouchscreen.ko insmod egalax_ts.ko8) To take out the black border on the display and make to lcd more touch friendly to the fingers, you will need to edit the config.txt file located in the /boot directory.To take out black border, change the disable_overscan=1 (this was originally 0)To lower the resolution of the display, add the following lines:hdmi_group=1hdmi_mode=2The HDMI group set to 1 allows you to set the HDMI mode where mode = 2 is the 480p . Here is the link for the mode definitions: http://elinux.org/RPiconfigReboot your pi9) You will want to calibrate your touchscreen. Follow the instructions on this link https://www.raspberrypi.org/forums/viewtopic.php?p=202150You will need to install the libraries first in order to successfully run ./configure. If the configure was successful, then you can run make, etc.Good Luck!
M**B
Tech Support Responded
The product works but... While installing the components, the end came off of the cable that connects the USB board to the ribbon cable on the display. When I contacted SainSmart tech support to find out if I could purchase a new cable, they requested my order number which I supplied but never responded after that. I was left to devise my own solution to fix the cable in order to use the touch screen functionality. I would have rated this 5 stars if their tech support would have helped me. This is a real shame as I have used many of their relay products in the past. In the future I will probably look for products from other manufacturers because of the lack of adequate technical support from SainSmart.Update 10/19/2015: After posting this review, tech support contacted me again. I received a replacement cable today. Bumping this to 4 stars. It's a great product. I've gotten the touch screen working on Windows 10 but have been unsuccessful on Linux (Ubuntu and Debian). Still working on it.
C**1
Just starting to play around with it
Came packaged in an envelope. There was bubble wrap around the LCD display. There was a CD included, but no instructions at all. I was able to get it put together pretty easily based on some youtube videos others had posted.I want to use the monitor as a head for a raspberry pi project. I was able to get it up and running, but I need to figure out the PSU and play around with the resolution. Display came up but the default resolution out of the pi is too small for me to easily read. Onscreen display shows it as 720P. I could get by with 640x480.Display seems pretty clear. Not super bright. Build quality is OK. I will post more as I fool around with the thing.
B**Y
Super easy install on Raspberry Pi 2, once you find the information
After reading some of the reviews I was hesitant as, although I am very confident with computers, linux isn't really my thing and the prospect of compiling a kernel etc didn't fill me with joy. Luckily I spotted Ceisc's review so went ahead with the purchase.The setup couldn't have been much easier considering you get a box of components, though I was very unimpressed with the lack of guidance included to set anything up (there was nothing in the box other than the components).After a bit of digging I found a video from sainsmart on youtube showing it being assembled (https://www.youtube.com/watch?v=ILBcgpWClD8). Another thing that isn't mentioned is that you need a 12V power supply (i realised i needed one, but wasnt sure what voltage), I used one from an old external hard drive. It is however mentioned on this page http://www.sainsmart.com/7-inch-tft-lcd-monitor-for-raspberry-pi-touch-screen-driver-board-hdmi-vga-2av.htmlI then followed the instructions in Ceisc's review. I only hit one snag which was because I was setting it up via ssh and and when I tried to use xinput it didn't work saying it couldn't connect to xserver which a quick google search revealed it could be fixed by typing "export DISPLAY=:0.0" I also found more information on xinput calibrator here https://www.raspberrypi.org/forums/viewtopic.php?f=91&t=78805. I'm guessing the newer raspbian releases include drivers compatible with this screen.The only downside I can see is that there is no way to mount the display, the case around the screen is completely flat with no screw blocks or anything, the distance between the active edge of the screen and the actual edge is between 2 and 5mm depending on what side of the screen it is which doesnt leave much room to attach it with.
C**C
Amazingly easy to setup
Amazingly easy to setup. I was expecting an evening of kernel compilations and frustrations. Instead I just followed the following simple steps.(I am running a version of Raspbian (2015-02-16-raspbian-wheezy.zip) and this is on a RPi 1 B+)1) Change the configuration file in /boot/config.txt to include the following: framebuffer_width=800 framebuffer_height=480 hdmi_force_hotplug=1 hdmi_cvt=800 480 60 6 0 0 0 hdmi_group=2 hdmi_mode=87(the framebuffer width and height do much as they say on the tin. hdmi_force_hotplug is for when the device boots and the screen isn't attached (an expected configuration from my point of view). hdmi_cvt is a configuration setting to allow non-standard CEA/DMT resolutions (the numbers are width, height, refresh rate (Hz), aspect ratio (15:9 in this case), margins, interlace and reduce blanking).2) Restart. At this point the screen should come to life (you may need to press some of the anonymous buttons it can with to put it into HDMI mode).The touchscreen didn't initially want to magically work, but after the following simple steps it just magically did:1) sudo apt-get update && sudo apt-get upgrade (make sure everything is nicely up to date - I don't recommend doing this if you happen to be running raspbmc as I've broken it with updates before)2) rpi-update (get the latest firmware etc. (this may also include a new kernel - I wasn't paying that much attention to what it was doing))3) Restart. When the device came back up touch screen was working. Nice. It was upside down, but that's relatively trivial to work fix:3b) "xinput set-int-prop "eGalax Inc. USB TouchController" "Evdev Axis Inversion" 8 0 1" (if you don't have xinput, run "sudo apt-get install xinput" and then re-run step 3b). Touch now works the right way up and is horribly calibrated.4) Download and install xinput_calibrator (which you may need to make from source - I did as I couldn't immediately see a package for it) (http://www.freedesktop.org/wiki/Software/xinput_calibrator/)5) Run the calibrator, touch the screen in the right places, copy the output to where it suggests.6) Reboot and be happy with your shiny new 7" touchscreen TFT.
P**R
great but needs instructions
This is a great product and worked as soon as I figured out how to connect it. I still don't know what all the buttons on the control pad do, or how to get the drivers installed though (or if I even have the right drivers). Sainsmart seems to be very slow in responding to questions. But for now it works.pros: small, cheap (comparatively), and easy enough to put together once you know how. Amazon ships very fast.cons: the 50pin cable between the board and display is too long and too short to fold the control board behind the screen. Unless you know what your doing (like I didn't), connecting the 50 pin cable to the board is very hard. I recommend using pliers wrapped in electrical tape to grip the cable while inserting it.Unless you can afford shipping from the US, or waiting for eBay to ship you something from China, which probably will be an exact copy of this, this product is probably the best I could find in Canada. Look at the sainsmart website though, they sell it a little cheaper and with free shipping, don;t know how fast it is though.If anyone knows how to install the drivers in a raspberry pi, please contact me.
O**A
Great Product, No Power Supply Included (it seems)
Great product that works very well. The installation is somewhat tough to figure out if you have never worked with hardware before. However, it is pretty intuitive.I would have loved to give it 5 stars but the issues that I have are with the lack of a power source. Yes, a 12V DC power supply is what I purchased in order to turn it on. My thinking at the time was that I could have charged it using the USB provided but was wrong since I could not have gotten it to work, so I purchased a power supply for it. I could be mistaken and the USB may be a viable option but I could not get it to work with it. Does not seem probable, as far as I could tell. The resolution is what is expected.So, the product itself is great for its intended usage but the lack of a power supply was annoying. At least put it in large letters that it is required or something. Also add a manual, there could be someone unfamiliar with hardware that may not install it. Be friend to first-timers.
S**E
You'll get to know your PI very well after using this product ..
A promising little kit. Arrived in 2 days as I expected and was reasonably well packaged.I will say, if you are expecting an easy install onto your Raspberry Pi, you'll be disappointed as it is NOT a plug and play item. I found the screen worked great after you set the correct HDMI settings in /boot/config.text. That's frankly the easy bit.There is nothing else for it, YOU WILL NEED TO re-compile the Raspberry PI Kernel in order to get the touch screen working. This will take no less than 12 hours (if it completes successfully) on your PI so ether download a ready made one (https://code.google.com/p/andrei-development/downloads/detail?name=kernel_3_6_11_eGalax_feb_2013.tar.gz) or I'd recommend using another Linux based machine to cross-compile the Kernel to save some time.If you need help re-compiling the Kernel on your PI, there are some fantastic instructions on how to do it here: http://engineering-diy.blogspot.co.uk/2013/01/adding-7inch-display-with-touchscreen.htmlUnfortunately for me, the touch screen was faulty and even after I recompiled the Kernel on my PI, it wouldn't calibrate correctly because the controller was only feeding positions on the X Axis. The Y Axis (Up and down) was only giving a single value of 2043 regardless where I touched on the screen.So, sadly, its all boxed back up and i'll be returning the product to Amazon on Monday.
Trustpilot
1 week ago
1 week ago
