


📚 Elevate your organization game—stack, style, and conquer clutter!
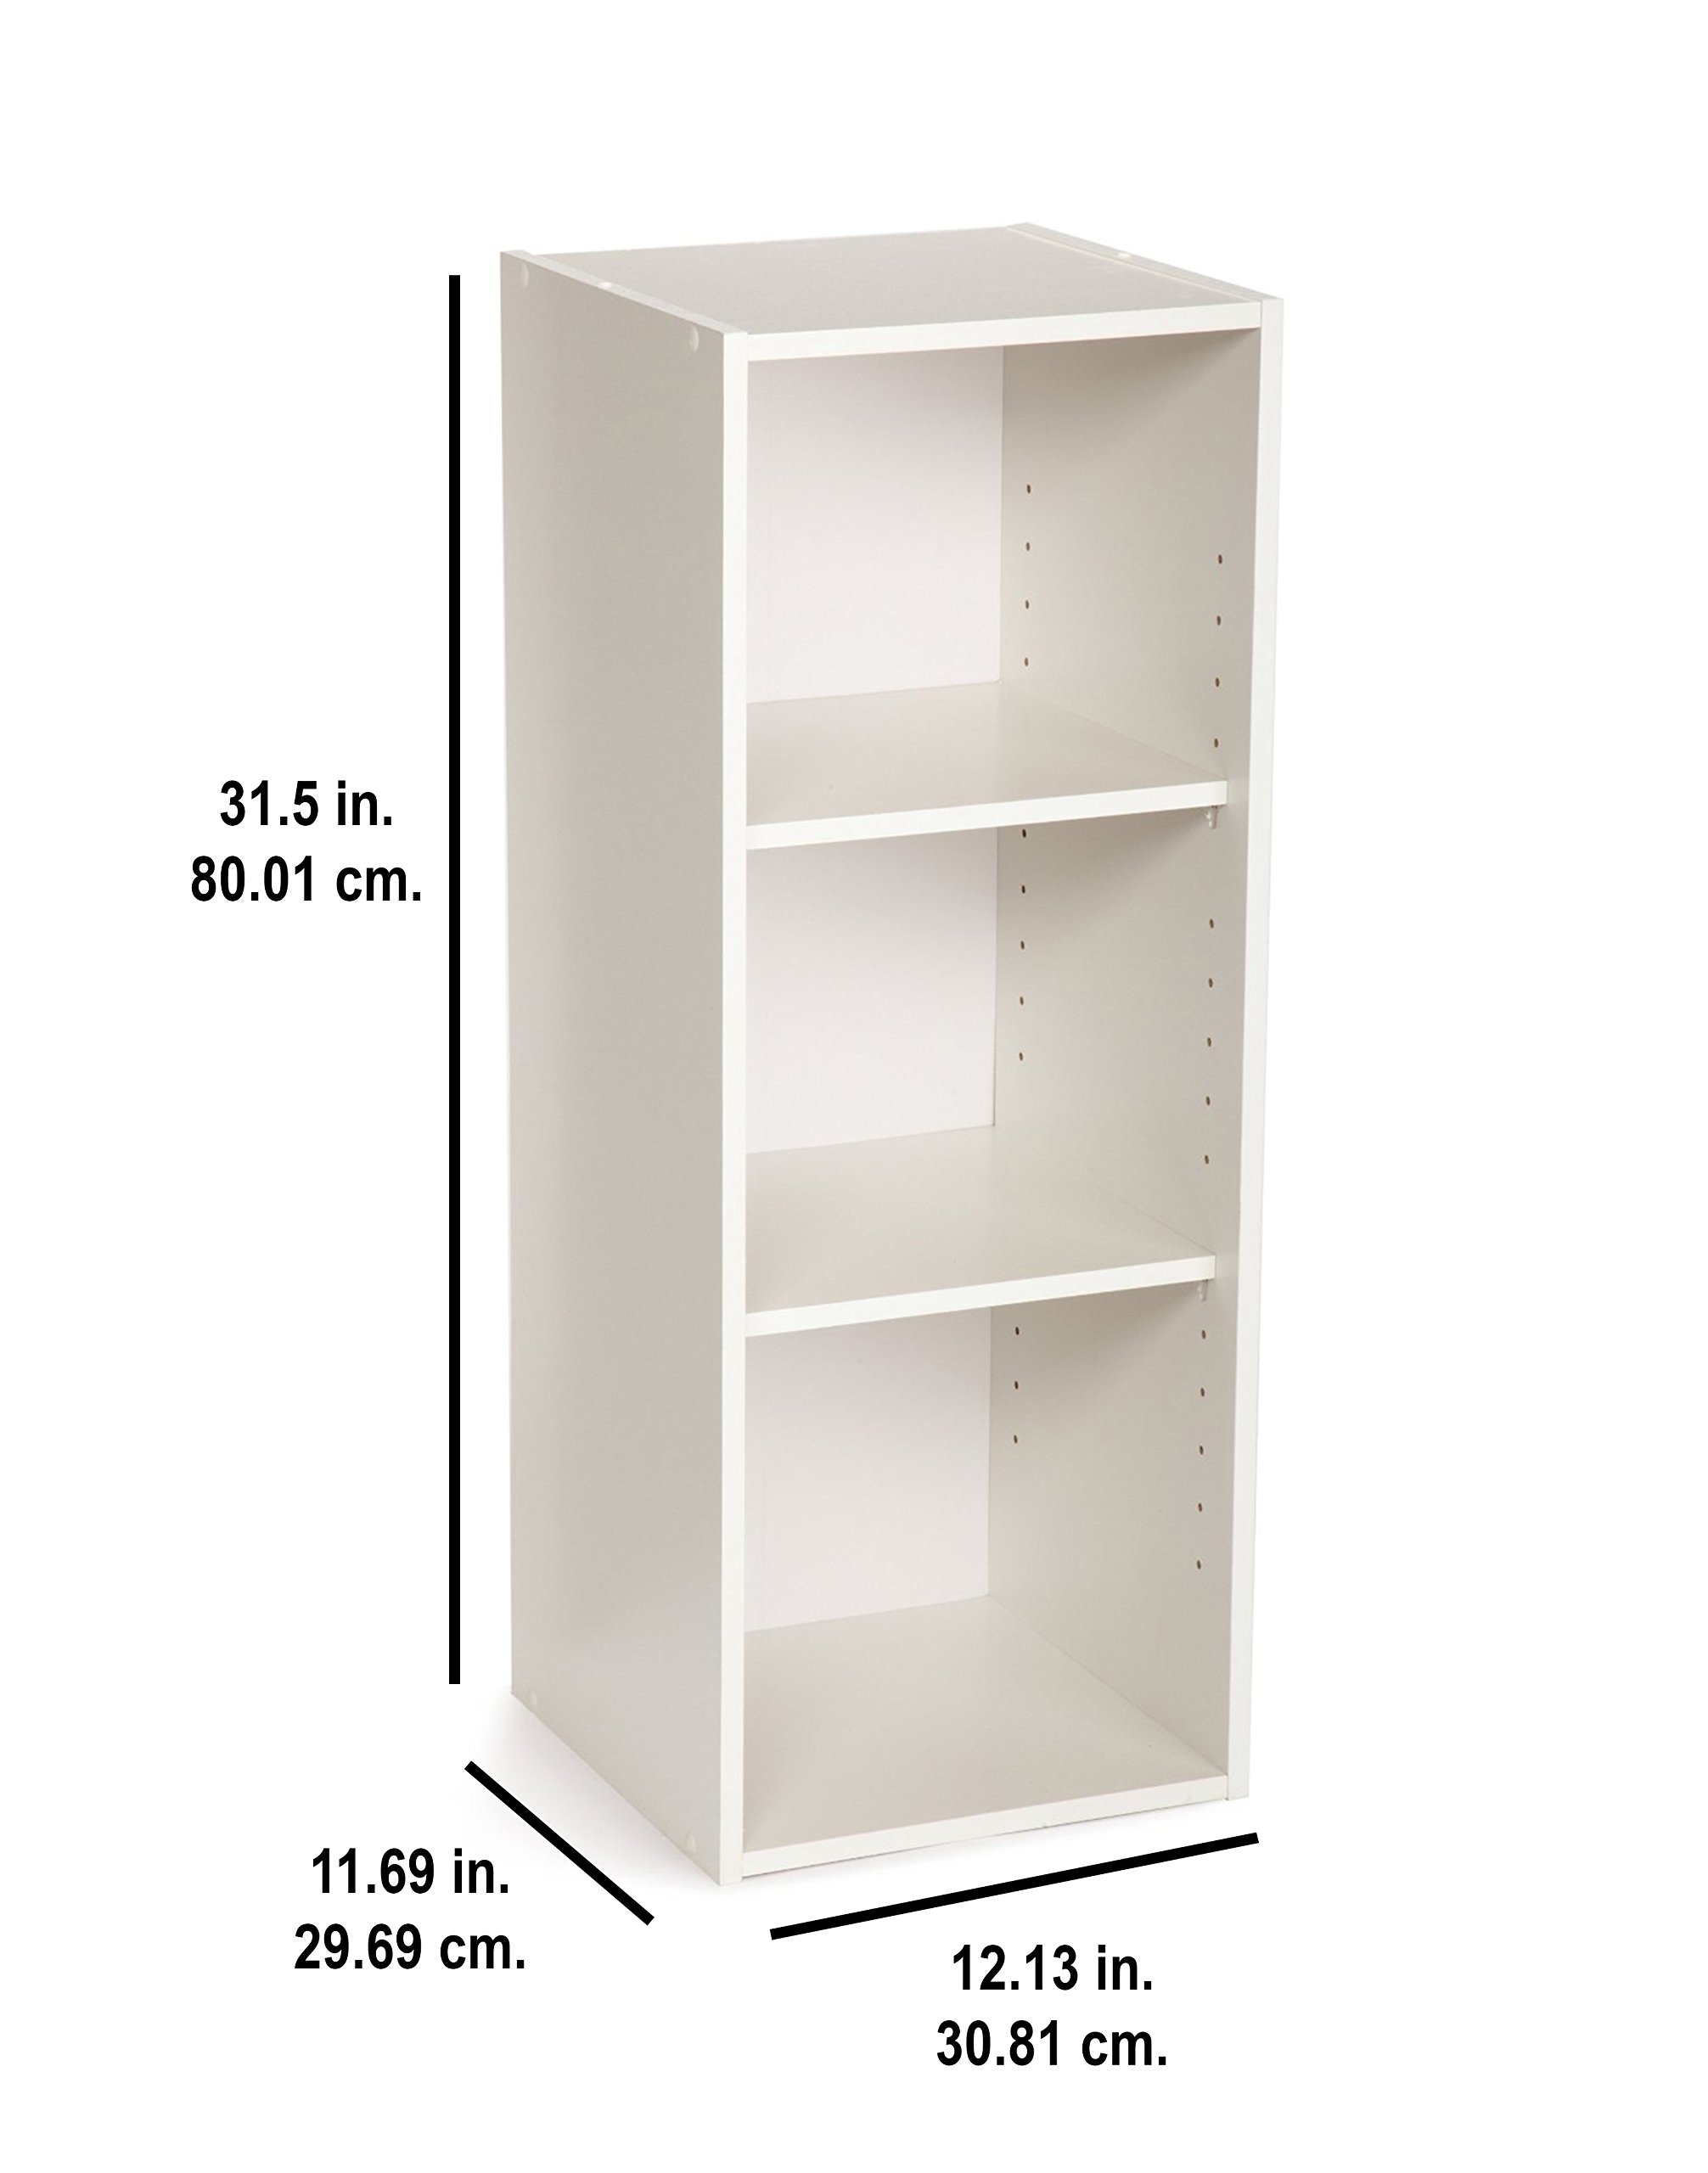
The ClosetMaid 8987 Stackable 3-Shelf Organizer offers a sleek, space-saving solution with its 31.5-inch height and adjustable shelves. Designed for closets or offices, its stackable white frame provides customizable, durable storage that meets TSCA Title VI safety standards.


J**Y
Perfect for what we needed!
Purchases two of these to add to my closet space. Love them. They are a great size to hold my hats and my backpack purses. It helps to showcase them!
I**E
Perfect for small space storage and great value
This product is sturdy, easy to put together All holes lined up perfectly very good easy instructions. It arrived packaged well with all materials in tact. You only need a hammer and a Phillips head screwdriver. It also has caps to cover the screws and holes which gives it a nice finished look . It took me 20 minutes to put together and it looks great!! It is pressed fiberboard so it's not meant to be a statement piece. But it will do the job for small space storage organization.
M**E
great value
Easy to assemble. good design
O**K
EASY to Assemble Space Maximizers
My husband and I bought FOUR of these to help maximize the use of a hall closet that was being used for nothing more than hanging coats.We took the coats OUT, assembled these by stacking them 2 x 2 (two on the bottom, two on the top). They turned out GREAT for their purpose (we're using them for overflow cabinets to keep extra supplements, tea, coffee, etc.).Here are our tips:1. Use Gorilla Glue as you assemble the outside structure. Makes them much, much stronger.2. Use a power drill/screw gun, rather than just a screwdriver, to assemble--speeds it up and you'll get a better fit.3. Make sure the finished edges are facing outward and upward (you'll see what I mean). The unfinished edge is the bottom.4. Work on a hard floor to get a good, square assembly. Verify everything's "squared" before you nail on the cardboard backing.5. We glued all parts of the bottom shelves together. On the top shelving units, we DID NOT glue the bottom shelf in place. We DID assemble it and then nailed the backing on the top shelving unit, EXCEPT for the very bottom shelf, which we then removed before stacking the units. Why did we do this? Just to get two "free" shelves, which we were able to install with some extra shelving brackets we had on hand. I'll post a photo in a few days so you can see what I mean (photo posted 4/7/14: see "Customer Images").6. Use the dowels provided to "stack." If you want a permanent installation, Gorilla Glue the top unit to the bottom. We did not want a "permanent" installation, so we didn't use glue, The dowels are sufficient to hold the two units in place, as long as you use a bracket to secure the top shelf of the top unit to the back of the closet wall. Works great!Are these strong enough for a child to climb on all the time? No. But if you live in an all-adult household and need some extra storage, these are a wonderful solution. They look GREAT and are very functional. No painting, no mess, no handyman required. You really CAN do it yourself. Highly recommended!UPDATE 4/8/14 CORRECTION: We bought FIVE. We bought ONE more unit, just to use as extra shelves within these organizers. Photo of the finished project has been posted under "Customer Images," just FYI). If you buy extra shelves, you'll need extra shelving pins. These fit ours perfectly: Shelf Pin, Flat Spoon-Style, Brass, 5mm (25).Have a question about these shelving units? Leave a comment & I'll be happy to help you, if I can.
S**D
Product is not as described
This cubby shelf did not come with a back panel as described in the information when I ordered it. In the description, it states to completely empty the box to ensure the back panel is removed due to it being pressed up against the box on the inside. I emptied the box in its entirety and I can assure you it is not in there. That comment makes me think others have found the back panel not to be in there as well. This is a huge inconvenience. How hard is it to assure all pieces to the product you purchased is in the packaged contents? The back panel is a thin piece of cardboard. If this wasn't so disgraceful, it would be comical. Cardboard? Its actually insulting. This product description would never leave one thinking the back panel is a thin piece of cardboard. Never again!!!
I**G
Be warned: Unit may not stack on other or older units of this same model. Some instruction tips, cautions.
I have purchased perhaps a half-dozen of these units in the past from various sellers (online and retail). To my knowledge, over the years, ClosetMaid has only offered one model with a thin cardboard paper back (that you nail on) for this 3-shelf model organizer. The various units I have can all be stacked on top of each other using the two insertable wooden dowels that come with it. (There are holes for the dowel on the left and right sides of the top of each unit. You insert the dowels in them and then place the second unit so that the holes on the bottom sides can be placed atop the dowels and pushed down to secure the two sets of organizers.)So imagine my surprise--and dismay--to find out that this unit I purchased specifically to sit atop another unit, does not line up with the other units. By not line up, I mean that the entire unit is something like a 1/8th inch wider in width than the other units so that you cannot get both of the holes on the bottom of the unit to line up with the dowels in the holes on the unit on which you wish to place it. (I had someone else attempt this thinking I maybe just was having trouble doing it myself. But even when we both tried jiggering it, it was a no go.)Now, I don't know if the other units I have are the ones that are "off" by being 1/8th-inch less wide or if it's the new one. This new unit is 12 inches wide as stated. I'm just giving you a heads up to double-check the width of your other existing units if you plan to buy this one and stack it atop, securely, using dowels.You can still place this unit atop the shorter-width unit (instructions indicate that each unit should be attached to the wall and that units should not be stacked higher than 72 inches...an odd number given that each one is 31 inches high--62 inches if on top of each other) and it will not wobble but there will be a slight overlap.The quality on these units has always varied. Holes for screws are often too small and have to be worked to widen them (carefully so you don't split the laminate) when you attach the permanent top and bottom shelves. Additionally the holes on the interior sides are often slimmer than they need to be to accommodate the pegs that hold the shelves.And you need to check carefully, BEFORE you start assembly, that you have all the pieces listed on the instruction sheet. You should also check to see that you have correctly lined up the shelf top and bottom when you afix them to the sides. (Trust me when I tell you it's easier than you think to either have the wrong shelf or to place improperly.)And never throw the box out without checking to be sure you've removed the very slim paper backing for the shelf unit. It does not slide out with the other pieces when you tip the box over to empty it out. It's very easy, as some have done, to toss it out and think it hasn't been sent.The kit comes with 14 nails for you to use in fastening the paper back (the company really should offer a back of the same material as the other pieces. It would be worth a few dollars more.) but you will probably need more if you want it to firmly adhere to the sides and top without gaps. So get some extra nails of this kind, which many of us already have around the house. The key is securing the four corners properly first before you begin to put nails into the paper back along the long sides and across the top and bottom shelves. You have to be careful that all four corners line up properly or you will end up with too little of the backing as needed to secure the nails properly.And as others have noted you have to carefully place the nails so that they go thru the paper back but also into the wooden/grainy part but NOT close to the laminate facing. Otherwise, you'll split the laminate when you pound the nails in.Use a lightweight hammer and go slowly. I've never tried to use a staple gun, but I suspect if you have one and you're good with it in terms of placement, that it might be an easier way to secure this back.
Trustpilot
5 days ago
1 week ago
