🔧 Seal the deal with confidence!
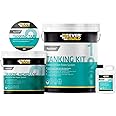
The Everbuild Aquaseal Wet Room System is a comprehensive waterproofing solution designed for both interior and exterior applications. This all-in-one kit provides a flexible, watertight seal on various surfaces, covering up to 4.5m², and is backed by industry best practices from Scandinavia and Germany. Ideal for both DIY projects and professional use, it comes with easy-to-follow instructions and is available in two sizes.
| Manufacturer | Sika Everbuild |
| Part Number | EVBAQSKIT45 |
| Product Dimensions | 12.4 x 12.4 x 10.24 cm; 6.5 kg |
| Item model number | EVBAQSKIT45 |
| Size | 4.5m² |
| Colour | Clear |
| Style | Single |
| Material | Synthetic Rubber |
| Item Package Quantity | 1 |
| Batteries included? | No |
| Batteries Required? | No |
| Item Weight | 6.5 kg |
R**N
Seriously impressed with the finished result!
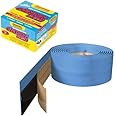
Having inherited a shoddily done shower installation from a previous owner and having to deal with the consequences of water damage to my floors, walls and joists, I was determined to ensure my shower installation was totally bullet (well, water...) proof.Water ingress protection measure 1:I installed 10mm Q-Board tile backer panels, onto a stud wall (studs spaced as per instructions) with the boards overlapping the shower base at the bottom. The boards were glued together at the seams with board-fix adhesive (which appeared to be curiously similar to conventional solvent free flexible grab adhesive) and fixed at the required intervals with the recommended discs and plasterboard fixing screws.Water ingress protection measure 2:I then ran a thin bead of board-fix sealant between the shower base and the panel, using masking tape to prevent overspill onto the shower tray. Remove the tape as soon as you have applied the sealant.I then bought the Aquaseal wet room system. First step was to apply the provided primer to the plastered walls. This went on really easily with a brush. With the 2nd coat of primer it was really easy to see that the first coat had sealed the plaster and wasn't allowing the 2nd coat to soak in quite as much.Water ingress protection measure 3:I decided that as well as running the tape up every corner of the shower enclosure, I would also run it between the top surface of the shower base and adjoining walls (two walls plastered and 1.5 walls tile backer). To do this I cut the sealing tape in half down the middle, allowing me to stick approximately 15mm of tape to my shower base (which had been cleaned with IPA) and the rest up the wall. 15mm was the max. I could apply to the shower base and still have the tape, plus 2mm of membrane paint, concealed by the combined thickness of the tile adhesive + tile + final silicone sealant. It also meant 5m of tape was just enough for my shower. I marked the required position of the edge of the tape on the shower tray with a marker pen, as a guide to make it easier when it came to sticking it down. The tape was very easy to apply, so long as you took your time and peeled away only a small portion of the backing tape from one edge, prior to applying it to the wall. The adhesive has seriously impressive sticking power, but you can still carefully remove small parts of it and reapply, so long as you don't press it down too firmly. The tape stuck equally well to both the shower tray, tile backer board and the plastered wall. The provided roller allowed me to firmly press down the tape, but the roller is pretty shoddily made and the white roller ended up falling off the handle after 30mins. This was easily fixed by applying an e-clip to the end of the roller, which I happened to have in the garage. The vertical tape seams up each corner of the cubical were done with full-width tape. I applied the vertical tape so that it overlapped the horizontal tape. It was difficult to get a very good overlap at the corner - there was always a very small 1mm square spot right in the corner that didn't have any tape over it. This will however, be covered by the tanking membrane.Water ingress protection measure 4:Having applied the tape to all corners, I applied the blue tanking membrane on top of all plastered walls within the shower cubicle as well as over all of the tape. I applied two coats with the supplied brush, but found it took at least 12 hrs for any inside corners to properly dry. Like others, I had lumps in the paint - this isn't really an issue as tiles will cover them, but it did have a tendency to scrape the paint back off if you caught a lump in your brush. Although not explicitly stated in the instructions, the brush was able to be cleaned in between coats with water. After two coats (one horizontal and one vertical, as requested) I found that the plaster was still visible in patches. I then did a third coat, applying with the brush and then used a small foam roller - this was far more successful at giving good coverage, especially when rolled over after the paint had been on for 10mins or so. Do watch out for the blue fall out onto the floor, however! The tanking membrane easily covered the area suggested on the tin, even with 3 coats.Once dried, the finished membrane/tape combo looked seriously solid and certainly looked impervious to any potential water ingress. I'm REALLY impressed with the finished result!Water ingress protection measure 5:Once tiled, I'll apply silicone sealant around the base and all verticals. I left a 2mm gap between the tray and the lowest tiles, so ensure I get a good bead of silicone pressed right in underneath the tiles.I then used Q-Board sealing tape (rubber backed cloth tape) to seal up the rest of the tile backer board joints further up the wall (in areas where water ingress is less likely) using tile adhesive, as instructed. I wasn't nearly as convinced at its ability to stop water ingress, compared to the Aquaseal system. You're relying on the tile adhesive, which is only water resistant, not waterproof. I'd definitely use more of the Aquaseal tape instead of this, were I to do it again. It's certainly much less of a faff and much cleaner as you don't have to muck about with tile adhesive.So there it is, my volume on the impressive Aquaseal Wet Room kit.
R**D
Great kit for waterproofing your shower.
Good kit for price.Primer would be nice to have colour in to see where you have painted.If you have large shower area like walk in I would reccomend purchasing an additional tub of the seal paint as you only get 3LThe self adhisive edging does not come with any pre made corners and is fiddly due to being very sticky. But it is very good quality seal once on.Roller is rubbish. Total junk head comes off in use as it has been cost saved to death (why.....) Use a wallpaper edge roller.Paint seals very well once dry. Beware of corners due to paint build up as may take excessive time to dry and you may not notice until uoyr applying your second coat.My tip is install fan to circulate air during dry period and check corners especially at bottom.If you buy additional edge tape, get self adhisive pay the little extra for the quality product.
D**G
Worth doing the job right at that price
Good price, so decided it wouldn't hurt to use this system before tiling the shower. The primer is quite milky but easy enough to put on and dries quickly. The tape is a bit of a pain, not enough of it and the roller they gave to help it roll it so it sticks properly, lasted about 5 minutes and broke. That aside it seems to be fine. The top coat membrane is blue , so easy to tell where you have already painted. Keep the room ventilated as the stuff stinks though. You do need to leave at least 6 hours between coats, I left 8 to be completely sure and the second coat went on fine. I think it's definitely worth using this if you want that extra bit of piece of mind- especially at that price
P**L
Ok
Nice product and quality only expensive
S**M
Easy application and fantastic value
On renovating our shower we decided on a belt and braces approach. This system was used along with tile backer boards.I had not used anything like this before and initially wondered if it would be as easy as other reviewers had suggested. Well I can honestly say it was.The aquaseal system was easy to use with easy application using a paint brush.Everything needed for the successful application of the system was supplied in the kit.The Tanking Tape and the Drain Mat are pliable and and again easily applied even though the corners of the cubicle were far from square. The drain mat was used to seal around the hot and cold copper pipes that protruded through the stud wall.I also used this for the rear of the pipe work boxing sections prior to them being installed and to the flooring boards prior to them being tiled (to add extra protection to moisture resistant boards). This is another benefit of the system, as the tanking can be applied to a wide variety of surfaces/materials.The heavy porcelain tiles (600 x 300mm) and flexible adhesive we used stuck on to the aquaseal perfectly.I will be using this product again when we renovate the bathroom.Highly recommended especially at this price point.
S**S
great product that pours out the box when you get it !!!
I really like the way you cannot use it at all when you open it.....it is really good at making a mess all over your roomI dislike intensely the brilliant waterproofing qualities it demonstrates on carpets.Get it from a shop where you can check this wonderful example of online shopping inadequacy....no actually it is best described as FAILURE.
Trustpilot
2 weeks ago
1 week ago