Waring YM350 Professional Yogurt Maker
Product ID: 42069013
⏰19-hour timer
✨Brushed stainless steel
🍶8 & 26 oz jars
Buy anything from 5,000+ international stores. One checkout price. No surprise fees. Join 2M+ shoppers on Desertcart.
Desertcart purchases this item on your behalf and handles shipping, customs, and support to Ecuador.
🥄 Unleash Your Inner Yogurt Artisan!
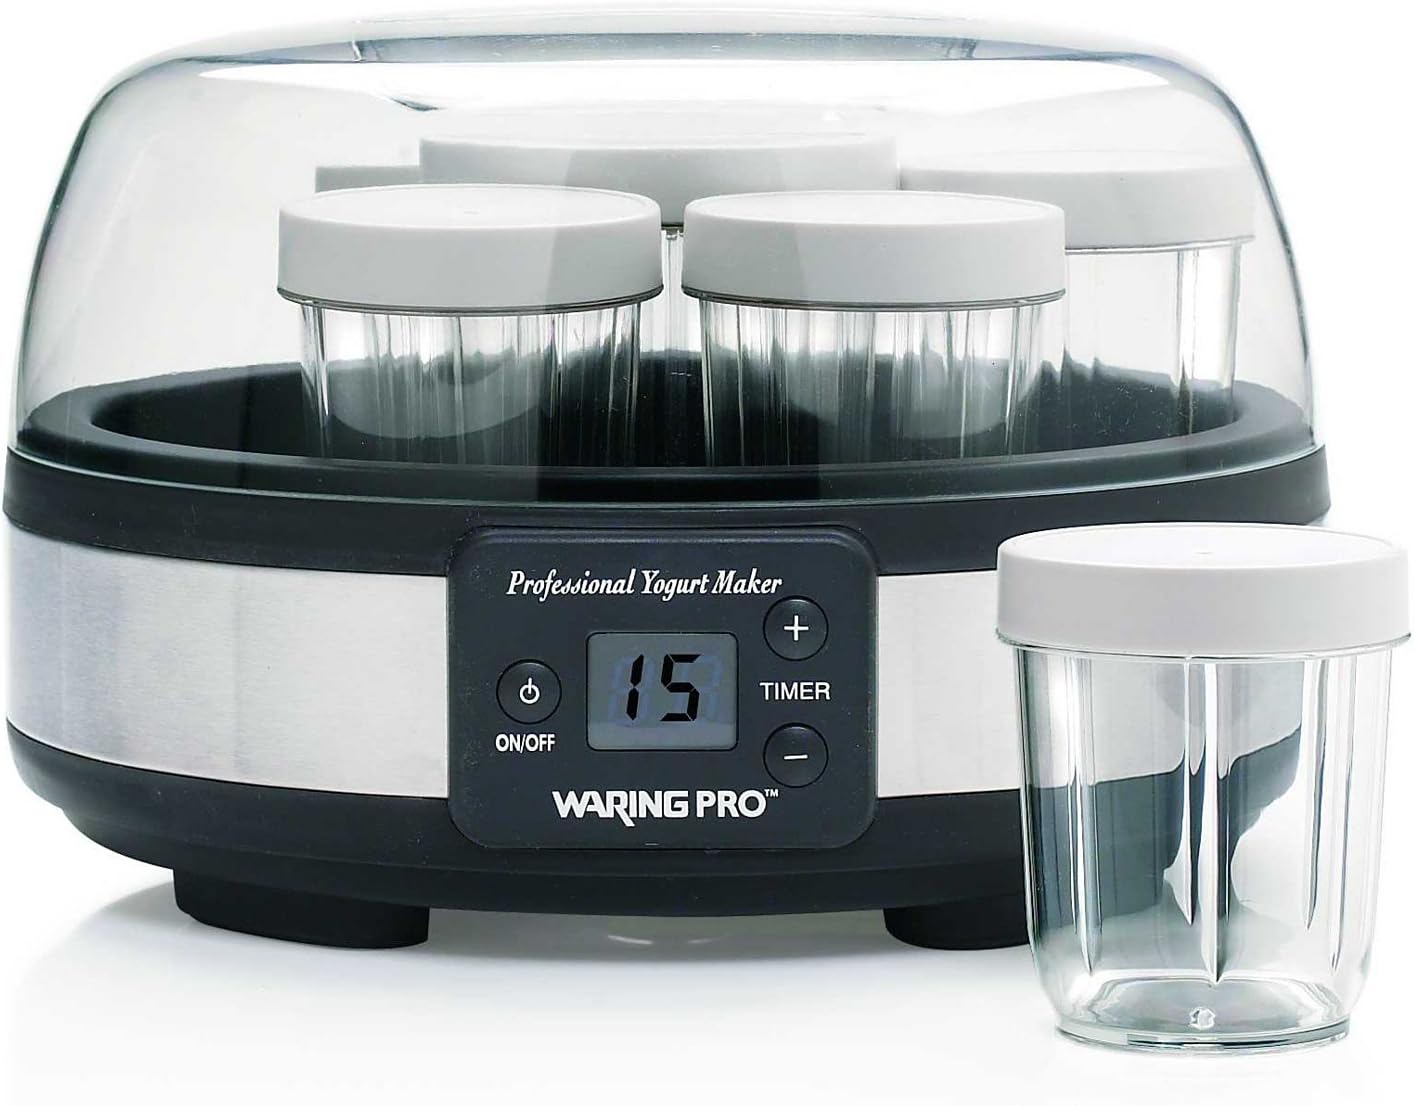
The Waring YM350 Professional Yogurt Maker features a stylish brushed stainless steel design, equipped with six 8-ounce and two 26-ounce stackable plastic storage jars. It boasts a user-friendly 19-hour blue LED timer that alerts you when your yogurt is ready, along with an on/off button for convenience. The dishwasher-safe cover, jars, and lids make cleanup a breeze, allowing you to focus on enjoying your healthy, homemade yogurt.
A**T
Use your microwave to heat the milk...works great!
I got the Waring Pro YM350 for myself for Christmas (2009) to use along with my Salton YM9 one quart maker but I'm finding myself using just the Waring maker; it seems to make a better yogurt. I like my yogurt to be more on the firm side. I've been doing 8 cups at a time (of 2% low-fat milk ) using the two 2-cups & four 1-cup--they all fit in at the same time...don't worry that the cups aren't sitting in the little "cut-outs" on the surface of the maker...you can forget they're there if you want...just put the cups in this order in a circle: a 2-cupper, 1 cup, 1 cup, a 2-cupper, 1 cup, 1 cup.(I've since added another 9-cup variation at the bottom of this review, in addition to another photo...as of Dec 2013 the photos show under the review section to the right under "Photos added by customers").For 8 cups:I cook 7-7.5 cups of milk in the microwave in a microwaveable bowl and check the temperature with a kitchen thermometer (Taylor Digital Thermometer w/probe that I got here on Amazon.com). Once the temp reaches approx. 185 degrees (approx. 18 minutes in the microwave on high) I let it cool on the counter (with a splatter screen placed on top of the bowl to keep dust etc. out yet let the milk cool more quickly). This is the same procedure I've been using with my Salton 1 quart yogurt maker for years, it just seems to come out better in the Waring.When the temp gets down to between 106 - 110 degrees, skim off the thin layer of cooled milk at the top and add 6 ounces of non-fat dry milk and 6 ounces of plain yogurt starter (from the previous batch or store-bought with active cultures) and stir in until a uniform consistency (put the starter yogurt into a separate bowl first and add about a 1/2 cup of the warmed milk and stir in with a whisk...then add that to the main batch of milk and stir in). I put the two bigger cups & 4 smaller cups into the maker (don't put the lids on); place the maker's cover on and set for 10 hours. I usually set up the batch in the evening so it's ready to put in the fridge in the morning before I go to work. It's nice and cold when I get home.I don't understand why a previous reviewer was complaining about the cups not being glass. I've been making yogurt for over 20 years and don't see any benefit to glass jars over plastic (BPA free). That being said, you can certainly replace the plastic jars with small glass jars, such as the Ball® brand canning jars. They're 8 ounces each and fit well. But any combination of glass jars you can fit will work fine.I also don't understand why a different reviewer was complaining that the maker is "...just a warmer"...uhhh...yeeeahhh...it does keep the cooked milk warm at a steady temperature, but THAT'S how you get yogurt. However, there are instructions in the included booklet to make yogurt without cooking the milk first. You use room temperature pasturized milk and warm in the yogurt maker for about 16 to 24 hours, depending on what type of milk you're using. This method takes twice as long as it would when you pre-cook the yogurt in the microwave or on the stove.Overall, this is a terrific yogurt maker!(Update June 2010):As I mentioned above, this is my latest configuration (I added a new photo)this machine can make 9 cups using:one of the 2 cup containers in the center,the 6 included one cup containers ANDan ordinary 1 cup glass canning jar (a jelly or jam jar works or a 1 cup glass).(Update December 2013): I am still using the first Waring YM350 I bought here on Amazon.com in 2009.I make one batch each week and sometimes use a yogurt strainer to make Greek yogurt (sold here on Amazon.com).I have since bought a back-up Waring YM350 so I now have extra jars (I just happened to find a refurbished unit elsewhere that was a really low price so I grabbed it).Simple instructions based on the included recipe but adjusted for the increased size of 9 cups:To make 9 cups using the configuration above with the 2 cup container in the center/7 individual cups containers around the center container):Cook 8-8.5 cups milk in a glass or ceramic bowl (preferably one w/ a spout to pour more easily like a Pyrex 8 cup container) in the microwave for 18-20 minutes full power to 185 degrees (time varies depending on your microwave). Remove from microwave & cool to 106-110 degrees (Cooling CAN be done in the fridge too!). After cooled, Stir in 1 cup dry milk. In a separate bowl add up to 1 cup plain yogurt (from the previous batch) and stir in 1 cup of the cooked milk that has been cooled & the dry milk was added. Stir that mix into the main batch of milk for an even consistency (stirring with a whisk).The jars are placed evenly as shown in the photo (2 cup container in the center w/ the remaining single cups placed around it)...they do NOT need to sit evenly inside the indentations on the bottom of the yogurt machine. Pour the batch of warmed milk into the jars. Do not put the lids on the jars while the yogurt is "cooking".Place machine's clear cover on the machine. Set the timer for 10 hours (more hours or less depending on your preference...10 hours is more firm than 8 hours, for example). I prefer a more firm yogurt so I cook mine for 10-12 hours (I've even tried about 15-16 hours & the yogurt comes out great!). When the yogurt is done "cooking", place the lids on the jars & put in the fridge (by the way, if for some reason you accidentally miss the yogurt maker shutting off when the time is up...I can't tell you how many times I've done this...I just put the lids on and place the jars in the fridge as soon as possible and chill overnight... the yogurt has been perfectly fine).
G**Y
Big Dissapointment!!!!!!!!!!!
Good yogurt in the beginning and just after the 90 day waranty was up..not working.For the price of the yogurt maker it should have lasted longer. I sent the machineback to the company as instructed by Amazon. The customer service people did noteven let me know what was the problem with the machine .
P**E
My very first Yogurt Maker!!!
Hi everybody,First of all, i want to say that this review is from a very non-cook-first-time-yogurter (if that word really exists :)) so I can be lacking of comparison data.I bought this yogurt maker from amazon about two years ago (2009) and after all this time (right now we're entering the 4th month of 2011) this yogurt maker was inside a kitchen cabinet just waiting for some action.When I bought this Yogurt Maker, I bought it because it had LED digital display and buttons and because Waring Pro sounded like a good name in kitchen products. Yes, I am that Ignorant but i looove the way techie kitchen appliances looks!. This two paragraphs describes the "When" and "Why", now let's go with the "How" because the "Who" is me :)Since this was my very first time making yogurt in my entire life, i spent time reading the manual (something most of us never do) and found it helpful enough to give it a try. This is what I did:- Blended some powder milk to prepare the raw material needed for the job in hands.- Went to the supermarket on a Saturday afternoon (this mean there was a lot of people there) just to buy plain yogurt to have those little thingies that turns milk into the finest Yogurt.- The instructions says you need a thermometer to measure the milk temperature that has to go to 180 degrees, that means just before boiling but without boiling. I don't have a food thermometer but tried a human thermometer, yes that one you use to find if you have fever, but had some problems when it fell inside the pan so i kept myself looking at the milk and just when the very small tiny bubbles appeared, just turned it off!- Used an strainer to skim the milk a little bit (first timer here too) and take the thermometer out of the milk, waited until the temperature of the milk felt just like a hot bath water because the instructions says you need to cool it down to 110 degrees.- Stir the just bought Plain Yogurt and poured the mixture into the 6 jars the thing came with.Now it's time for electricity!!!Just connect the YM to the power outlet and a big blue "8" will come to life on the led display. Because i used complete milk, 8 hours was enough.Now, 12 hours later that included the 8 hours making, 1 hour resting inside the YM (while I woke up) after it automatically shuts off, and some hours inside the refrigerator..... Yeah.. it happened.... just what you suspects.... a completely incompetent cook (me) did it... for the first time ever.... Home Made Yogurt was made by me in my house!!! and without my wife help and/or supervision!!!Yes!! it happened!!! it was SO easy even a person like me was able to achieve success at the first time and just with the help of the product manual. No asking, no google... Just the good old me with all the associated pride!As a conclusion, I can say, the product manual is useful, the appliance works and it's a shame you can't taste the yogurt I (not IT ;) ) made... I mean, its unbelievable... the texture, the flavor... Yummy!!!Maybe it's about the same with any other YM but this is my first one and I find the auto shut off very helpful for people like me that likes to sleep at night. Looks great and works great!I'll give the additional recipes a try, now I feel so confident my wife is scared I'm going to fill the refrigerator with only quality home made yogurt made by me :). A new Yogurt Era has come into my house!Amazing! Maybe I could sell some here at Amazon... Yogurt I mean...Thanks for reading and hope you enjoyed that reading!
Trustpilot
1 month ago
2 weeks ago