Sew Smart, Cut Sharp! ✨
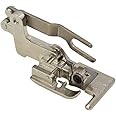
The BrotherSide Cutter Foot, SA177, is a premium sewing accessory designed to elevate your sewing game. With its built-in blade, it allows for seamless trimming and finishing of seams in one easy step. Crafted from durable metal and plastic, this genuine Brother accessory ensures precision and compatibility with most low-shank sewing machines, making it an essential tool for both amateur and professional sewists.

| Material | Plastic, Metal |
N**R
Strong product
Works very well with my Brother ST531HD sewing machine.
C**S
Video Shows How To Use, Even Corners. Works On Brother LB6800 & SE400. I Just Love This!
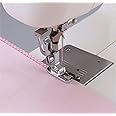
The media could not be loaded. ► Why I like it:When I got it, I was in the middle of designing and making a custom shaped mattress-like pillow for hubby's recliner. He is so tall, that his feet always hang over the foot riser portion when he reclines and the chair always needs pillows under him from one end to the other and then some. He always had to be “tucked in” by me every time he would get up and sit back down, so hence the custom pillow. Having bare legs on the pillows was always cold for him, so when I made it, I selected a nice fuzzy flannel for the top layer. While I was measuring and designing it, I watched as the flannel kept fraying away. So in stepped this presser foot. What you see in the 2nd half of the video is me doing a finishing edge on the flannel piece of his pillow before sewing both sides together. The last thing I wanted to happen was to see it come apart at the seams from his daily use.I consider this presser foot to be a must-have in your arsenal of presser feet if you do not have a serger. So many fabrics unravel or fray so easily. This presser foot with the right stitch and settings will let you sew a beautiful seam while also covering and protecting the edge at the same time. I personally love the look of a nicely finished edge. This foot is super easy to use once you understand how to use it.So let me tell you the secret to making it work like icing on a cake. Once you understand how it works, you can easily “turn it on” and “turn it off” while stitching without loosing a beat or even having to lift your presser foot. The secret is the little bar in the front that runs perpendicular to the direction of sewing. I show it in my video. When you put the fabric on top of it, the cutter cuts while sewing. To make it stop cutting and just still sew the edge, simply place the fabric below this bar.Depending upon how far in you will be sewing from your existing edge, you may or may not need to first do a ¼” to ½” snip in the fabric along the imaginary line of where the cutter would have cut the new edge. The reason you do that is because the needle is located behind the cutting blade, so the cutting blade cannot cut the beginning of your sewing that is in the area between the cutter and the needle when you first start out. But once you get going you will see that the cutter cuts just shortly before the fabric passes to the needle. But if you forget, you can always manually trim off the excess fabric from the starting edge once you remove it from the machine.Again, watch the video and you can see better what I am trying to explain. It is such a simple and easy process once you see how it all works. You should not have ANY fears about using it or not being able to make it work right the first time out the gate.For those of you who are new to using unusual presser feet, there are a few things you need to always keep in mind. First, if your presser foot is large enough to cover your bobbin plate, make sure you have first put in the correct thread color for your bobbin and that it is full enough for what you are going to sew. Second, if your machine has an auto-threader, USE IT BEFORE YOU INSTALL THE FOOT. I cannot stress that enough, as if you try to use it with some oversized and/or odd shaped presser feet, you run the risk of breaking it. Not a fun thing to happen. We LOVE our auto-threaders. Third, when using any presser foot that has a component going over the needle screw bar, always make sure that it is tight before you begin sewing. Check it a few times along the way, as sometimes the shared action will cause it to work itself loose. Fourth, when installing such oversized presser feet, try using your presser foot lifting handle and manually raise and hold it all the way up, past the normal “raised” position. That will give you more room to work to install the presser foot. If your machine does not have this extra play, just drop your feed dogs. Fifth and finally, try a few stitches with the manual wheel first to make sure that your needle has all around clearance and will not break.For those of you wishing to know what settings I used on what I was sewing in the 2nd half of the video, I took a photo of my settings and which stitch I used.► Pros:Lets you make serger-like stitches without having a serger.► Cons:None.► Suggestions for Improvement:Improve on the directions.► Would I buy again?Yes.► Purchasing Decision & Questions:I hope I have helped your purchasing decision of this Brother Side Cutter SA177. I am not affiliated with the manufacturer, seller or any other product related company nor am I under any obligation to write this review. I do this for my own fun and pleasure! Feel free to comment and let me know if I have helped you. If you should have any questions, please post them below in the Comments. I try to answer all inquires in a timely fashion to the best of my ability. Lastly, Follow me on Amazon if you wish to be notified as I post new reviews. I promise they will always be meaningful and never of penny ante junk.
S**S
Use this if you don’t want a serger.
I am relatively new to sewing and wanted to learn some edge-binding. (I do not do it often enough to warrant buying a serger.) I did lots of research and watched a bunch of videos before choosing this one. I am using it with my Brother NQ575 machine. I like the fact that this is a snap-in foot (not all side cutters are.)After reading the directions and watching a video about it, I was ready to test. I tried it on some quilting cotton, which is mostly what I sew. Once I got the feel for how to feed the material I to the foot, it worked like a dream. I got neatly cut, finished edges.A couple of suggestions;1)As I said, this takes some learning. I strongly recommend looking at some videos before you use it. (Search for “snap-in side cutter foot”).2) If your machine has an automatic threader, you can’t use it with this foot in place. So either thread by hand, or use the threader before putting the foot on the machine.3) As there is a cutting blade on this foot, it should be stored safely. I found that it fit nicely into a metal band-aid box.
R**L
Almost!
I bought this to see if Brother presser feet would work on my Kenmore sewing machine (model #385.19365, where 385 indicates Janome made). I wanted the neat serged-looking edge. The sewing machine's overcasting and overedging work OK with their respective presser feet, but feeding the pre-cut fabric into the sewing machine makes the fabric fray more.If you are like me and want to use Brother (or other) presser feet on your Kenmore sewing machine, consider carefully the manufacturer's way of positing the needle against the presser foot's hole. Brother and Janome both have 7mm wide stitches, but Janome positions the needle more left than Brother. The needle on my Kenmore hit the left side of the SA177's needle hole in the 7mm wide overedge stitch. I had to decrease the stitch width to avoid this. If I am to buy another Brother presser foot for my Kenmore, I would buy only the feet with wider needle holes to allow me to adjust needle position to match the foot.I did not find the instructions difficult, but if you find it unclear, you can go to the Brother website to download the manual for any Brother sewing machine that uses SA177 and read the few pages that explains how to use it. The SA177 works fine for thin fabrics and sewing mostly straight. You have to sew slowly. The blades of the side cutter are really short, and they cut curves somewhat jaggedly.I concluded that the side cutter does not adequately substitute for a serger, because I have to go slow, I am limited to thin fabrics, the edge of the fabric is not cut and finished as neatly, and I am still limited to 2 threads. I also concluded that although buying presser feet for my exact machine is annoying because they are more expensive than Brother presser feet, I will buy the presser feet that match my machine to avoid having to adjust needle position or potentially damaging my machine.
W**2
side cutter
I can't tell you how pleased I am with the side cutter. It does exactly what I wanted it for. It is a little tricky to attach. Once on and the material loaded (very easy to do) it cuts and bounds the material edge perfectly whether the material is woven or knit.I had several people, including the local authorized dealer for Brother, tell me it would be a waste of money to get a side cutter. That it wouldn't work. Well I guess I am just the lucky one cause I would not trade it for anything else. It is cheaper than a serger and easier to use.
D**A
correct measurement
work great
K**R
It doesn't cut anything
Used on ST371HD. In addition to not feeling like it fit the (low-shank) machine, it's useless at its primary reason for existing - trimming fabric.
S**A
Works great!
Obviously it's not as good as a serger but it's a good tool for this learner. It gives my garments a more professional feel and does a good job of stopping my garments from unraveling. I've been pairing it with one of the overcast stitches on my machine and it comes out looking like a serger seam.
J**O
Excelente producto
Funciona excelente.!!!
A**R
Fonctionne très bien
Utilisé sur la Brother se600.
A**
Brother sidecutter
Great sidecutter but still pretty expensive for what it is
N**E
Perfect addition to my Brother sewing machine!
Works great! I got this for my Brother sewing machine for smaller jobs and is close to a Seger depending on which stitch is used to sew. Instructions were perfect as it was a little trickier than regular feet to put on and not for very thick fabric.
Trustpilot
1 day ago
2 months ago