🚀 Elevate Your Connectivity Game!
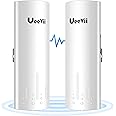
The UeeVii CPE450 is a high-performance wireless bridge designed for outdoor use, offering a long-range Wi-Fi solution with a maximum distance of 3km. It features a user-friendly plug-and-play setup, high-speed data transmission of up to 300Mbps, and robust support for video surveillance, making it ideal for extending networks to remote locations like barns or garages.
Color | White |
Item Dimensions L x W x H | 12"L x 7"W x 3"H |
Number of Channels | 13 |
Impedance | 4 Ohm |
Maximum Range | 3E+3 Feet |
A**O
No conduit or long wires required
This Point to Point System is the way to go. No Long wires. Easy to set up, comes with everything that you need. So far it has been reliable and speed is insane. I’m transmitting the signal at a 600ft distance. And works like a charm. I would definitely say it’s worth the money so far. Hopefully it keep working this great over time.
A**R
It works!
Got this for my stepdad for Christmas. He has been wanting WiFi in his metal shop for a couple years, and I found this. He has one tower mounted on the outside of the shop with the other in the house connected to the router and he has the strongest signal. It was easy to set up by watching YouTube videos. The instructions didn’t help, but the videos walked him though. I got the router of the same brand to go in the shop. If you are on the fence, get this. It’s easy and it works.
J**S
Works well, but instructions are trash
Like others have already said, the instructions are trash. I am not a a techy and have little to no networking experience, but I used a couple youtube videos and the sorted through reviews with advice and figured it out. I have a farmette and wanted to get WIFI from my house to a Barn about 170ft away. My internet service is actually provided through WIFI, so essentially, I was trying to get WIFI to WIFI. I am going to post some instructions for those who are like me and don't know anything about networking in case they have the same need. I assume it would essentially be the same as extending WIFI that is provided through other means (broadband, fiber, cable, etc). Pay attention to "transmitting/origin" and "receiving/destination". I am referring to "transmitting/origin" as the end providing the data connection and "receiving/destination" as the end that the connection is being extended to. As others have mentioned, it is much easier to do a mock-up in a single room first to get settings right and to test it before putting lots of distance between the antennas. This is highly suggested.I did not do any crazy configuration stuff through my laptop. It's not necessary for basic bridge for wifi. I did everything through my cell phone for configuration of my receiving router. Yours may or may not have that capability, but likely should if it is a wireless router.1. There was talk about the dip switches on the antennas. The instructions mention it but it's buried. You should set transmitting antenna dip switch to "B" and receiving antenna(s) dip switch to "A".2. The POE ports on the POE AC plugs get connected to the Antennas choose LAN1 or LAN2 but be consistent in hook up at both ends. I prefer LAN2 b/c it gave me more room to hit the configure button.3. Your receiving wireless router will likely need to be configured to be set up as an "access point". You will need to refer to the instructions provided with the router you choose to use on that end to set the router up for this. This was the most difficult part of the install for me and the part that seemed to be the missing link in everything that I read to try to figure out hook-up.4. Connect the Transmitting end POE to the origin router via ethernet cable. I used the LAN port on the back of the origin router.5. Connect the POE LAN port on the receiving end to the "modem" port of the destination router.6. Power up all devices7. Hit configure button on transmitting antenna. "H" will blink to show configuration mode. Press the button to select a channel. I just used channel 1. When you reach the channel you want just stop pushing the button. The channel will continue to blink, in this case "1".8. Hit configure button on receiving antenna. "H" will blink to show configuration mode. Press the button to select a channel. I just used channel 1. When you reach the channel you want just stop pushing the button. The channel will continue to blink, in this case "1".9. If the antennas have line of sight, the channels on both antennas should stop blinking after 30 second or less indicating that they have been paired. If successfully paired, you should see the green indicator lights on the side of the antennas at both ends light up for signal strength and see a lit LAN light that corresponds to the LAN ports that you used for your routers/antennas.10. Go to destination end of the network (receiving router end). turn on wifi on your desired device. Search for the name of your receiving router in wifi connections, click on it. Enter password if needed.Now you should be connected.I hope that this helps other tech dumb folks like me get WIFI to other points of the property. The stability and speed of the devices are good. I just wish that they could re-do the instructions with somebody that has a technical writing background in English.
T**C
Good Product with Sub-Par Instructions
I have never tried using a WiFi bridge before but had a need to temporarily get a WiFi signal between two buildings about 400 ft apart. I tried a range extender but the speed loss was too severe. The good news is this inexpensive bridge did the trick and the speed loss is negligible (I had about 80-90 Mbps at source location - essential same on receiving end). My situation is pretty ideal for this bridge with a clear line of sight between units and no obstructions of any kind. Setup was actually pretty easy for the WiFi transmission mode, but the instructions are poorly written and make it seem more complicated than it really is because they include obscure advanced setup options most people won't ever need to do. My recommendation is to first "pair" the devices on your kitchen table per the intial instructions by selecting a common channel, then unplug everything and move the "Master" (connected to origin ethernet source) and "Slave" (installs on remote location receiving end). Fortunately the units have RAM memory that remembers their settings when unplugged, so once paired they immediately re-pair/re-connect when they power up again. Simply install where desired, aim at each other, and within a minute or so you are up and running. Installed a couple of days ago so have not used long enough to comment on durability or stability, but so far no issues.
K**L
Perfect Replacement
I recently replaced a non-working wireless bridge on a customer's sign with the UeeVii CPE450 5.8G Access Point to Point WiFi Bridge, and the experience was remarkably smooth.The setup was genuinely plug-and-play, as advertised. The instructions were clear and straightforward, making the installation process hassle-free. From unboxing to having a fully operational wireless bridge, it took very little time and effort.The UeeVii CPE450 performed admirably, providing a stable and robust connection. The 5.8G frequency ensures minimal interference and consistent performance, which is crucial for maintaining reliable connectivity over longer distances.The build quality of the device is solid, with a design that seems durable enough to withstand various weather conditions, making it suitable for outdoor installations.Overall, I am very pleased with the UeeVii CPE450 5.8G Access Point to Point WiFi Bridge. It proved to be an excellent replacement for the previous bridge, offering a reliable solution with an easy and efficient setup process. I would highly recommend this product to anyone in need of a dependable wireless bridge solution.
Trustpilot
5 days ago
1 week ago