

🌞 Reflect Your Style, Shield Your Space!
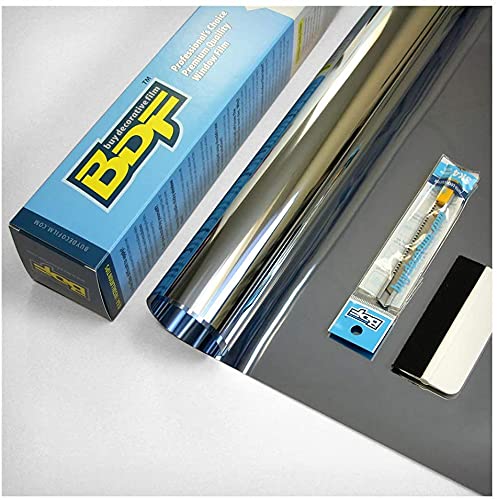
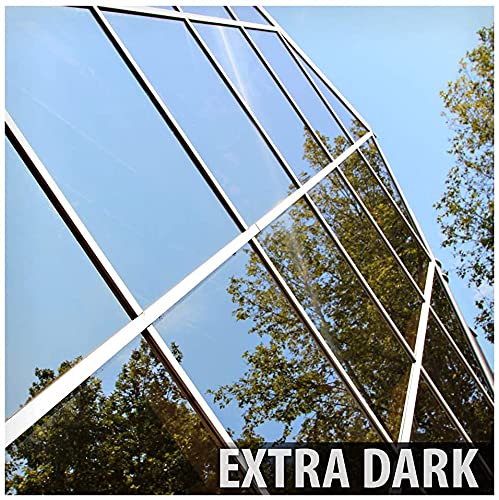
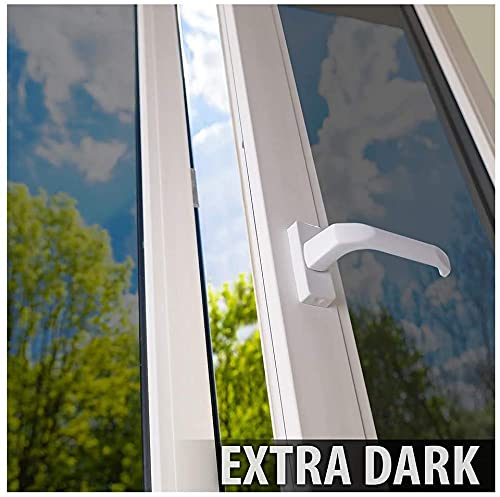
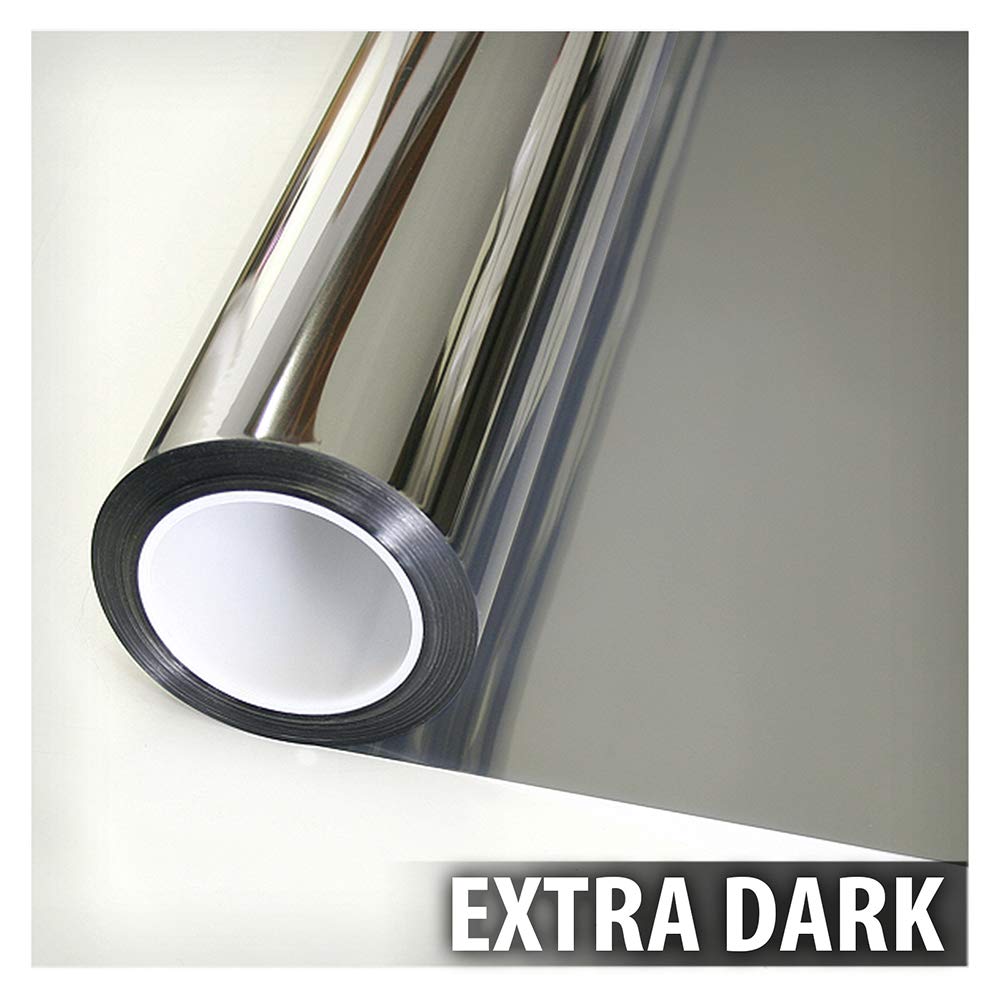
The BDF S05 Window Film offers exceptional daytime privacy with a striking mirror effect, while effectively reducing heat and cooling costs. Measuring 24 inches by 24 feet, this high-quality, metalized reflective film is easy to install with included tools and is designed to last for years.
| Material | ['Metalized Reflective Film'] |
| Brand | Buy Decorative Film |
| Color | Silver |
| Size | 24in X 24ft |
| Product Dimensions | 24"L x 2"W |
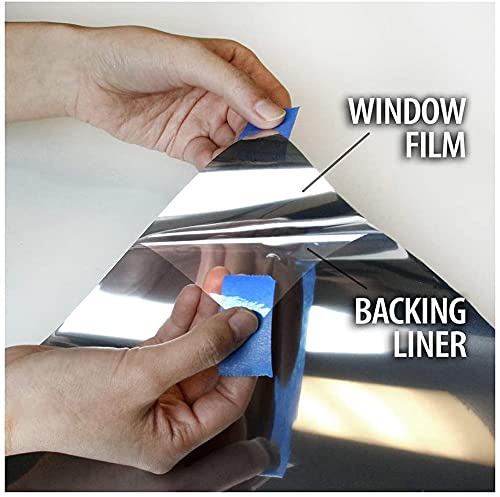
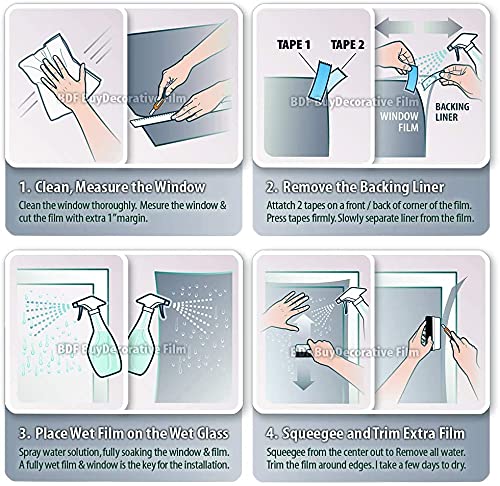
| Installation Type | Peel and Stick |
| Ultraviolet Light Protection | Yes |
| Number of Items | 1 |
| UPC | 810203024600 |
| Global Trade Identification Number | 00810203024600 |
| Manufacturer | BDF |
| Unit Count | 48.0 Sq Ft |
| Part Number | CSRSI0512100 |
| Item Weight | 12 ounces |
| Country of Origin | Korea, Republic of |
| Item model number | CSRSI0536100 |
| Is Discontinued By Manufacturer | No |
| Pattern | Mirror |
| Item Package Quantity | 1 |
| Included Components | Installation Tools |
| Batteries Included? | No |
| Batteries Required? | No |
D**R
Excellent privacy and shade, easy to apply!
I tried a different brand (the kind with the protective film that you peel off before you apply, and I hated it. Too curly, peeling off the protective layer was a pain, and it didn't stick well at all. THIS stuff does NOT have the projective film, and it's much easier to apply. If you take your time, and maybe watch a video first, it's easy to have a nice, professional looking tint on your windows for cheap. It comes with a handy trimming knife and squeegee. It's important to be able to cut a straight line, so have a yardstick or other straight edge,and an appropriate surface cut it on.I am NOT a handyman or craftsperson, so I really appreciate the ease of application and having the tools included. Looking out from inside,this has a somewhat dark tint, as though you're looking through sunglasses. From the outside looking in,the reflective qualities give you almost 100% privacy during daylight hours. I live in a city on the top floor of a building, so this actually affords me alot of privacy at night, because the streetlights bounce off the film . So besides cutting down on sunlight glare, they also cut down on nightime "light pollution" for city dwellers. If you have a darker or rural setting, it will probably be possible to see in through the film (at least somewhat).*Some notes: Mine did NOT have the protective film that you peel off, which actually made it alot easier to install. The instructions DO show how to peel off the film,so I assume you might get that kind on your order. Don't sweat it. Watch the video, and take your time.* I could never determine any difference between the "indoor" side of the film and the "outdoor", so I just hung it with whatever side pointed in or out. Didn't seem to matter, all the finished windows look the same.* Use MILD soap, like a few drops of baby bath, into the water you spray the window with. Apply the film starting at the top of the window, and squeegee thoroughly from the middle of the film out with the handy felt edged squeegee. Very easy, looks awesome when you're done.* Unlike the instructions say, I preferred to very slightly undercut the film so that it fit in without having to trim it in. It left about 1/8" of bare window around the film which really isn't enough to notice. I thought this made it easier to fit in, easier to squeegee, and if I need to remove the film it will be easier to get it off the window without messing up the film at some later time. If you don't like this idea, follow the printed directions and trim it in as necessary.
N**Z
Reduced heat immediately
I did for Windows in my living room which the sun beams in and creates a lot of heat. After just doing one window, I could feel a difference! It was easy to install and not hard at all too with the tools included as well as we be the extra water out. As I got more confident with the process it became easier and faster. I decided to do my windows after doing my front screen door a couple of summers ago. Pictures by Langston I love that I can keep my door open and see who comes to my door without them being aware that they're being watched. Now I can keep my curtains open in the hot summer sun and still keep an eye on my great granddaughter. And I bought the 24-in width, it was fairly easy for me to do by myself but if any wider I do would recommend getting a helper. I panicked when the film stuck together the first time, but slow and careful removal did not damage it at all. destination I definitely am considering buying more to do a couple of the bedrooms where the Sun hits throughout the summer months.
G**N
Works great, takes a little work to install, though
I was a little intimidated by reviews of this product, but it's not that hard to install if you do it the right way. It takes some time, but if you install it correctly, it looks great and works great. I'd recommend the following actions if you're buying this film:1. Measure your windows and ideally get a roll that can cover a full pane with one piece of film. So if your windows are 42" wide, get the 48"-width roll, rather than the 36"-width roll. That way, you make one cut, apply it to the pane and don't have to cut another piece to cover a single pane. It's WAY easier to do it you have one piece per-pane.2. Clean your windows thoroughly before doing anything.3. Measure your window pane, then add an extra inch of length and width when cutting the film. The kit comes with a razor to slice off the extra film from the window. This gives you an exact cut after it's applied, rather than trying to perfectly measure and cut the film before placing on the window.4. After you cut the measured film from the roll, place a piece of masking tape at the corner of one side of the film, and another piece of masking tape at the same corner, on the other side of the film.5. Lay the film on a flat surface. Use the masking tape tabs to separate the backing plastic from the film, leaving the adhesive side of the film facing up. It's pretty impossible to separate the backing from the film by hand. The tabs of tape make it simple. Don't pull too hard, or the film below could rip. Just pull slowly and evenly from the corner until all of the plastic backing is removed.6. Get a squirt bottle with a little soap and some warm water in it. Spray the window pane liberally with soapy water, then spray the adhesive side of the window film liberally as well. Get every surface and corner wet.7. Line up the film and carefully place it on the window pane, lightly applying pressure from top to bottom as you go.8. Use the squeegee that's included in the kit to smooth any air bubbles or wrinkles away. Move from the center of the film to the corners.9. Slice off the excess film with the razor provided.10. Boom. Done. On to the next pane!
A**A
Works great
I have 4 west facing windows in my bedroom. It gets roasting hot in the afternoons. I installed this and it makes a noticeable difference in the room temp. Installation is a tedious pia, but you can do it if you're committed. I would recommend.
J**S
Buena calidad en el polarizado, recomendado
Compré dos marcas diferentes de polarizado y este fue el que sentí tenía mejor calidad en la película, refleja muy bien y no se ve hacia el interior, el rollo incluía un cutter y squeegee (la tablita para aplicar).Muy recomendable que el cristal este totalmente limpio sin polvo, si no lo hacen es una de las razones por las que les puedan quedar burbujas en el cristal, y que al momento de aplicarlo mojen el cristal con agua enjabonada, eso les ayudará a que si se equivocan al colocarlo tengan tiempo de mover la película y arreglarlo.Por las noches el efecto es contrario, desde afuera de la casa se puede ver hacia adentro, pero esto depende de que tan intensa sea la luz.
D**Y
Really good product, follow the instructions!
We had a room that got far too hot and sunny in the daytime. After looking at a few options I decided to try this out. Does exactly what it says it will! I'm amazed at how good this stuff is. The first pic shows part way through installation and the second picture shows all the windows completed. To be successful in your install make sure you have 2 people (especially on larger sections) and follow the steps in their how to video. Everything needs to be soaking wet! If you're patient, the results will be impressive.
S**R
Very happy with this
Works very well in our kitchen window. It looks slightly darkened on the inside and a mirror on the outside. Keeps our kitchen much cooler. Was easy to install. Just be careful how to peel the plastic off as you are applying it, and you won't have any wrinkles. Comes with a great scraper tool and a sharp knife.
A**R
Tiny for window
I installed for the summer to keep house cool. I couldn’t believe how good it works . At night thot it would of be more transparent.
J**Y
Très bonne qualité
Rapport qualité-prix
Trustpilot
3 weeks ago
2 weeks ago