🖨️ Elevate Your 3D Printing Game with Overture!
OVERTURE PETG Filament is a high-performance 3D printing material that combines the ease of PLA with the durability of ABS. With a precise diameter of 1.75mm and an impressive dimensional accuracy of ± 0.02mm, this filament is designed for compatibility with most FDM printers. Each spool is meticulously crafted to ensure a clog-free and bubble-free experience, making it the ideal choice for both hobbyists and professionals. Plus, with a lifetime satisfaction guarantee, you can print with confidence!
| Manufacturer | OVERTURE |
| Brand | OVERTURE |
| Item Weight | 2.2 pounds |
| Package Dimensions | 8.86 x 8.31 x 2.8 inches |
| Item model number | OVPETG175 |
| Color | 1 Kg Black |
| Material Type | Polyethylene Terephthalate Glycol |
| Number of Items | 1 |
| Size | 1.75 mm Diameter, 1 Kg ( 2.2lb ) Spool |
| Manufacturer Part Number | PETG JP A01 |
T**C
Fantastic PETG Filament. --> Strong, Reliable, and Easy to Print!
The Overture PETG filament has been outstanding! It prints smoothly with excellent layer adhesion and minimal stringing. The strength and durability of the prints are impressive, making it a great choice for functional parts and high-temperature applications.I’ve had no issues with clogging or warping, and the filament feeds consistently without tangling. The dimensional accuracy is spot-on, and the final prints have a great finish. For anyone looking for a high-quality, easy-to-use PETG filament, Overture is definitely a top choice. I highly recommend this brand of filament, especially for PETG prints
H**S
Easy to print and strong
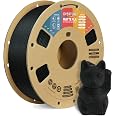
Good PETG for the price. It is not too picky on temperature, it prints fine anywhere from 245-255 on my Ender 3 V2. It doesn't bridge very well but that is to be expected for PETG, if you want to bridge I recommend printing at 245 and turning on bridging settings in Cura which makes bridges possible although pretty ugly. Supports work better than bridging, but can be hard to remove because PETG sticks to itself so well.Here are my settings for Ender 3 v2:micro swiss all-metal hotend / original extruder / original bowden tubebltouch leveling probe + yellow springsnozzle 0.4mm 250cbed plain glass + gluestick, 85cfirst layer speed 10speed after first layer 30first layer height: 0.28layer height after first layer: 0.2fan: none unless you are trying to bridge, if so use bridge detection to turn fan 100% only for the bridgeretraction 3mm @ 30I find that the biggest struggle with PETG is just getting the first layer to stick and look good. Once you get past the first layer it is usually smooth sailing. If you have problems with the first layer, first of all dry your filament even if it is brand new. It is an easy way to eliminate frustrations. Also go ahead and calibrate your extruder steps and measure your filament diameter and put that into your slicer, again these are easy steps that ensure you will not be fighting under/over extrusion while you are trying to get everything else figured out. Next use glue stick on plain glass and let the glue stick dry. You want the glass to look dull, not shiny, but it also shouldn't feel sticky to the touch. This combo works great for me, it adheres well but not TOO well and the prints pop themselves off when they cool. Lots of people like hairspray too but gluestick works fine for me and is less messy. Finally the #1 most important thing is to adjust your z offset and first layer height. You cannot mush the filament onto the bed like PLA, it needs to fall out of the nozzle and gently lay down onto the bed. Before doing anything with your z-offset I recommend turning your first layer height up to .28 or .3. The reason is that this sets your nozzle higher AND automatically adjusts the flow rate to match. If you just start bumping your z-offset higher and higher, you will be under-extruding by a lot which can cause its own problems. Once you set your first-layer height to .28, then start printing a test print and live-adjust your Z until the lines lay down and stick to the bed, and are neither gooping up onto the nozzle, nor being hit by the nozzle and pulled off the bed. This is tricky because the sweet spot here is TINY. Like within one or 2 micro-adjustments on the z, either side of that you will have issues. But once you hit the sweet spot on the Z you are golden. Then print some bed leveling test prints and adjust your first layer extrusion multiplier or line width if needed so your lines are touching. I recommend always using the bed level print that is CIRCLES when starting off, not squares. The sharp corners on the squares are super unforgiving and will pop off instantly if your settings aren't right. It is easier to use a bed leveling print with circles to dial your settings in without frustrating yourself and needing to restart the print a hundred times.When printing things over 2" tall I recommend using a wide brim because originally I was using skirt and I have had taller prints pop off the bed right as they are nearly finished, I think the reason is due to the lower part of the print cooling off. A brim is cheap insurance against your whole print being ruined at the last moment, and is easy to remove and leaves little trace that it was ever there.
A**R
Gorgeous and Reliable Transparent Filament
Even if we were to set aside the fact that the transparent filament is gorgeous, I'd still recommend this product based on how easy and reliable it is. If you're aiming to print something for decorative purposes where a translucent effect is required, you should definitely print slowly (30-40mm per second) to increase the evenness of layer lines and generate a gorgeous transparent effect. But because it's so reliable, I can regularly print overnight where speed isn't a concern. I'm genuinely stunned to see how often I'm able to nail the transparent effect on the first print, including challenging designs such as the incredibly thin (0.4mm) capsule shaped lamp diffuser in the photograph.But here's the kicker: This prints so reliably that has also become my go to filament for functional prints/prototype. When perfectly even layer lines and flawless transparency aren't a concern, I can crank up the speed and it will still turn out great prints on the first try when other "easier" filament types fail.Tips: Pre-heating/drying this filament isn't necessarily required if you live in a low humidity area, but it really does help when you want a near perfect transparent effect. Additionally, I've found that this particular PETG really likes heat. For a perfect first layer, I crank up the extruder temp above the recommended level (270-280° C) and use a bed temperature of 80-90° C. From there, lowering to 250° is a sweet spot for transparency and layer adhesion. I also found that it performs better when my chamber temp is set to 55 or 60, though this may not be the case for those who don't have a chamber fan.
Trustpilot
2 days ago
5 days ago