We remain fully operational. Our teams are working around the clock to ensure your deliveries continue safely.

DOWNLOAD THE APP


Customer Services
Copyright © 2025 Desertcart Holdings Limited
DOWNLOAD THE APP


🎧 Upgrade your sound, comfort, and style—because your ears deserve the best!
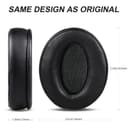
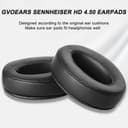
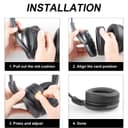
These replacement ear pads are designed specifically for a wide range of Sennheiser HD4 series headphones, featuring premium protein leather and soft sponge for superior comfort and noise isolation. Engineered for durability with reinforced stitching and high-quality materials, they offer an easy, tool-free installation process backed by a helpful video guide. Elevate your listening experience and extend the life of your headphones with these sleek, black cushions.


| ASIN | B09HCCDMCK |
| Best Sellers Rank | #21,610 in Electronics ( See Top 100 in Electronics ) #685 in Headphone Earpads |
| Brand | G GVOEARS |
| Color | Black |
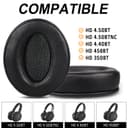
| Compatible Devices | For Sennheiser HD4.50BT HD4.50BTNC HD4.50SE HD4.40BT HD400S HD4.30G HD350BT headphones. |
| Customer Reviews | 4.7 4.7 out of 5 stars (418) |
| Enclosure Material | Leather |
| Item Dimensions | 3.6 x 2.9 x 1 inches |
| Item Weight | 31.2 Grams |
| Manufacturer | G GVOEARS |
| Warranty Description | 1 Year Manufacturer |
_**L
Quality and installs without much hassle
These feel high quality, and they are a lot easier to install than I was expecting compared to other headphones cups I've replaced before. The instructions from the manufacturer were a lot more helpful than what comes with OEM Sennheiser replacement cups.
M**S
Exactly like the old ones (but they're new!)
My old cushions were peeling after several years of a lot of use. That's bound to happen with faux leathers. I was going to use tape or fabric to cover them but I figured I'd see if there were replacement cushions and then I found these! I just received them today and was struggling to fit them onto the headphones but after watching the video (especially noting the comment that they can be stretched a bit without damaging them) I lined them up, fit the top into the gap then held that in place with one hand while I used the other hand to stretch the cushion ring just enough to fit it into a spot towards the bottom, then scooted and stretched it until the entire lip of the cover was fitted into the gap of the earpiece. It does require some fine motor skills but once I got the knack of it the rest was much easier. No tool needed here, and I think a tool would have complicated the whole ordeal that much more for me. They fit perfectly and look and feel brand new! So much better than a chincy fabric or tape fix. In the meantime I'm keeping the old ones to tinker with.
A**L
Not easy to install, but that's the point
Everyone complains about how hard it is to install these, but......they really aren't that hard and they stay on solidly. Installation for this was so daunting, I put it off for months. Here's the deal, when you pull your old ones off, you'll see that there is a ring of material that slips inside a gap between the speaker guard and the housing of the headphones. On the edge of that material is a black shiny elastic band. It looks impossible, but think of it like a shower cap. Once stretched slightly, it wants to close back in and go into the gap. Position the headphones so that you can access the top part of the earpiece you want to install first. (this is literally the most difficult part of the job) Gently stretch the material and slip a little bit of it over the headphone housing and wiggle it into the gap. Once you get a little bit in there, squeeze that spot to hold it in place and stretch the neighboring parts of the "shower cap" so you can fit them over the housing. That little band on the edge that wants to slip into the gap for you, it's not going to fight you, once the edge gets in the gap, it constricts inward by itself. A couple guitar pics will help you stuff it into the gap to get it started or hold it for you while you work another area. Toothpicks might work, just be careful that nothing cuts or pierces the material. Keep squishing the ear pad down with your holding hand where you've gotten the material in the gap so it doesn't slip out - then work your way all the way around with your other hand. Reach your fingers until the earpad to pull the material out and stretch it over (like a shower cap) and you'll notice it seating itself. Be careful to squeeze the other side so it doesn't pull out on one side while it goes in on the other. When I got to the end (bottom, because starting it at the top of the headphones makes it easier) I used some PC chip pullers to try to hook the material (a crochet hook would work better) to snag the material under the earpad and pull it out. When I did the second one, I skipped the hook and just squeezed the earpad at the top to hold it in place and pulled/stretched the earpad with my fingers to pull it out enough to find the cap. It fell right into place. Once it looks like it might be seated, you can rotate the earpad slightly each way to get it to seat evenly. You'll notice it's on solidly and not about to pull off, even though it looks like a loose fit. Takes about 10 minutes to do the first one, about 3 minutes to do the second one, once you've figured out your technique.
L**Y
Works well with my Seinhouser
Great for replacement, I've bought them 2x
D**K
They work great.
Exact fit replacements are hard to find. With a little research was able to determine these fit my Sharper Image tv headphones perfectly.
Z**.
Great replacement earpads, but very difficult to put on.
So far these pads are great, and feel nearly identical to the original pads, maybe a tiny bit softer (which i prefer, they press on my ears a little too hard). The video doesn't really do it justice in showing how much of a pain these are to replace. For anyone struggling, be patient. There's a slightly off color section of the plastic film, that's how far you need to insert it. Using your other fingers, you need to hold the back edge in place as you work your way around otherwise it'll slip out and undo any progress. Finger nails or a spudge might help, but i found it worked better to stretch the earpads until I could insert the edge flat. Also, you'll have to use quite a bit of force and stretch them, to the point that it feels like you're going to rip it. If you don't have decent hand strength, dexterity, or are missing fingers, you might be better off asking someone to replace them for you. Or just replace the headphones entirely. It took me about half an hour to to get both of my earpads replaced.
J**E
Ear Cushions
Love when simple parts can be replaced. Thanks, Sennheiser for allowing ear cushions to be replaced, love my headset.
S**A
Great product, no difference with the original
Great replacement, the difference with the original is not noticeable at all. Looks like a great quality, though the time will show. First time it’s a bit challenging to install them, but after some trials it goes really smoothly. I’m totally happy with them, great product!
B**N
These new ear pads are stitched vs glued, which is why my original ear pad ripped. A little tricky to put on the new ear pad but they will fit on the headphones and feel as good as the original. The fabric between back of the ear pad that touches where the sound comes from on the headphones is a little thinner than originals but I don't think it will matter.
Y**E
Thank you so much. They are perfect and easy to put on, just slip on one side and rotate it (earned hack).
O**P
Great pads. Installation is fairly easy if you watch the video on the sales page. It took me about 10 minutes to replace the original pads on my BTNC 4.50. The mesh inside is slightly thinner than the original, but the pads are more comfortable. All in all, it was a great buy. Shame on you, Sennheiser, for not providing replacements.
L**.
Bought this for my Sennheiser headphones as the original pad were frayed. It was a bit of a hassle to put on but it works. They aren’t as stiff as the original stock ones; they required to be worn in to be truly comfortable. These replacements didn’t! TBD how long they last. The original ones lasted 5 years of almost daily use.
T**G
Read that they were very difficult to install. If you start at one end and work down the sides making sure to hold tight just before pulling hard to stretch them to get them in the opposite end. Took about 5 minutes for both ears.
Trustpilot
2 weeks ago
3 days ago