✨ Elevate Your Space, One Cable at a Time! ✨
The EVEO Cable Concealer is a 300-inch paintable cord cover designed to organize and conceal cables for wall-mounted TVs. It features a slim design, easy installation options, and a customizable fit, ensuring a neat and safe environment for your home.
Brand | EVEO |
Manufacturer | EVEO |
Model | emareg-992 |
Product Dimensions | 43.18 x 2.41 x 0.1 cm; 1.6 kg |
Item model number | emareg-992 |
Hardware Interface | USB |
Batteries Included | No |
Batteries Required | No |
Connector Type | AUX, USB |
Includes Rechargeable Battery | No |
Manufacturer | EVEO |
Item Weight | 1 kg 600 g |
J**A
Conceal and Organize with Ease!
As a cable clutter warrior, I recently got my hands on the this product. Let’s dive into the details of this cable management wizardry!What’s in the Kit?• Spaghetti Lifting Magic: Okay, not really, but close! This cord cover wall kit conceals up to 306 inches of unruly wires and cables.• Paintable Wonder: Made from sturdy polyvinyl chloride (PVC), it’s ready for your artistic touch. Paint it to match your wall seamlessly. Mine had no issues with white and black paint.• Easy Installation: Choose your weapon—tape or drywall anchors and screws. In just 15 minutes, transform your living room from chaos to zen and eliminate wife complaints about cable messes!• Safety First: Beyond aesthetics, this cable raceway ensures safety. No more tripping hazards or curious pets nibbling on loose cords.Why I Love It:1. Customizable Chic: Paint it white, black, or unicorn rainbow—it’s your canvas!2. DIY Delight: Cut it down to the desired length. No cable is too long for this superhero.3. Sturdy Locking System: The unique connector kit keeps everything snug. No cable escapes!
F**S
As easy as ABC!
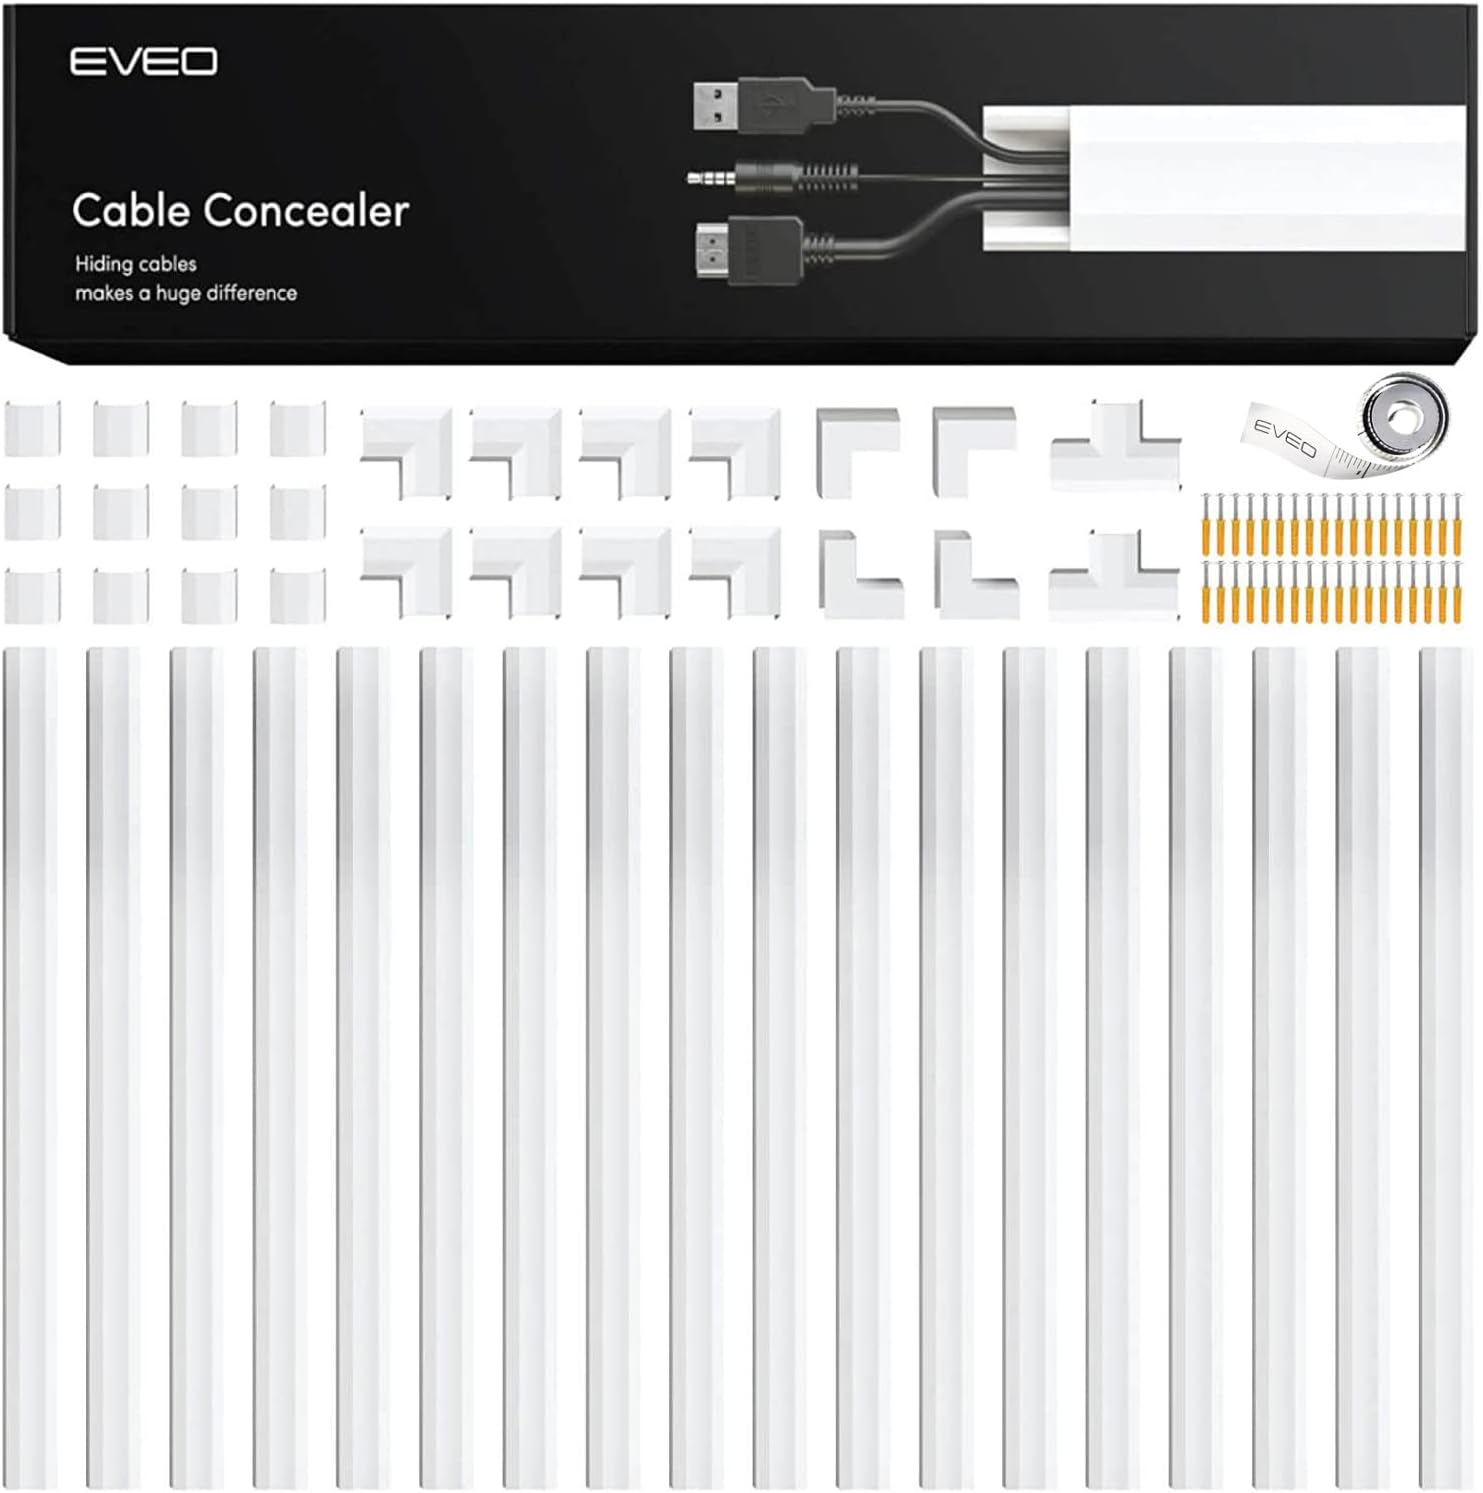
I wasn't looking forward to doing this because I'm a huge noob when it comes to home improvement stuff. I don't own a saw, don't own a drill, etc. When I came across this and how it was all-in-one, I was instantly sold. Some reviews about the difficult installation did make me worried.Yesterday I finally had some time to attempt installing this, and it went better than I had hoped!Some tips that worked out well for me:- Use tape to construct the entire layout, with the wires inside. This forces you to work out all the nitty gritty stuff before committing, and it provides you with the alternative of reworking it.- When cutting with the saw, just mark with a sharpie and use the provided saw. I used the box as a cutting board actually, and it worked great. (Told you I literally have no tools at my disposal). Yeah edges look a little jagged, but it's fine since it's covered by the connecting joints.- When you're happy with the layout, don't take all of it down. Slowly remove section by section (the rest should still be held in place with tape). When you remove that section, remove adhesive and press down. I actually reapplied the tape to hold it back it place, hoping that it would help with the adhesive bonding.- Important: Remember to account for the connecting joints when you tape it down! The joints are another millimetres or two, so if you taped down that section without that, you'd most likely not be able to fit it in.That's it! Mine's still held up with tape, so I can't attest to the strength of the adhesive yet. Will update again if the adhesive comes off the wall.
G**H
Works Well and Easy Installatoin
I was afraid that it would not reliably stick to the wall like my previous DIY trunks. But they are working well so far!
A**.
Amazing results.
I am not a cable management type of person. I generally do not care for messy cables. However, I do get sick of my roomba getting stuck on my wires. I had to stop turning it on. I finally decided to find a solution that could cover the wires. There are many options out there for different prices. I decided on this specific one for a few reasons. One was that it had over 300 inches that I needed. The second one was I got same day delivery. I got the results from the picture in just 30 minutes of work. They are super easy to work with. I was worried about having to cut the pieces because my sawzall is 2 hours away. You can cut these with a BOX CUTTER, but be careful when you do. I used the couplers to make sure every piece was the same height and leveled to the baseboards. I have never been more happy with the results. My intention was not to make it look this nice. My intention was just to keep the cables off the ground. Now I plan on ordering more to hide cables in other places where I think it would look nicer. Just look at the pictures for the results.
N**.
Installs well, even if you don't have the right tools
So, we have a soundbar on our mantel, and the soundbar needs to plug into the box for our Frame TV, which lives in a cabinet off to the side of our fireplace. We tried the soundbar with bluetooth, but it wasn't the best and wired is a much better option. So, that meant we had this ugly mess of cords dangling off the side of our mantel -- it just didn't look too good. These cable runs were perfect. I was able to cut all of them with scissors and a box cutter (a hacksaw would have been a lot better, but we don't have one) to follow the trim around the mantel perfectly, and I actually used 3M command strips to stick everything to the wall instead of the adhesive on the back of these (just in case we ever decide to reconfigure everything). The finished job will be easy to remove if we ever need to, and it looks tons better than having cords going all over the place.
Trustpilot
1 month ago
1 day ago