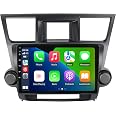
🚗 Upgrade your Highlander’s cockpit to the future of driving today!
This Android 13-powered 10.1-inch touchscreen radio is tailor-made for Toyota Highlander models (2008-2013), featuring an octa-core CPU, 4GB RAM, and 64GB storage. It offers seamless CarPlay & Android Auto integration, 5G WiFi, GPS navigation with offline maps, and premium audio with Bluetooth hands-free calling, transforming your drive into a connected, immersive experience.


| Item Weight | 5.37 pounds |
| Product Dimensions | 6.5 x 12.6 x 14.5 inches |
| Display Size | 10.1 Inches |
| Warranty | 1 Year Warranty |
| Voice command | Touchscreen |
K**M
Great unit, AMAZING tech support, challenging but doable installation
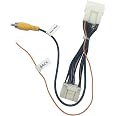
I bought this to modernize my 2009 Toyota Highlander. Both Android Auto and Carplay work seamlessly on this radio, which is what I needed most, and the radio works fine. Also, I tied the backup camera to it, and it's nice to see the larger view. The installation was not easy, but also not too hard, and the tech support for this unit (via WhatsApp) was AMAZING. Very responsive and helpful. It was great to chat with a real person who understood my questions and helped me work through issues. Also, there were a lot of really helpful tips in the other Amazon reviews (some of which won’t make sense until you get into the installation and setup). A few things I wish I had known upfront, and some advice:1. Find a YouTube video of a similar installation. Even if the head unit is different, the process of taking apart the dashboard will be the same.2. Disconnect the negative car battery terminal while doing electrical work in the car. Don't reconnect everything and start the car unless you've reconnected the hazard light button or you'll get some sort of error with the airbag light.3. A small ratchet, 10mm socket, and extender are very helpful for disconnecting the battery and for removing the old radio.4. I do not own any special tools for removing car trim. I used a small metal putty knife and just went VERY SLOW.5. The various wiring harnesses are all different sizes and shapes and there's really only one place to plug each thing into, so don’t worry about keeping track of what goes where.6. When you open the box, you'll find the new screen already attached to the plastic trim, but almost everything else is loose wiring harnesses and parts for the knobs. Unfortunately, there are no real installation instructions or photos, but there is a one-page flyer that is helpful and a manual that helps explain some of the menu options once you get it running.7. You'll need to salvage some pieces off of the old radio, including several of the yellow or red clips that hold the trim into the dash and six screws for assembling the knobs. These were small/cheap parts, and I wish these parts had just come in the box new. You'll also need to remove the air conditioning vent pieces from the old trim, which was tedious and frustrating to remove and reinstall. Just go SLOW to avoid breaking any of the plastic bits. Lastly, you'll need to remove the hazard light button from the old trim and install it in the new trim. This part was relatively easy.8. Assembly of the knobs (which I like having!) wasn't too bad, but it was a little challenging to wire up the power. I wish this had a plug like everything else, to keep it easy.9. On my Highlander, the small backup camera screen was mounted to the factory radio with a U-shaped metal bracket, which was then attached to the car frame with four screws. I had to take this off of the old radio and reattach it to the car frame. The wiring for this small screen is independent of the wiring for the head unit, so if you want your backup camera to show on the large screen of the new head unit, you'll need to purchase a separate wiring harness (about $30). The tech support person pointed me to the right piece to order on Amazon, and it was easy to install. The reverse signal wires were different colors on that wiring harness and the head unit wiring harness, but both had a label that said “back” so it was easy enough to match them up.10. There are no instructions on where to mount the GPS or 5G antennas inside the dash. I stuck them both on top of the small existing backup camera screen, keeping the ventilation holes clear.11. This unit comes with two external USB inputs. There are no instructions on where to install these. I drilled a hole in the plastic trim piece at the back of the pocket between the cigarette lighter and the old AUX jack and left them hanging out there. It would've been nice if these had been integrated into the trim, maybe by replacing the cigarette lighter or the AUX jack, as I no longer need either one with this new unit.12. This unit comes with an external microphone with plenty of wire length. I placed it on top of the steering wheel column to keep it easy, but I think it could’ve extended up to the visor.13. Most of the wiring had plenty of length to work with, except for the factory FM radio antenna. I just plugged this in last and made it work, but it would’ve been helpful to have an extension cable for this one. Note that the AM radio antenna won't plug into the new head unit.There seem to be a LOT of features and menu options on this radio, but I think many of them won’t work without adding a SIM card or connecting to wifi (and it’s easier to just use Android Auto or Carplay). I wish it was easier to switch the connection between different phones when there are multiple phones in range with Bluetooth on, but it seems like that can only be done by turning off Bluetooth on the other phones. Overall, great unit, AMAZING tech support, and a doable project for a first-timer.
M**S
Impressive unit
After had numerous problems with my factory radio/CD player on my 2012 Toyota Highlander, I decided to give this unit a shot after reading several reviews. I made my decision.. I pulled the plug and purchase this unit. It came very quickly and it was nicely wrapped in the shipping box. I watched a video about the installation and it was not that complicated. I kept notes of the wire splice wire that was left regarding the installation also I followed very close how they take off original radio from the car. I experience very good installation. It was not that complicated. I also took note and purchased the camera cable along with my order. I did not use the camera that came in a box to installed with a radio because I did not want to run the wire all the way to the back to be honest with you, the camera that I hooked up to it’s decent the CarPlay feature is very impressive. The sound that comes from the radio is very impressive. the features built in in this unit are amazing. I’m very happy with what I got for the price and thinking to buy another for my other car. I’m very happy with this purchase and the upgrade to my 2022 Toyota Highlander.
M**S
Buy this radio, but read review for full details
This radio is awesome and is great value. It elevates and modernizes the interior and looks OEM. The screen is high resolution, very bright and is reasonably responsive. The layout is smart and easy to use.The assembly was straight forward but extremely tedious, particularly connecting power to the volume / tuning knobs and installing the vents.The volume / tuning knobs had to be spliced into the power connector to work properly. Acc (red) goes to acc (red) , grnd (blk) goes to grnd (blk). This ideally should be prewired as it is not plug and play and not a simple task, requiring cutting wires and crimp-on connectors.Removing the HVAC vents and installing them in the corresponding slots was also very tedious. Ideally, this radio would have retained the original HVAC housing as this would have made installation much easier. When removing the vents from the original housing, loosen each clip one by one. And carefully guide them into the new assembly, making sure you're passing the fork through the slot in the vent.My install went perfect except one of the vents is crooked. It was difficult to get into it the fork slots, as I didn't want to crack the assembly. I'll leave it alone as I'm not sure I can make it better. The power connector was a tight fit in the radio as well. I routed the USB to the glove box and taped the GPS and antenna on top of the rear view camera, trying not to block the air vents on top. I did not install the microphone or use the back up camera adapter.The radio settings were straightforward. It came with the correct can bus settings pre configured and the steering wheel controls were easy to set up. Wireless car play doesn't connect 100% of the time but it is fairly reliable, usually connecting the majority of the time within 10 secs. When it doesn't connect, it always comes back after closing and opening the app through the multitask window. A reboot of the system or a vehicle restart also works. Blue tooth audio is much more reliable and always connects. The built in microphone works but I have received complaints of my voice being low on phone calls.Otherwise, the system is nearly 10/10. I highly recommend buying this radio. It's made the I interior a nicer place to be. It reliably plays my tunes and I'm happy with it. Time will tell if the radio will last, but first impressions point to it holding up and being good quality.Don't hesitate, get it! Just be prepared for the install. Read the directions and watch YouTube videos about disassembling the 2nd Gen highlander dash. Also, the customer service is incredible and doesn't get much better. Levi is awesome and very helpful and responsive and it was a pleasure to communicate with him.
Trustpilot
Hace 2 semanas
Hace 3 semanas