🧁 Mix It Up: Elevate Your Kitchen Experience!
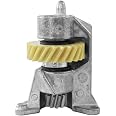
The KitchenAid Stand Mixer Worm Drive Pinion Gear Mixing Parts Replacement 240309-2 is a high-quality, durable component designed to restore the functionality of your KitchenAid stand mixer. Engineered for precision and easy installation, this replacement part ensures your mixer operates at peak performance, allowing you to create culinary masterpieces effortlessly.
A**R
Good product bade of metal not.plastic
Dont throw away your Kitchen Aid. This is such a simple fix. I watched a great video on how to, bought this and with a screw driver in 20 minutes I had a like new machine.
K**M
Thrilled - Fixed a thrifted stand mixer
My husband and I were so excited when we found a kitchenaid stand mixer for $8 at a thrift store....obviously it wasn't going to be that simple, the motor worked but a lot of the grease had liquified (most likely due to improper storage) so the last time the previous owners tried to use it, the worm gear got completely shredded. My husband found a repair video on youtube, we ordered this part, and voila! Works like new. I know other people have said this but kitchenaid really has changed so little about the design in decades, when we took it apart we saw that this mixer came off the line in 2007. You'd never know!! This part plus a few tubs of grease (always get rid of all the old grease!!) has allowed us to procure a stand mixer for roughly $50 instead of $450!
A**R
fixed
fit my mixer and fixed the issue
L**S
It works very well
It fit my mixer as advertised my wife loves me because I’m the hero for fixing her favorite mixer.
S**.
Lasted ONE use. Not worth it.
Save some money and buy the GEAR ONLY and use the original metal outer parts. What looks like metal in the photos was some cheap alloy that was sloppy and loose and wore out by mixing just one time.My husband thought that it would be easier to replace the whole unit than replacing the gear alone. After this FAILED, I ordered the gear only for 1/5 of the price and it runs much smoother and wasn't as difficult to replace as originally thought. Good thing we kept the original metal outer parts.I've used the mixer a few times now and runs smoother than it has in a while.Don't waste your money on this. Buy gear only from any other vendor for a fraction of the cost.
P**O
Just want I needed
This replaced the broken gear on my stand mixer, durability is to be seen, functions as intended, good value, easily installed with instructional video I found on YouTube
M**A
Kitchenaid worm gear
Exactly what I needed. It was easy to install.
D**A
Wow! I did it! And it worked!
I regularly make pizza dough, and the KitchenAid decided to break down a few weeks ago and stopped spinning, just as I was finishing my dough.Being a DIYer I decided to do some research and see if there was a way to fix it versus having to get a brand new KitchenAid- lo and behold there was! For instructions, YouTube search ‘How to fix KitchenAid mixer that isn’t spinning’.After viewing the video and feeling like I could do it, I took the chance and ordered the part outright! Aside from being a messy job (which you’ll see in the video), it worked!! I am beyond belief, lol!So grateful! Home- made pizzas are back on the menu!And as added bonus my recipe:- 3 cups ‘00’ flour (King Arthur and Gusto’s are my gotos- they’re consistently best prices on Amazon too)-1 tsp salt- 2 tsp instant yeast (if it’s not instant yeast, activate in the warm water, following its specific instructions)- 3 tblsp olive oil-1 cup warm waterPut all dry ingredients into the mixer and blend well. You can use the medium hook.Add in all the liquid but a few tablespoons of water. If the dough is too dry, add a teaspoon of water until it’s pulling all the flour up. If it’s still wet, add a teaspoon at a time, until it’s blended well. When the hook begins to struggle switch over to a dough hook. Blend for a couple minutes pushing down on the dough as needed. Form into a ball and place into an oiled bowl, lightly oiling the top of the dough. Wrap the top with plastic and place into a proofing device, (i.e. oven, toaster oven, convection microwave) for an hour and a half minimum. It’s ready to form as soon as it’s raised and you can freeze it.Lastly, put into a preheated oven at 400° and depending on what you’ve put on it anywhere from 8 to 14 minutes-ish. The more that is on the pizza the longer it takes to cook -basically keep an eye on it until you feel that everything has been cooked and it’s all bubbly.Side notes: you can add your favorite spices to the dry mix before adding liquid. Also not all mozzarella cheese is made the same. Look for quality you’ll get way more ooze, in addition to taste. Try different sauces they’re also not made the same. And final recommendation- a pizza stone, parchment paper (so you can place it directly - with the paper- on the hot stone) and a pizza paddle will ensure crunchy on both top and bottom!Buon appetito!
Trustpilot
Hace 2 meses
Hace 1 mes