☕ Brew it your way, every day!
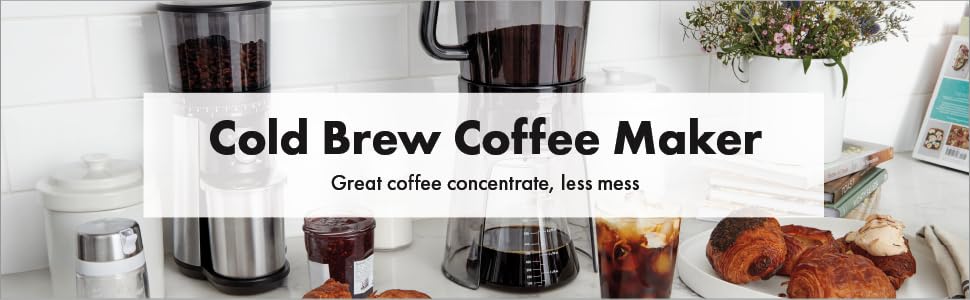
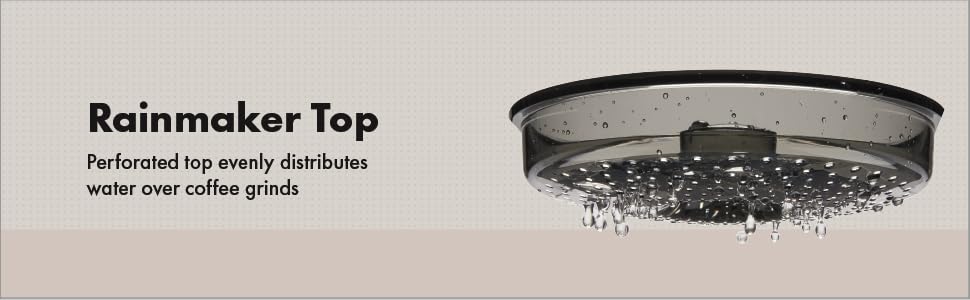
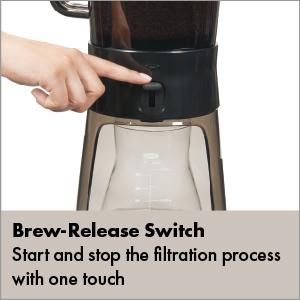
The OXOGood Grips 32 Ounce Cold Brew Coffee Maker is designed for coffee enthusiasts who appreciate low-acid brews. With its innovative Rainmaker feature, this fully automatic coffee maker ensures even water distribution for a rich flavor profile. The reusable mesh filter and easy-to-clean design make it a sustainable choice for daily use, while the silicone-sealed stopper keeps your coffee concentrate fresh. Compact and stylish, it fits seamlessly into any kitchen space.
Exterior Finish | Stainless Steel |
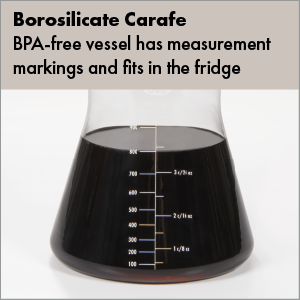
Material | Stainless Steel, Silicone, Borosilicate Glass, Plastic |
Item Weight | 3.7 Pounds |
Unit Count | 1.0 Count |
Number of Items | 1 |
Item Dimensions D x W x H | 9.53"D x 9.53"W x 14.72"H |
Capacity | 32 Fluid Ounces |
Style | Cold Brew Coffee Maker |
Color | Black |
Recommended Uses For Product | Cold Brew and Tea Brewing |
Operation Mode | Fully Automatic |
Voltage | 120 Volts |
Human Interface Input | Touchscreen |
Filter Type | Paper,Reusable |
Specific Uses For Product | Cold Brew |
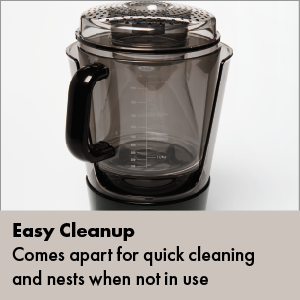
Special Features | Jug,Easy Cleaning,Removable Tank |
Coffee Maker Type | Coffee Infuser |
C**A
I am in LOVE with cold brewed coffee! Great machine!
Wow! This is my first experience with cold brewing and I am pretty much thrilled!I love coffee, however, though I have my likes/dislikes and I know a lousy cup when I taste it - I am not a coffee snob. So if you are, ignore me! If you aren't then read on! :-)My boyfriend and I had made a pot of coffee every day or so for years. Since we mostly prefer cold coffee - except on those rare nippy SW cold days - we had been brewing it and pouring it into a pitcher that we cooled and then chilled in the fridge. Our old Cuisinart coffeemaker has a mesh reusable filter and it finally came apart at the seams by the plastic at the bottom, and would blow coffee out into basket. When I went to look for a new filter (which I did find, btw) I was poking around looking at coffeemakers in general. It ended up leading me to Cold Brewing, which I started to read about in greater detail. When I discovered that cold brewed coffee was less acidic, I was sold. I love my coffee but both my boyfriend and I can get terribly acidy tummies from time to time. Myself, especially when I am stressed at work or something.So, I poked around Amazon looking at cold brew systems - reading reviews, checking prices, looking at what you had to buy to use them and keep them up each day. I ended up settling on this unit because of the reviews, the no-need for a paper filter (more on this later) and the price! I happened to get a unit from Amazon Warehouse Deals. I love them, because 9 times out of 10 I get something for a FANTASTIC deal and there is maybe a scratch on it or the box was torn up at most. I've returned a couple things that somehow got through Amazon QC, but that's fine. It was an easy process. That said I got this guy for another ~25% off, and it was a great way to start - especially when compared to the cost of a new mechanical, traditional drip coffeemaker!The past few weeks I've been playing with it. And here is what I've got so far, especially for other cold brew newbies like me:Prep Work:- You will need to get a coffee grinder or have ready access to fresh ground COARSE ground coffee. Your regular drip ground coffee won't drain well and will cling to too much of your concentrate when it's done brewing. I got this one and it works great! I will be reviewing it soon: KitchenAid BCG111ES Blade Coffee Grinder - Espresso-You probably want to use filtered water if you don't already. This is going to sit in water for 12-24 hours, rather than just burst through in a flash like your drip maker does. I use a common Brita.- Be prepared! Make this ahead of time! It does take 12-24 hours to brew. I have done 18 - 24 hours and that range works great for my tastes. I love the stronger flavor, personally.- Consider getting another "carafe". I brew my coffee, then drain into the provided carafe because it fits the whole system properly, but the glass - however sturdy they claim it to be - feels too thin for my liking and we have too many klutzes in our house. I put mine in a thick glass pitcher for the fridge. I happen to think that for an OXO product this should have: a rubberized grippy bottom and a rubber grip at the neck (in OXO grippy black of course!). Why this isn't the case is beyond me but maybe they can update in a future model. I would buy that separate if they made it.Time to make coffee! Here is how I've begun to do it:- Grind your coffee! Yum, this is fun especially if you've never done it before. It smells amazing! and the coffee made with it is pretty amazing, too! Make sure you grind it very coarsely. I have a method I use with the suggested Kitchenaid grinder I cited above and I will share that in that product's review.- Remove the rain shield.- Put about 3.5 cups of coarse coffee (to taste - you may like more or less!) into the reservoir. If you just ground it, let it sit for a few minutes before you add water.- Double check the switch in the middle of the unit is UP. But to be safe I leave the carafe under the unit while brewing.- Replace the rain shield (or the sieve like lid, whatever you want to call it)- Add 5 cups (again, to taste) of filtered water, let it sit a moment, then stir the mixture thoroughly.- Wait 18-24 hours.- Replace carafe if you didn't leave it under while brewing as I do, and flip the switch down.- Wait 10-30 minutes (may be more or less depending on your grind coarseness) for the brew to drain. Maybe gently wiggle the unit a little to assure it all drains out.- Remove reservoir - covering bottom so you don't drip concentrate on the way to the sink - and do what you do with grounds. We save ours for the roses! :-)- I immediately rinse and wash everything - by hand - and set to dry.- Pour about 2oz of the concentrate in your favorite glass, add your cream and/or sugar to taste if desired, fill remaining part of glass with ice, water, milk (again, as desired), stir and enjoy the smoothest iced coffee you've ever had!Side thoughts and suggestions:If you see my attached picture (it's not much to look at that isn't already shown in the product page but) you can see I keep mine on a small dish towel. This is actually a pretty stiff towel, as it is backed in a plastic mesh for scrubbing dishes, so I use it to slide the unit under the cabinets while brewing or storing, and out when I am making or harvesting a batch of coffee.The lid for the carafe - I used it once. Since I don't use the carafe in the fridge, I don't need to lid the coffee in the carafe with the lid. I first used it once for measuring as suggested, but now I can easily eyeball how much concentrate is enough for me, as can my boyfriend. I will keep this, but it's more of "just in case", as I find the carafe a semi poor design for storing the concentrate, and I don't need it for measurement purposes.Paper filters - it comes with them. I've used them a couple times, and I find it just makes the brew drain too slowly. I didn't find that there was much sediment in the coffee, so I don't find them useful or necessary. This is also subjective, and perhaps objective depending on your grounds, so you may prefer the extra filter for your brew, and find it worth purchasing in the future.Bottom line: I am in love with this thing! It's a bit more of a process and a wait than my old drip machine, but the brewed concentrate is so much smoother on the tongue and easier on the tummy. It's also made coffee making an enjoyable event. I've spent time hunting for different whole beans, smelling them, grinding them... I also suspect I will continue to play with types of coffee, how I grind it, ratios, etc. It is actually a bit FUN. And the coffee made in the process is fantastic. At this price, whether or not you get a discount for an Amazon Warehouse purchase, I think it's a bargain. And that is even counting the cost of the little coffee grinder I picked up.If you have questions or suggestions, please leave a comment! Thanks and hope this review helps! :-)UPDATE 12/29/2016: Nothing in particular to say except that it has been about half a year since I got this machine. It still works great, nothing is broken or wonky and it was a bargain for how much it gets used and the yummy smooth coffee it makes. Still the only thing I dislike is the carafe. Oxo - Make the neck more indented and/or covered in your Oxo rubber-grippy stuff! And the bottom, too! I would never put this thing in my fridge. It would get smashed to bits.UPDATE 03/23/2018: Time flies - and I am due for an update. It's pretty simple - It still works great. Looks almost new. Nothing broken or worn out. This was a great deal and barring dropping it I suspect it will be worry free for years to come. It also rocks cause it doesn't use power which means there is no electrical component to go on any sort of "fritz". It also makes it low impact and maybe even something you could take camping (surely without the awful carafe!) or use in a tiny home, etc. I am pleased with this item and very glad I got it some years ago. Good luck to you, too! :-)
A**R
LOVE. And my recipe for consistently good cold brew :)
First off, I love this cold brew maker. It's easy to use and consistently churns out amazing cold brew. I've had it for over a year and have made close to 50 batches of cold brew (I know because I'm running out of paper filters soon). I thought I would do my good deed of the day and enlighten everyone with my perfect cold brew recipe. It's rich and chocolatey and downright delicious. It's much better than what they serve at Starbucks (or anywhere else, IMHO). World, you are welcome ;)1. Get one bag of Starbucks Guatemala Antigua and one bag of Starbucks Yukon Blend, ground coarsely (by Starbucks or by you). I know, I know, many coffee snobs hate Starbucks, but this *is* really good. I promise. The bag of Guatemala Antigua will be enough for about two and a half batches of cold brew and the Yukon Blend will last for four. They don't line up exactly but I'm anal and this doesn't bother me.2. Use a paper filter in addition to the metal filter--I really think it makes a difference.3. Mix 6 oz. of Guatemala Antigua and 4 oz. of Yukon Blend in the cold brew container. (I measure this out with a kitchen scale and I would posit weighing is important.)4. Add 16 oz. water (preferably cold and filtered) through the rainmaker and let sit for 5-10 minutes to saturate the grounds.5. Add an additional 24 oz. of water and stir to make sure all of the grounds are saturated. (It's also ridiculously satisfying to stir and smell the coffee so I don't suggest skipping this step.)6. Cover the rainmaker lid with a small piece of Saran Wrap (to keep out any fridge smells) and put in the fridge. As long as you don't touch/pull the seal on the bottom where the filter is, you can put this right in your fridge, but go ahead and put it in a bowl if you're worried about leaks.7. Let brew between 20-22 hours. I really don't notice the difference in the couple of hours and I've accidentally let it sit for 24+ hours and it's still been fine, but YMMV.Enjoy!
Trustpilot
Hace 3 semanas
Hace 1 día