We remain fully operational. Our teams are working around the clock to ensure your deliveries continue safely.

Descargar la aplicación


Servicios al cliente
Sobre nosotros
Copyright © 2025 Desertcart Holdings Limited
Descargar la aplicación


🚀 Unlock your maker potential with safe, precise, and ready-to-go 3D printing!
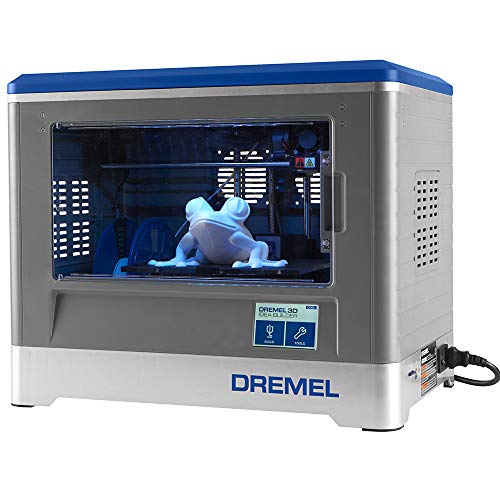
The Dremel Digilab 3D20 Idea Builder is a fully assembled, UL-certified 3D printer designed for hobbyists and beginners. It features a 9"x5.9"x5.5" build volume, a non-heated build plate optimized for PLA filament, and an extruder capable of reaching 230°C. With a 4" touchscreen and compatibility with popular slicing software like Cura, it offers high-quality 100-micron resolution prints. Supported by Dremel’s US-based customer service and a 1-year warranty, it balances safety, ease of use, and precision for professional-minded makers stepping into 3D printing.


| ASIN | B00NA00MWS |
| Date First Available | September 3, 2014 |
| Is Discontinued By Manufacturer | No |
| Item Weight | 15.4 pounds |
| Item model number | 3D20-01 |
| Manufacturer | Dremel |
| Product Dimensions | 18.5 x 13.39 x 13.78 inches |
I**E
An excellent printer, but not quite the turnkey solution Dremel probably wants it to be
I've printed dozens of things on this printer, including some prints that took days to finish, and for the most part I have been quite pleased. It is easier to set up and use than most printers, but as with any 3D printer, you still need quite a bit of knowledge and experience to be successful. Just knowing which settings and orientation to use for your prints can take quite a bit of experimentation. THE GOOD * The printer itself is fairly nice looking, and I like that it is completely enclosed. That helps with safety if you have small children or pets, and also muffles the noise a bit -- like all 3D printers, it is on the noisy side. * The color touchscreen is convenient. It's a pressure-based screen rather than a capacitance-based one like a modern cellphone, but it's still nice to have. While you can connect your computer to the printer via a USB cable, I have just been using the included SD card since I don't have the printer near enough to my computer to use the cable. Just select the model you want to print, and go. You can also copy models to the printer's internal memory. This is probably more useful for schools, but might be nice if you have certain models that you print often and want to always have available. * The quality of the printed models can be truly excellent with the correct settings. For things like sculptures, I like to use the finest layer height (0.1mm) since it drastically reduces the layered effect that you get from 3D printing. However, it does take a lot longer than other settings. I have painted things that I have printed and they look fantastic even without a lot of sanding or other preparation. * The support from Dremel has been fantastic. I was able to reach a human being in their 3D printing department very quickly every time I called. I had a problem with a clogged nozzle, and they emailed me a number of service documents that I could use to try and fix the issue. When those didn't solve the problem, they sent a new extruder assembly free of charge, and even let me keep the old one when I asked (since I wanted to see if it would be possible to fix it). They also would have been willing to have me send back the whole printer for a new one, but that seemed silly for a simple clog. In the end, I was able to fix the old extruder by replacing the nozzle with a third-party one, so now I have a spare assembly in case anything else goes wrong. * The included Dremel3D slicing software seems okay, but does not have any sort of support structure generation. In fact, it tells you to use MeshMixer to generate supports. MeshMixer is a great program (and free) but it seems bizarre that the included software can’t handle such a fundamental feature. I purchased Simplify3D early on and have been using that exclusively with the printer, so I can’t say much more about the included software. THE BAD * As I mentioned above, I did have a clog that I couldn't solve with the steps outlined in the manual, or the service documents from Dremel. I'm not sure why this occurred, but clogs are pretty much unavoidable with 3D printing -- if you haven't had one yet, you will eventually. The extruder assembly is actually fairly easy to take apart once you know what you’re doing. * One thing I should note is that following the procedure outlined by Dremel to change the filament will usually not actually allow you to remove the filament. I found that if you select "Unload Filament,” the filament in the machine will usually not come out smoothly (or at all). What you need to do is to first select "Load" and let the previous filament flow through the nozzle for a few seconds. Then just pull it out. After I started doing this, I have had no issues when changing filament. I think they may have updated the firmware to help with this issue, but I haven't updated mine since I have everything working so well now and don’t want to jeopardize that. * The Dremel filament is fine in terms of its quality, but it's nearly triple the cost of comparable third-party filaments, since they come in 1 kg spools and the Dremel spools are only 0.5 kg. Unless it's the super-cheap no-name stuff from eBay, I think it is very unlikely that third party filament would damage your machine (for the record, the clog I mention above was when I was using Dremel filament -- I've had no issues with other brands, but I chalk that up to my own inexperience when I was using the Dremel filament early on). I personally have printed a universal spool holder from Thingiverse that replaces the internal holder in the machine, allowing me to use any filament internally. You could also use an external spool holder and just feed it inside the machine. Dremel claims that using third party filament will void your warranty, but I doubt that they would even be able to tell what kind of filament you were using, unless it was some very unusual color or something. * The enclosed nature of the printer makes it difficult to take time-lapse video of prints, if that matters to you. * The printer does need to be leveled manually, using three screw adjusters beneath the print bed, and it can sometimes be a little tricky to know just how much to turn them. You slide the included leveling card under the extruder and you want to just feel a bit of resistance but not too much (hard to describe). I find that it stays level over multiple prints, but it’s a good idea to re-level periodically, or just before starting a very long print. If you find you’re having trouble with your initial layers adhering to the build plate, look into your leveling. IDEA BUILDER vs. FLASHFORGE DREAMER This printer is based on the FlashForge Dreamer, but it’s not just a simple rebrand. The Dreamer is $100 more expensive, and has dual nozzles, Wi-Fi, and a heated print bed, all of which are missing from the Idea Builder. However, from what I have heard, the dual nozzles are not really very useful. I've heard more than one person say that they would actually prefer not to have that feature, since the other nozzle can sometimes knock into your prints. I’m not sure if the Wi-Fi feature is good or not, but my experience with 2D printers and with a MakerBot Replicator has led me to believe that Wi-Fi printing is often more trouble than it’s worth. Finally, the lack of a heated bed is only really an issue if you plan to print in ABS plastic. Since I’m fine just using PLA, I don’t find that to be a disadvantage. And there are some advantages to the Idea Builder over the Dreamer. Dremel claims that they have upgraded some of the internal mechanisms such as the bearings and the like, and the Idea Builder is UL listed, so you can be relatively sure of its safety. Also, I have heard mixed reviews of FlashForge's customer service, while everyone (myself included) seems to be very happy with Dremel’s service. In conclusion, I’m very happy with my purchase and have been running the machine almost constantly in the two months since I bought it. It is on the expensive side compared to some other printers, but I feel that it’s still a pretty good value for its capabilities — especially if you don’t use the Dremel filament.
M**R
Fun for family, safe for the family room or bedroom
Fully updated review! I hope that you will find this review and video helpful in making an informed decision. If you do not like the product, please do not mark the review "unhelpful", unless the review really is lacking. Thanks. Quick Note: I've seen a lot of comments about no user manual. Once you order your Dremel, you will have at least two days before it arrives. Go to the Dremel website and watch all of the quick and to-the-point videos that cover everything from unpacking to leveling to starting your first print. Then when your printer arrives, you will be prepared and ready to go. Plus you can refer back to the videos as you set up, or you can do what I did: just call Dremel's customer support and say "Hey, I my printer just arrived, its still in the box. help me set it up!". Like everyone else, I always go to the worst review first, and he (Amazon Customer Since only Books were sold) provides exceptional useful counterpoint information, so please check it out. In fact it was largely based on his recommendations and warnings that I made my decision to purchase. When I got the machine I immediately experience some really quirky issues when I ran it from desktop, but not from Dell Venue, so I did several experiments on my own and friends computers to get at the heart of the matter, as I will discuss later. I selected the Dremel from 3 possible choices: The Dreamer by Flashforge for around $1300, the Solidoodle Press (to be released Dec 6 2014) for around $600 and the Dremel for around $1000 So why the Dremel? 1. User Reviews: I had a concern about Flashforge user reviews, some important 5 star reviewers had no other reviews except that product. Although the Solidoodle Press is 5th generation for this American based company, there are several negative reviews about customer support. Amazon Vine Voice users gave thorough and convincing reviews of the Dremel. Many vine voice Amazon reviewers received the product in advance to test and review before it came to market. I found myself reading and re-reading their reviews every day before it became available for sale. They are ALL GREAT, but IF I had to pick my top 3 favorites, they would be: Amazon Customer Since Only Books Were Sold (3 star) Fritosgirl (5 star) LynnE (5 Star) 2. Cost of Proprietary plastic spools. Although it is possible to jury-rig any set up if you are technical enough, I am not, and am supposing the average buyer of the these machines is not the open-source 3D guru of yesteryear. Dremel's cost per pound is the lowest for proprietary spools (although significantly highly than generic spools) 3. Location of Customer support: Dremel and Solidoodle customer support is US based. Flashforge is China based. 4. Print speeds: Dremel hard set their print speed at Good 120, better 100, and best 80. Flashforge and Solidoodle range speeds from 60-150 or 40-120 but warned that higher speeds reduced print quality. I did try to pin down exact answers but in the end I felt that I was left with a "it will be up to you to guess". I did not like that. The Dremel has delivered: 1. Customer support: Chat and phone calls. Immediate, thorough, and very intelligent 2. Print quality and speed: Please see attached video for detailed discussion of what that really means to YOU. I think I finally present an answer that everyone is asking. Just what does it mean. I printed the exact same model 3 times. Good, 1 hour, better 90 minutes and best 2 hours. Then I show on the video what the differences are. My final verdict is: For a lot of model making with low details, I feel I could easily go with "good", I don't even need "better". For highly detailed pieces, the "best" setting will provide excellent results and not disappoint. I think every reviewer provides personal insight and solutions into what they encounter. Here are my solutions for you: Between Nov 5 and Jan 1, 2015, I have made over 200 models. I re-level the build after about every 15 models, or when I notice that models are not sticking well to the tape. What are the causes of the build plate to become un-level? Dremel has a removable build plate, that snaps in and out. If you remove the build plate to extract your object (which is by far the easiest method), I have seldom had to re-level, either after pressing too hard removing the plate, or after every 10-20 builds. The forces required to extract your object from the build plate with the plate still in the machine will change the level and force you to re-level EVERY TIME. I cannot imagine that is good for the life or wear and tear on your machine and strongly advise against it. Nevertheless, even the act of removing the build plate causes you to push down on the leveling screws. CORRECTION!!: Cost of proprietary PLA: Dremel PLA works out to be about $0.1897 per meter. I was paying Makerbot $0.16 per meter for their PLA, because every third party that I tried had issues in my printer. Inexpensive third party PLAs mentioned by other reviewers will reduce your cost to about $.06 per meter, but you will have to build your own delivery system. Honestly I don't have the experience to comment any further, so read their comments to get a better understanding on going this route. Oh, to put it into perspective, the squirrel in my video review, at 20% infill, uses 5.5 Meter of Dremel PLA, Costing $1.09 per squirrel model. Although I am VERY accustomed to using blue tape for PLA, I have not done so. I used one sheet of the supplied Dremel tape for my first 40+ builds before I replaced it with the second sheet that they supplied. If it does not become available for purchase, I will just switch to blue tape. Here's a clue: When using Dremel tape, you should level with a business card thickness (much thicker than blue tape). With Blue Tape, level with standard their leveling paper or standard 20 pound paper The software from Dremel has one compatibility issue that causes "Network error" messages". It cannot install on a computer that has on-board Intel Graphics and Windows 8. I have only printed one Dremel object, everything I have printed has come from Thingiverse or other designers, or things that I designed myself using the free Google Sketchup. Some Thingiverse.com or other party designers (also check out http://www.makershop.co/shop/fantasygraph) may have "holes" in their structures, or may need supports added. Dremel has partnered with Meshmixer software to make fixing any downloading object a breeze. If you try printing an object and the Dremel printer says that's there's an error in printing, its because the object has an issue. Also if you design your own objects using Google Sketch up you will need to use Meshmixer to finalize them. I have included them in the appendix of this review Advanced Settings INFILL In the software you can select "Advanced Settings", which allow you to have access to many setting, especially Infill. Infill is how dense the honeycomb pattern that fills the interior of your item is. For models, you could easily go with a low infill. For tools and useful objects that may be subject to stress, you will want the standard or higher infill. I did a final 4th test on my squirrel object (not shown on video), Best (or High Quality), but I reduced the infill from 35% to 15%. That reduced the time from 2hrs 21 minutes to 1 hour 56 minutes, but more importantly reduced weight (reduced plastic consumption and cost per piece) with zero discernable impact on quality. Need More? Its been over 1 month of solid daily use now since I received my Dremel printer. Watch here: https://www.youtube.com/watch?v=xSUlX0Z0DFc. This is fun stuff! 1 full spool of while, 1 full spool of Translucent, and a 1/2 roll of white and black. No jam s, no fouls, nothing. I don't rush the filament unloading and loading process either and make sure that the Filament really is loaded by going to control panel and shooting through extra filament until I have constant flow. I also make sure the exterior of print head is clean, just common sense, folks. I love this printer and I think you will to: List of appendixes below: #1: Cleaning objects from Thingiverse, adding supports using Meshmixer #2: What a supports, warnings #3: Creating YOUR OWN designs!! #4: Compatibility issues with video cards Appendix #1: Cleaning objects from Thingiverse, adding supports, using Meshmixer: (Time to complete 5-15 minutes per object, only needed once per object) First Time Installation and Set up A) Go to Thingiverse.com and select an item to download and print. (there are THOUSANDS!) B) Download Meshmixer from the Dremel Site, Install and Run. C) Click on the Large Import button D) Navigate to where you have saved your .STL file from Thingiverse E) On the left menu bar, click on PRINT icon F) Below the three buttons, Import, Open and Modify, is the button with the printer name "Dremel"? If not, click on It. G) Uncheck all the printers, EXCEPT Dremel H) Proceed to regular Steps Regular Steps: A) After importing your STL From thingiverse or that you created in Sketchup, Click Import B) On the left Menu Bar, Click "Print" C) *** Now you have to set the object into the printer area **** D) Click Transform E) If you created in Sketchup, and did not put in the center of the universe, look for your object beyond the bounderies and move it with your mouse F) Click Rotate to the get the best seating G) The size utility in Dremel is much easier, I'm not too concern about that now, just make sure the size fits within the box H) Click DONE, then select "REPAIR SELECTED" (Note there are manual repair settings once you get the hang of it) I) if you have overhanging edges, click "ADD SUPPORTS" J) Click SEND TO PRINTER. This automatically opens your Dremel software Appendix #2 : A comment about objects that require printing with "Supports" Not every object requires supports. None of the objects that I regularity print do, Supports are additional thin plastic vertical layers that are added to hold overhanging ledges. A standing four legged animal will require supports because its belly is an overhanging surface, a sitting animal will usually not require supports. What happens if you don't print with supports? You will get a lot of runaway thread spilled out, making you think that your print has failed. It has not failed, your machine and your program or fine, it just means that you have overhanging edges and you should stop and restart with supports. What is bad about supports? Supports can be dangerous to remove! They can create sharp edges, needles, and splinters. I would be fine allowing a 10+ year old create with the Dremel for everything EXCEPT removing supports. I would recommend that he selects objects that do not require supports, but if want to pick those type, You should have tools: Needle-nose pliers, tweezers, craft style wire cutters (for finishing work) and patience. I must add that Dremel's support attachment is much better that what we had with our old machine, nevertheless, I still advise caution Appendix #3: Using Google Sketch-Up Want to create your own object quick and easy? Download the free Google Sketchup (NOT PRO). This program allows you to design many objects with very little design instruction. Plus there are many youtube videos on how to use Google sketch up. You must add the STL feature from the Google Program top bar menu (go to "Window>Extension Warehouse") in order to save (export) your designs to the compatible .STL format for printing on the 3D printer Appendix #4: Compatibility Issues As I mentioned above, There is obvious unannounced bug in Windows 8, in that MICROSOFT and INTEL do not have a Windows 8 update for any machine running Intel on-board graphics. (You can online to Intel and look for updates for graphics for Windows 8 and all you will find is Windows 7). a) Desktops and Laptops with Windows 7 or 8.x and Video Cards other than INTEL: 100% compatible, no issues b) Desktops with Windows 7 or 8.x, and on-board graphics other than INTEL: 100% compatible, no issues c) Desktops with Windows 7 and on-board graphics by INTEL: INTEL has drivers windows 7, 100% compatible, no issues D) Desktops with Windows 8.x and on-board graphics by INTEL: INTEL does not have drivers for Windows 8.x, You will have some compatibility issues that Dremel can help you through, but your best bet is add a video card to your machine. I purchased a Radeon 5450 $video card for 32.28 from Amazon, and now I have perfect connectivity.
G**.
Estaba preocupada porque la impresora fuera a ser realmente de buena calidad, debido al precio pues es casi el doble de otras que pudieran competir, sin embargo estoy encantada con el producto, decidí comprar esta impresora porque es mi primera impresora en 3D así que quería algo fácil de usar, y así fue! Prácticamente la sacas de la caja, lees el manual y estás listo para comenzar a imprimir, ya he impreso varias herramientas para mi empresa de jabones y cosas para la oficina, realmente tiene muy buena calidad de impresión, además viene con un software bastante fácil de utilizar para configurar las impresiones, realmente un excelente producto, estoy feliz de haber elegido y comprado.
B**M
Bought this Dremel 3D20 for our son's 16th Birthday Gift (secondary reason is COVID-19 boredom distraction) both my wife and I are green/green/green to this technology but wanted something that the kid was doing in school to add some inspiration to these long days ...... well my goodness!!! ENTERTAINING? it is so! We had done our homework and wanted something out of the box that was ready to go, watched many youtube videos and read a lot of reviews for this and comparable products before deciding on Dremel. Let's start with delivery! Amazon fast! came faster than promised at checkout! Was not expecting fast delivery, 2 days! Thanks Amazon! Next, unboxing and setup. It took longer to unpackaged it, remove the packaging and plug it in than it did to start printing our first project. INSTANT GRATIFICATION! Pre-Loaded 3D Dinosaur head that comes on the included SD card is really detailed and very cool! It has been great to learn in advance of receiving the product how to use the varieties of free CAD software out there that you will need to design and build 3D projects, also there are an assortment of free downloadable models that are ready to print all you have to do is run them thru the Dremel "Slicer" (new terminology for us too) which works flawlessly and easily. Simple as drag and drop. (I had 2 days to learn and practice before the machine arrived) Got it! piece of cake, was ready for this to be a total success when it was unboxed, didn't know that the kid was already well versed. None the less it has been fun doing some initial projects. PRO's Easy set up Price point Easy to use software IT WORKS! include everything needed to start building right away Large building surface 230mm(w) 160mm(d) x 140mm(h) Low noise. While i would not set this up in a bed room, we initially set it up in our kitchen, noise was not high enough to interrupt normal conversation or TV volume levels. Low aroma, reading reviews some concerns were of the plastic aroma, we did not notice anything concerning. that being said we will let the 3D20 live in our developed basement. We chose Dremel because of the Brand strength. Prior tool purchases proof positive. Nuff said CONS; None yet, we bought into Dremel knowing that they recommend using their filament and knowing the cost. Distracting - very much so - this machine is more distracting than Super Bowl commercials on your new Flatscreen TV - Cuz this is way so much cooler!!!
M**E
L`imprimante 3D DREMEL 3D20 est très simple à installer et à utiliser. L`écran tactile Le fait que l`imprimante est livrée entièrement préassemblée nous a permis de commencer notre première impression sans difficultés. La trousse est bien outillée, la carte SD contient plusieurs fichiers de modèles gratuits prêts pour la construction et les instructions pour télécharger le logiciel Dremel 3D Idea Builder sur un PC sont claires. Nous sommes très satisfaits avec la qualité d`impression.
A**Z
Esta maquina la compre en una oferta y no me arrepiento en lo absoluto. Es rápida, algo ruidosa pero soportable. He dejado piezas haciendo toda la noche y duermo perfectamente. El manual dice que solo se ocupe PLA marca Dremel, pienso que por la garantía, pero es un problema conseguir el blanco de dicha marca. Es una excelente maquina.
R**R
No venía la espátula, pero el inconveniente mas grande fue que nunca se pudo nivelar la plataforma, a mi parecer la impresora venía usada, que lastima que no la pude probar, ya que tiene muy buenas reseñas a pesar de ser un modelo del 2014, afortunadamente el soporte de Amazon es excelente, por lo que me mandarán reemplazo. ACTUALIZACIÓN: Me llegó el reemplazo y como dice en el manual, a la primera pude niverlarla e imprimir, así que en efecto la impresora que había llegado de inicio si estaba defectuosa.
Trustpilot
Hace 1 mes
Hace 1 semana