Sobre nosotros
Servicios al cliente
Atención al cliente
Acceso Regional
Legales y políticas
Obtén la aplicación

Apunta tu cámara para descargar la aplicación
Copyright © 2024 Desertcart Holdings Limited
![DIY-MotoShield Pro Premium Precut Ceramic Window Tint for SUVs - All Windows [99% Infrared Heat Reduction/Blocks 99% UV]](https://m.media-amazon.com/images/I/71TofPq-c4L.jpg)


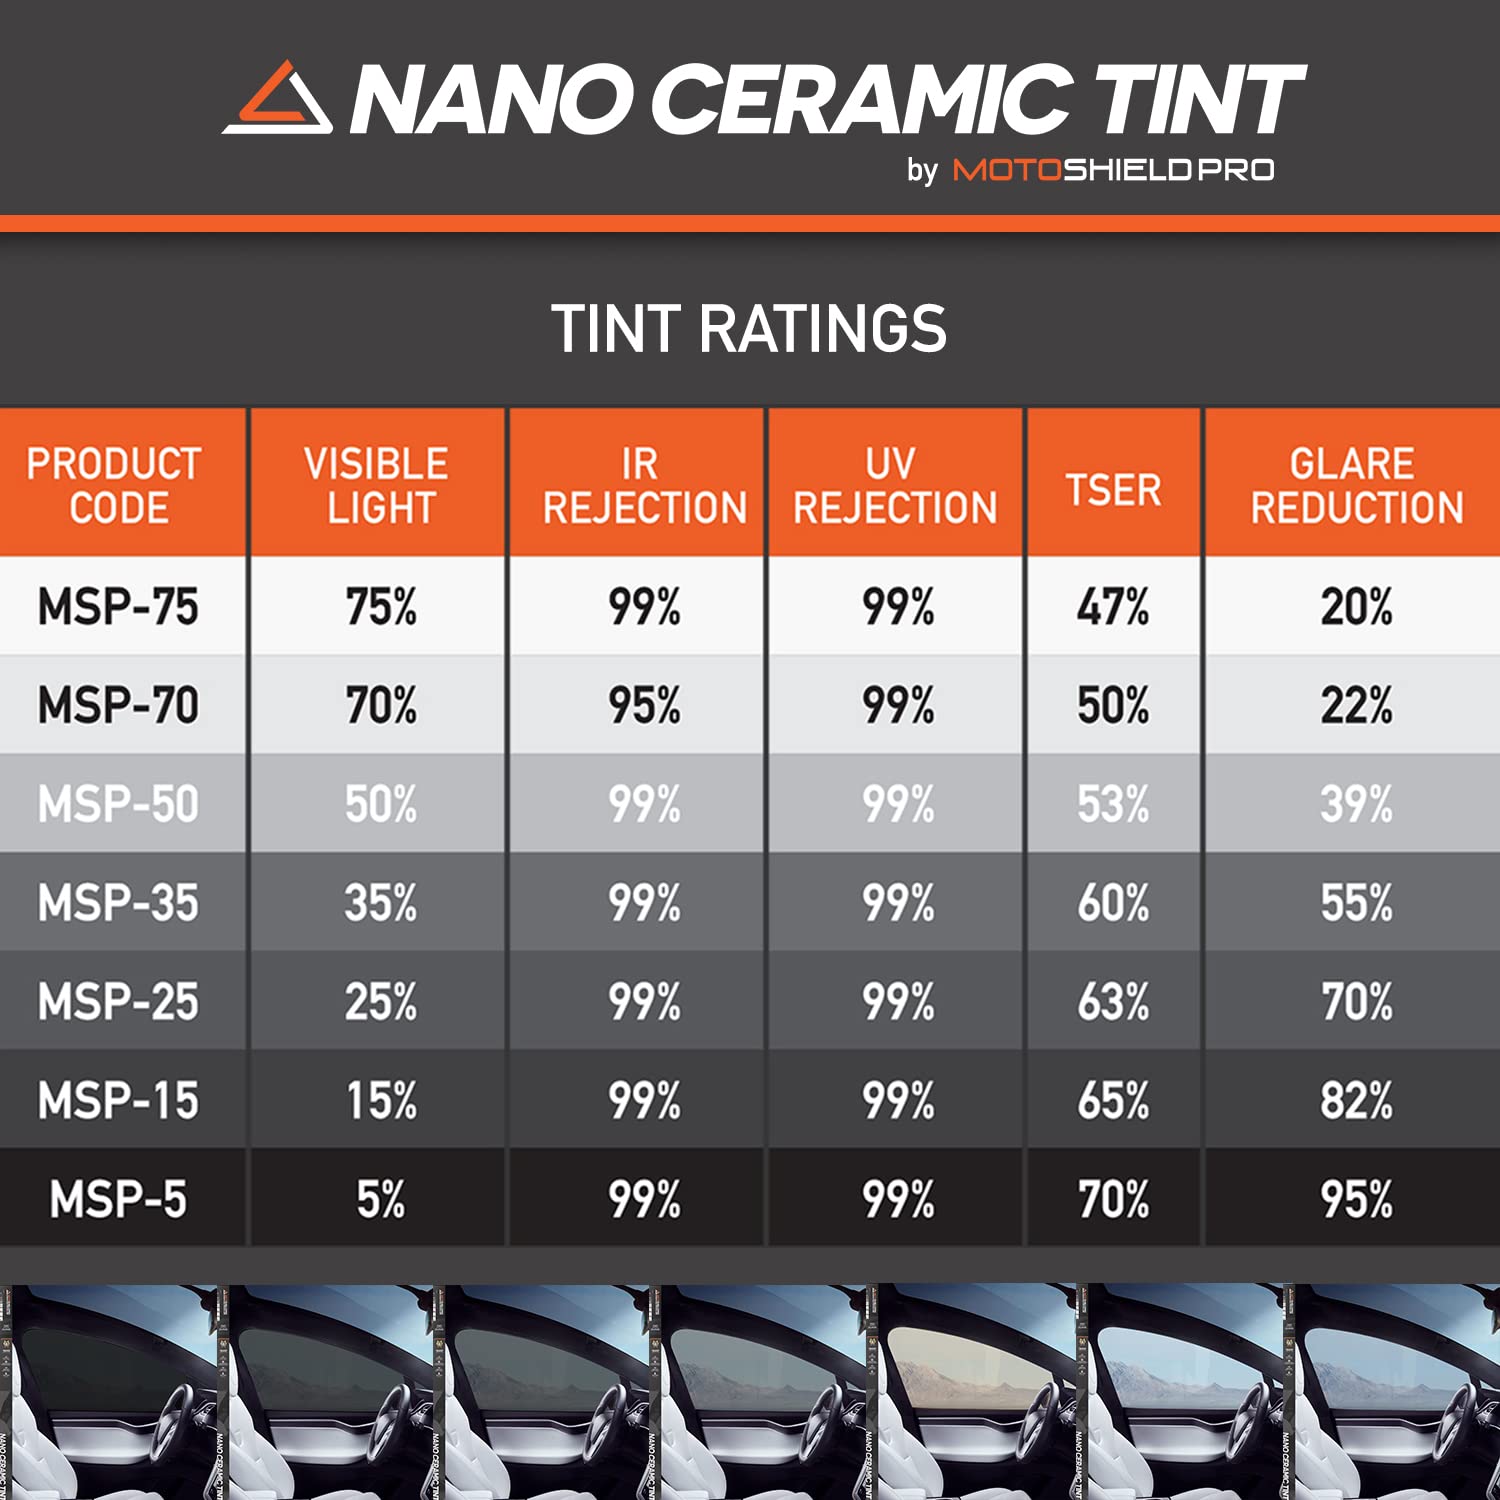
🚗 Stay Cool, Stay Protected!
The DIY-MotoShield Pro Premium Precut Ceramic Window Tint for SUVs offers unparalleled protection with 99% UV and infrared heat reduction. Hand assembled in the USA, this durable window film is custom-cut for a perfect fit, ensuring your vehicle's interior remains pristine. With a lifetime warranty, you can trust in its quality and performance.
F**X
Very thick - wrong cut size - hard to shrink
I ordered the precut. This film is overall very thick and much better than the stuff from Autozone or Walmart, but doesn't compare to GeoShield or professional-tier tints.The windshield piece came too small for my car. I contacted support and they sent over another piece, but it was still too small. Additionally, the film is very thick and takes forever to shrink properly.I think it's probably fine for flatter side or rear windows, but don't get this for windshields.
D**T
Quality product, may have trouble with the backglass.
Installed on a 2013 Nissan Versa. Came packaged in a cardboard tube which is good, however, mine had a dent in the side so there were a few imperfections in the roll. I dont think it made a difference. The roll had dust on both ends, so I would recommend that the company place the product in plastic before inserting in the tube for shipping. Looks like a quality product.Dont try to install this without the right tools. I purchased a tint installation kit with different squeegees, plastic tools, razor knife, etc. I purchased a decent heat gun that has 12 temperature settings. Purchased two spray bottles from walmart, one for cleaner the other for slip solution. Slip solution I used was 2 cups distilled water and 1/4 tsp Johnson baby shampoo. Worked very well.Just because its pre cut doesn't mean you wont be cutting. They left an important part out of the video. After you remove the outer tint you then have to cut the clear line away, too. Otherwise you wont be able to place the tint on the outside of the window for the fitting and get it tucked into the moldings. The thing piece will be a little large but will tuck into behind moldings and trim panels.The door windows went in easily, I tried to take my time being careful but still managed to catch a corner with a squeegee folding it back or put a small crease in here or there. You have to press rather firmly to ensure you get all the solution and air out from under the tint.The rear window is where the trouble was. I removed the rear brake light housing and plastic pillar trim panels to allow for easier installation. I watched numerous videos and learned my lesson from the door windows. I didn't think my back glass was that curved but I guess I was wrong.I placed the tint on the rear glass and it did not shrink much. Still had many large fingers in it that I could not get rid of and no matter how slow I went, i still ended up with a few small creases in the tint. I figured I would place it inside the glass and try to shrink it that way.That worked better, however, it was still a lost cause. I ended up ripping it out and throwing it away due to all the fingers I could not shrink up and squeegee out. The only other option I know of is to use strips but you'd have to cut this in order to do that.Not going to attempt to install the windshield's today. Probably going ask a shop if they will install this product and have them do it.
M**S
great product vs inflated ego
First let me say that this is a great product. Second, let me qualify that by saying the only experience I've had besides this with window film was the film I applied to the windows in my home. So when I decided to tackle this project because the local shop wanted over $500, I based my ability to get it done properly on this limited experience. What I discovered was this: side windows on a normal passenger car are fairly straightforward and it is possible to achieve acceptable results as these windows tend to be flat, vertical and of a manageable size. But the REAR window (on my car, a 2005 Chevy Classic) is tilted back at a 50 degree angle, has imbedded antennae, heating elements, and a field of small raised dots which may be for sun mitigation. The space is cramped, even with the rear shelf and seat removed. Bottom line: I was completely unable to get the film installed in the rear glass. I had watched several hours of Utube videos, and I had an assistant but was completely unprepared for the degree of difficulty there. I don't blame the product, I blame the hubris of the idiot I hired to install the product. The only product fault was that two of the pieces were mislabeled, but that wasn't much of an issue because of the obvious differences in shape. The seller included a practice piece and clear instructions; there were no creases or any defects when the product arrived, it was perfect. If anyone is still thinking of applying their own film, I heartily recommend this product. Just be aware of your own limitations, and be especially sure that you know how to heat shrink the film properly because it is an important step, ESPECIALLY on the rear glass. I think that someone in better shape than I would do a better job, so I'm giving this product 5 stars all around because my side glass turned out well enough that I'm not gonna just have the entire car redone by a shop.
A**R
Buy Gila window slip solution to do this
As a preface, I bought a heat gun and all the tinting squeegee tools so I could do this as easy as possible.That being said, it seems like a great film. The issue is the directions aren't great and it says to do 500 ml of water and 6 drops of dawn dish soap for the slip solution. That did not work at all. I used the water and dawn disposal in a 500 ml spray bottle on my front passenger side just like the directions said to. It did not slip much at all and caused the tint to crease. It was terrible. But, that was what the directions said to do so I did it. I tried the heat gun as well but it didn't seem to help at all.After that mess, I went to autozone and got the Gila slip solution. As you can see, my driver side window went on easy as can be and has no creases or bubbles. No need for the heat gun either.I'm frustrated because the directions stunk and I did everything the directions said and it still caused my front passenger tint to crease. I would have gladly spent the $6 to get the Gila solution from the beginning. I don't really want to buy a new front passenger tint but I will need to because it looks terrible.I think the tints are great but save yourself money and don't buy a heat gun and buy the Gila slip solution. It made it so easy.
A**R
Does not shrink well
I found this product hard to install on a model 3 rear windows. No matter how much heat I worked into the product fingers kept coming back. I was patient and got the front to install perfect. The back would not shrink enough and ended up with creases on the bottom part of the window. DIY difficult. Good luck
Trustpilot
Hace 1 mes
Hace 2 meses