Sobre nosotros
Servicios al cliente
Atención al cliente
Acceso Regional
Legales y políticas
Obtén la aplicación

Apunta tu cámara para descargar la aplicación
Copyright © 2024 Desertcart Holdings Limited

💨 Elevate your space with silent power and sleek style!
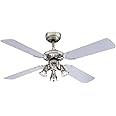
The Westinghouse Lighting Turbo Swirl Indoor Ceiling Fan combines a powerful 50W motor with energy-efficient A++ rating to deliver quiet, effective air circulation in rooms up to 10 square meters. Featuring a contemporary gun metal finish with six black blades and an opal frosted glass light kit, it blends modern design with practical comfort. Remote control functionality adds effortless convenience, making it a perfect upgrade for stylish, functional indoor spaces.
| Brand | Westinghouse |
| Manufacturer | Westinghouse Lighting |
| Product Dimensions | 76 x 76 x 38 cm; 5.3 kg |
| Item model number | 7871140 |
| Part Number | 7871140 |
| Area Lighting Classification | IP20 |
| Number of Items | 1 |
| Style | Single |
| Collection | Kitchen |
| Colour | Gun Metal Finish With Black Blades |
| Shape | Rectangular Prism |
| Finish types | Metal |
| Number of Lights | 1 |
| Included Components | Ceiling Fan |
| Maximum Compatible Wattage | 40 Watts |
| Voltage | 230 Volts |
| Specific Uses | Indoor use only |
| Special features | Energy Efficient |
| Shade Colour | Black |
| Shade Material | Glass |
| Light Direction | LED |
| Power and Plug Description: | AC |
| Switch Style | remote control |
| Batteries included? | No |
| Batteries Required? | No |
| Type of Bulb | LED |
| Cap Type | E14 |
| EU Energy Efficiency Label | A++ to E |
| Wattage | 50 watts |
| Item Weight | 5.3 kg |
| Guaranteed software updates until | unknown |
R**D
Installation and early impressions - and now later impressions too!
We installed the Westinghouse fan & light pendant just today so, for now, our review will focus on the installation we did rather than how it works out long term. I will say from the outset that I can see it operating just fine for quite a while. It seems solid and gives off an air of competence in its manufacture, but only use will determine the facts of that aspect. I'll look at1/ Things that came up during installation (inc. remote unit)2/ How it looks and works as a new unit3/ A few observations4/ Definitive info about a suitable bulbShort-form review.1/ It can be a real fiddle to install if your wiring isn't perfect.2/ Looks nice, fairly quiet, some nice features. It blends.3/ Needs work if you want to carry on using your existing simple wall switch.4/ You can angle the bulb holder to get a choice of bulbs to fit. Just don't do it too often.But first, please remember this if you plan to fit this yourself and you're not an electrician.Dying to fit your fan?Installation could be short and painful if you don't switch off the lights circuit at the consumer unit/fuse box. The light switch alone is not enough, since the lighting circuit in the ceiling is always live, and the wire to your lightswitch just makes interrupting the circuit for that particular room's light easier - the wires for the rest of the lights remain active (otherwise switching off one light would switch off every other light in the house!). So kill the lights circuit at the consumer unit with its switch, or pull the appropriate fuse.1/ InstallationI'd like to say that it is a "breeze", but despite the bad pun, it isn't. I had a terrible time with the ceiling wiring because the instructions assume that you will only switch the fan using a remote control and not from your old wall switch. They also assume your ceiling wiring will be neat. Ha! If you simply can't live without it being wall switchable using your old fitting, you will need to split out some of the wiring at the ceiling rose to make that separate switchable circuit. In my case, I was pretty irritated about this assumption on the part of Westinghouse and will get an electrician to get that working as we'd like. The online versions of the specs and installation guides don't mention this problem because the instructions expect you to do things Westinghouse's way, and not necessarily how you'd prefer it to work! That niggle aside, we did manage to get it working along with the wireless remote we'd also ordered first time, no problem.Installation was still a "monumental faff", even so. Most of the work needs to be done up at the ceiling and, if you are fitting the optional wireless remote as we did, you have twice as much to do. First of all, though, you must have somewhere very solid to mount the fan, either a concrete ceiling (in which case I advise getting better, longer, screws for the unit, and suitable fixing points for the concrete) or find the central line of a ceiling joist. If you have a drywall ceiling I don't see a heavy unit like this staying up there for longer than a week unless it is attached through to a joist. If the people that built your house were even halfway competent, the ceiling wiring should come down adjacent to a joist.Westinghouse organise their own cabling quite nicely, with snap-together cable connectors complete with alignment arrows for orientation (between fan and remote), but if your ceiling cables are short and plentiful, connecting to the mains can be a pain. With a light in the middle of a typical ring circuit you'll have nine wires from the ceiling, 3x earth/live/neutral, and a fiddly little chock-block to push the copper into. The chock-block is also a little deeper than most I've ever used, so if the stripped parts of your wires are in any way short, you might want to ensure that there is enough copper beyond the shielding before you try pushing them all into place and screwing them in. Things can get a bit tight and, for laughs, Westinghouse instructions just show single cables going into the chock-block!If you're installing the wireless remote, the next paragraph covers this, otherwise you can skip it.Installing the optional remote receiver (the part that goes inside the ceiling rose) ought to be easy, but in our case the bundle of wires exiting the ceiling was slightly obscuring the slot in the ceiling mount into which the remote receiver is pushed, so in our case it was a pain trying to get it past the bunch of cables, and because wires emerge from the unit on each side, it only pushes through one way. My advice would be to put the ceiling attachment in such a position that the wiring emerging from the ceiling comes up *beside* the mounting bracket and is positioned right next to the chock-block, and not through the hole in the centre of the ceiling bracket, and also to one side of the gap in the bracket into which the remote receiver is slotted. The large Westinghouse ceiling rose will be large enough to accomodate this.Some people have mentioned that it is a nuisance fitting the blades, especially fitting them last! Well, yes and no - there is a slot in the lowest section of the fan that allows a screwdriver to pass through to the fan disk (which isn't the bit with the light on it, but the bit above that), so provided you have a magnetic screwdriver that can hold the screw to itself while you feed it through the lowest section, you'll be okay. These screws are already in the fan disk and need to be removed, and then screwed back in when the blade has been positioned properly. With 2 screws per blade, this makes a fair bit of time working over your head. The blades have metal attachments that use the 2 screws mentioned to attach to the fan disk, and three more decorative screws per blade with very tight felt washers. These can take a while to prepare (threading washers onto the screws) so a willing helper can take that job on!2/ How it looks and worksIn situ, the completed fan looks great, with a contemporary look that is very easy on the eye. For something considerably larger than most ceiling shades, it does a great job of disappearing once you get used to it.It is very quiet in operation, although with my good hearing I can clearly tell whether it is running even with my eyes closed, even on the lowest setting. That said, it is an unobtrusive hum that could actually help people that are woken by the slightest noise because it raises the background noise a little and might hide a few of the quieter sounds.On the high speed setting the blade/wind noise is more than the motor noise - there is a distinct "rush" of air with the motor almost buried beneath it. It is still not overbearing, and may even help people drift off to sleep. If the unit is not mounted completely immobile, you may find that small imbalances in its rotation can set up rhythmic creaks. Ours does this a little on high speed, but we can live with this because the high setting would be very seldom used. Even the mid setting is rather breezy.The switchable direction for the fan is a stroke of genius for winter use, when heat gathers up at the ceiling and needs to be encouraged to circulate a little more.3/ ObservationsIf your remote doesn't seem to operate the light but runs the fan just fine, try switching on the light using the pull cord, after which you can use the remote for dimming.It is a bit of a bind that we can't carry on using our wall switch (until we get out an electrician to split the wiring and make it work that way), and I was a bit surprised that the lighting remote button didn't work until I'd pulled the lighting cord. It seems to need to be switched on by both the cord and the remote together.The bulb we fitted would also only be switched entirely off by the pull cord. Using the dimmer, the bulb (a LED dimmable one) would go to a minimum brightness and just carry on glowing if switched off, and dimming similarly went from bright to this muted glow, so for now we will need to use the pullcord until we figure this one out. Some dimmable devices have a "minimum brightness" setting that can be adjusted, but I'm pretty sure that this unit doesn't have that very handy feature.4/ Compatible bulb sizes.Some reviewers also complain that it is hard to find bulbs that are small enough. I've just installed a Diall E14 bulb bought from B&Q, which is 107mm end-to-end. This is possible because the glass shade has a wide point after which it narrows down into its inverted dome, and by angling the light bracket that holds the bulb so that it is inclined slightly down-angled from the ceiling, the tip of the bulb will fit into the shade at its widest point. Going anywhere beyond 107mm would be pushing your luck, though. It is a tight fit. We will look for an E14 bulb that is shorter and fatter next time, and will also see whether all LED bulbs have this problem of not switching entirely off on the Westinghouse dimmer remote. (See updates below)Sorry if this is all rather long-winded for you, but the laughable Westinghouse instructions really almost require consumers to fill in all the missing bits, and the tips & tricks.I will come back to this review after a summer of use and mention how we got along with it (gotta use these calendar apps for *something* useful!).Until then, stay safe.4/4/17 After two weeks of use the fan is now settled in. Initially it would cause creaking sounds from the ceiling on top speed. It no longer does that. Another aspect we noticed the first time we ran the fan together with the light is that there is light spillage up to the ceiling, and this causes shadows of the fan blades to flicker on the ceiling (the fan is on the short extension tube, not flush-mounted). While we were okay with this, we thought it should be mentioned since the subtle strobing effect could disturb some people who are sensitive to flickering light.18/4/17 Last update for a while. We ended up switching the LED bulb to a halogen one. Although the LED E14 bulb worked "okay", the only way to stop it glowing was to switch it off using the pull-cord on the ceiling unit. Couldn't be done from the remote, it would just go to a pale glow due to the efficiency of LED technology, which can produce viable light from the very tiny amount of current from a lighting circuit that is switched off! This was proving to be annoying, so we switched to halogen and the dimmer (remote) works a treat now. With the LED bulb, minimal settings were still putting out a lot of light, and switching off would still have the bulb glowing. With halogen, "off is off", and if we use the on/off button on the remote it comes back on at full brightness. If we switch back on using the dimmer button, it comes back at the last dimmer setting. Really nice to use. On the plus side, if you can live with the LED quirks, dimming the LED doesn't result in it flickering (we used a Diall E14 candle LED bulb from B&Q - we switched to Diall halogen at 107mm long end-to-end.Edit 2-Sept-2017: Still loving this unit, which has seen us through a few sultry summer days in quite a lot of comfort, even if it has sometimes meant interrupting things and going to the fan for a cool-down and a rest. We may need at least one more, maybe two, for other rooms. We thought we'd never have need of the most forceful setting but have used it now and then when we've woken feeling too warm - it knocks the heat back really well. Most summer nights we've left it on setting 1 and had a very comfortable time. It might actually be too effective to use in winter, when we like to move air around to keep the room feeling fresh.In the months we've used it I can't say I've ever forgotten that it is there, which I thought I'd probably do. It's very unobtrusive but still a bit of a presence in a low-ceilinged space (our ceiling is about 7ft 6in/228cm from the floor).The only possible gotcha with these units is the risk of inadvertently putting fingers or arms up into the fan disk. This might sound a bit suicidal - you might wonder why someone would do this. Just try pulling on a t-shirt nearby - it can be that easy to get your hands awful close to the fan disk just by doing something else that you do without thinking. If there's a risk like this, you might need to consider mounting the fan over something else that stops you standing anywhere near or beneath the fan. In our room the fan disk is about 6 inches in from the foot of the bed, which is also wide enough to keep us away from the blades from either side too, so we're okay. I've had a couple of close shaves though, so this is something that definitely must be borne in mind. It either needs to be mounted high enough to be out of reach of outstretched fingers, or sited so that you have advance notice that you're getting rather close to the blades. It's too easy to forget the fan when you're doing something familiar such as pulling on a shirt.Apart from that caveat we're still loving it.July 2021 - Heatwave. This fan has been wonderful during the heat warnings in the Southwest this year, and we're now very used to it. I've occasionally awoken with dryish eyes due to the breezes overnight, but this can be fixed either by using the winter setting (where it runs in reverse to push the warmer air at the ceiling down around the walls and onto you!) or arranging to sleep in a position that avoids you facing the breeze. During exceptional heat it's been a real pleasure to have had a damp flannel to hand, and dabbing on some water on face, shoulders, arms. The cooling doesn't last forever, but it does help to get skin temperatures down quickly.May 2024 - automation! With the arrival of a bit of light home automation we now switch and dim the ceiling light using voice commands. There is now also a greater choice of compact bulbs on the market, including small more spherical ones that fit more comfortably inside the glass diffuser/shade. You would still need a remote for the fan if you didn't want to use the pull-cord on the fan itself.It's safe to say that we've never once regretted installing this fan, and if the climate carries on as it is, we may install others in other rooms.
G**Y
Easy to Install
Bought this item to replace a previous ceiling fan that had expired. The instructions are clear and the assembly is straightforward as long as you follow them closely. The ceiling bracket is easy to fit and because the mounting comes with connectors you don't have to mess with the heavy assembly while you are setting up the bracket and electrical supply. I used the ceiling rod as some reviews had reported noise issues with mounting against the ceiling directly. I am 6ft tall and even with the rod installed the fan cleared my head. Assembling the rod and preparing the fitting is very easy. Once you are ready to install the fan it just slots into the bracket and you connect the power and earth supplies. There is a neat hole in the light fitting to pass through the screws for the blade assemblies. Having a magnetic screwdriver really helps here when attaching the blades and it was relatively easy. Some other reviewers suggest attaching the blades before mounting to the bracket and this may work better for you if you have a high ceiling or access issues.Once the blades are on (follow the instructions to get them the right way round, it is a moment's work to put int he bulb and pop on the shade cover. Finally add in the decorative chains stamped with a light and fan symbol and the job is done. We found the fan to run surprisingly quietly on all three fan settings although one observation is that the difference between high and low fan settings is not as great as it could be. We have been running the fan on low throughout the night and despite being a light sleeper I found the noise on the low setting unobtrusive. All in all a very good product which is well made and is very effective.
S**N
Excellent fan; bit of work required to optimise installation. Installation instructions OK but could be better.
After a couple of problems with ordering this the fan arrived this morning and is now in place and working. Unfortunately the Westinghouse RF Remote which I had ordered with the fan did not work so I am now waiting for a replacement remote. The fan itself is a very neat unit, well suited to the small double bedroom where it is installed. There is a bit of mains hum in evidence whilst the fan is on, this is independent of the fan speed setting and the installation instructions say this should disappear after a 24hr running in. There are no rattles or noises other than that.Installation was simple once a suitable joist had been located and wires from the previous ceiling rose were drawn through. The installation manual is multilingual so there is a lot of flicking backwards and forwards. It pays to read it through before you start though. I decided to fit the blade mounting brackets to the main assembly before attaching the unit to the ceiling as this seemed more sensible than working upside down at a later stage. I followed the example of a previous reviewer in adapting a 5w led candle to fit the small screw light fitting; this doesn't give enough illumination for a primary light source in the room but no doubt purchasers will make their own decisions on lighting options. In a bedroom where the light is not on for long periods a led bulb is only going to give a modest saving in monetary terms and, assuming that I get a working remote, which has a built in dimmer, I may well opt for a halogen bulb.Later- Amazon replace the faulty remote and this is now installed and working. As anticipated, the light dimmer control is not suited to led lamps. On the plus side, the fan control electronics seem to reduce the operating hum quite significantly. I also added some noise absorbing pads on top of the mounting plate and thick rubber washers under the mounting screws so the fan is now virtually silent apart from the actual airflow.Had this been achievable on the initial installation, I would have given 5 stars.
Trustpilot
Hace 4 días
Hace 3 días