Desert Online General Trading LLC
Dubai, United Arab Emirates
Desert Online General Trading LLC
Dubai, United Arab Emirates


🛡️ Secure your space with strength and style—grab bars redefined!
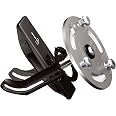
The MoenSMA1005CH SecureMount Anchor is a precision-engineered metal anchor designed for easy, stud-free installation of grab bars. Supporting up to 300 lbs, it features a sleek chrome finish and compact design, making it a reliable and stylish safety solution for any bathroom. Backed by a limited lifetime warranty, it ensures durable, worry-free use.


| Brand | Moen |
| Material | Metal |
| Color | Chrome |
| Item Weight | 136 Grams |
| Style | Transitional |
| Finish Type | Chrome |
| Weight capacity | Minimum weight: 300 Pounds |
| Global Trade Identification Number | 00034584017628 |
| Manufacturer | Moen Incorporated |
| UPC | 034584017628 |
| Part Number | SMA1005CH |
| Item Weight | 4.8 ounces |
| Product Dimensions | 7 x 2 x 9 inches |
| Item model number | SMA1005CH |
| Is Discontinued By Manufacturer | No |
| Size | 1 Count (Pack of 1) |
| Finish | Chrome |
| Item Package Quantity | 1 |
| Maximum Weight Capacity | 300 Pounds |
| Number of Handles | 1 |
| Mounting Type | Wall |
| Included Components | Anchor |
| Batteries Included? | No |
| Batteries Required? | No |
| Warranty Description | Limited Lifetime Warranty |
W**L
Worked well and very sturdy.
First class anchors for a tile surround over sheet rock. Very sturdy and easy install. Note if using Moen bars, you don't need the plates that come with the anchors. It is rather obvious but the instructions on neither product show that. Do yourself a favor and order the exact hole saw you need especially for tile an start your hole with a small bit to make sure you aren't over a stud. Would definitely use these again. Good design, good product. Suction cup grab bars are evil and should not be used anywhere.
R**C
Works great, very secure.
I follow the direction and youtube videos. I drilled tile with correct hole cutter and sheetrock. It all went well, the tile is slow so be patient. Installing the anchor is straight forward. Installed the bar, had to open the screw covers a little, The anchor seen very strong, it has made a big difference for us. The 1st was so strong I ordered a 2nd set for another bar. I do recommend.
L**O
Right Tools, Good Planning, Measurement Twice and Twice Again Thin Cut Once
Why did you pick this product vs others?:Firmly holds the grab bar.Build quality:Solid construction.The Instructions are good - read them several times. Gather the right tools. For a tile wall you should use a stud finder with deep penetration ability if you're on a tile or porcelain surface; these are available that also indicate if wiring or piping are close behind the wall. Use a diamond hole saw (with pilot drill) even on ceramic tile and especially on porcelain. I've installed three grab bars so far and my diamond bit is still cutting and should be good for at least a few more cuts; cool the bit with water a couple of times on each hole you make. I encountered an obstacle on one hole and had to insert the Securemount with arrow pointing horizontal; once in place I was then able to rotate the entire assembly to get the carrier arrow pointing vertical as required. In other words, be ready to adapt and overcome. Be sure to cover the drain with a cloth rag - you WILL drop parts, guaranteed.
V**T
Metric screws, M5-.80x10
I got 2 of the Moem Securemounts to install a chrome grab bar from Delta on a wall between studs. The Moem mounts have a flat aluminum plate that’s threaded to accept the supplied truss head machine screws. However, the mounting flange on the Delta grab bar is fairly thick with countersinks on the mounting holes meant for flathead screws, so the heads of the screws supplied with the Moem mounts protruded from the surface of the flanges. Even without using the supplied split ring washers the covers on the Delta bar stood about 1/8” away from the wall this way. I took one of the screws to Lowe’s and matched it up with a screw gage they had there, and they’re metric, M5-.80. Fortunately they had a pack of M5-.80x10 oval head screws, Hillman brand, that worked much better for my application. Now the covers for my Delta grab bar fit much closer to the wall than before with just a tiny air gap. I hope this is helpful for others who may need different screws than the ones that come with the Moem Securemounts. The mounts work perfectly and were easy to install.
D**N
Nice mount for grab bar
Installed successfully in a wall that had the required void in the wall, I think 3.5 inches. When installed, the grab bar felt sturdy enough. The only problem was the the holes in the grab. bar did not match the holes in the mounting plate.. I doubt know which was wrong, the grab bar or this item but it needed some enlarged holes in the grab bar so the screws holes would match up.
A**N
Strong, perfect match
You cannot beat these for installation of Moen grab bars on hollow walls. I've done 18 of them on 9 grab bars in 2 baths and showers. (Both sheetrock and ceramic tile over green board walls). They are a bit pricey but work flawlessly and are many times stronger and more secure than typical sheetrock wall anchors. READ THE INSTRUCTIONS though!
J**.
Rock solid.
Very much worth the costs! Installed thru existing tile. Engineering of this is amazing. Very easy to install. Imagine a toggle bolt 1.5" wide x 2" long behind the wall. Solid.
P**E
Works well in a fiberglass walk-in shower enclosure.
Great product
Trustpilot
Hace 3 semanas
Hace 2 semanas
Hace 3 semanas
Hace 3 días