We remain fully operational. Our teams are working around the clock to ensure your deliveries continue safely.

Descargar la aplicación


Servicios al cliente
Sobre nosotros
Copyright © 2025 Desertcart Holdings Limited
Descargar la aplicación
⚡ Level up your 3D prints with precision and ease — don’t get left behind!
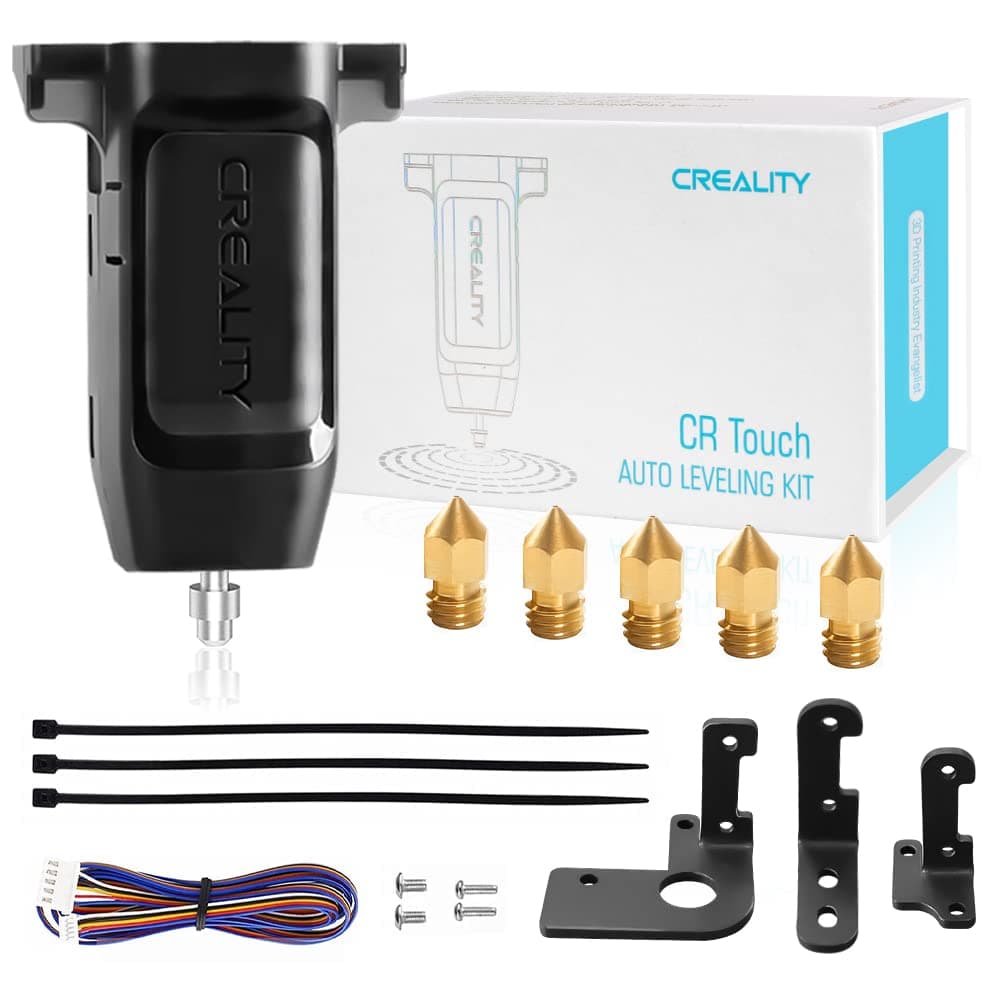
The Creality CR Touch Auto Leveling Kit revolutionizes your 3D printing experience by automating bed leveling with multi-point detection and smart compensation. Compatible with popular Ender and CR10 models using 32-bit V4.2.2/V4.2.7 motherboards, it offers durable performance for over 100,000 uses and supports a variety of print surfaces. Easy firmware updates and included mounting accessories make installation straightforward, eliminating manual bed leveling hassles and boosting print reliability.


| Best Sellers Rank | #10,808 in Industrial & Scientific ( See Top 100 in Industrial & Scientific ) #146 in 3D Printer Accessories |
| Brand | Creality |
| Color | Black |
| Compatible Devices | Ender 3/Ender 3 V2/Ender 3 Pro/Ender 3 Max/Ender 5/Ender 5 Pro/CR 10 with 32bit V4.2.2/V4.2.7 Mainbaord Compatible Devices Ender 3/Ender 3 V2/Ender 3 Pro/Ender 3 Max/Ender 5/Ender 5 Pro/CR 10 with 32bit V4.2.2/V4.2.7 Mainbaord See more |
| Compatible Material | Glass, Metal, Plastic |
| Customer Reviews | 4.4 out of 5 stars 1,093 Reviews |
| Item Weight | 0.13 Kilograms |
| Material | PEI, Sticker, Glass, Metal |
T**N
Works well. Creality Firmware (Ender 3 Pro, v4.2.7) required for it has issues.
Easy enough to install. Have to route a long cable through the umbilical sleeve to the head, but easy enough if you’re patient. This takes the place of the Z limit switch, so that switch can be removed entirely if desired. The firmware for your board has to be downloaded from Creality and updated. My issue with this firmware is that frequently the board resets to defaults when turning on now so everything has to be reset. The menus come up in Chinese when that happens so you know your settings are gone. ( This happens every few restarts) Also when it happens, the Z offset has to be re-programmed. I finally just wrote down the values and re-enter the values without going through the whole process now. That’s my issue with the kit. Other than this, when everything is working correctly, the auto-leveling works great. I don’t have to manually re-level the bed every couple of prints now. Worth the money for the upgrade, IMO. Just wish the Creality firmware issue would get addressed.
C**4
This was a great purchase.
Worked well with my foxnovo ender 3 printer i have updated all parts on it this helps with the leveling if the bed has made my prints come out way better and more reliable. You just need to make sure you get the right software for the system you have.
P**I
Failed at 25 days. Update: Support replacement on the way...
Update: Contacted Creality Support, submitted information about what happened with a video of the issue, they are sending a replacement. My other one is working fine. So I'm sure it was just the luck of the draw. It is a little different leveling, and I still recommend a manual level, and switching out the springs for spacers. I have two of these on two different printers, one failed functioning at probably 25 days, but I did not identify it until I replaced the motherboard about 5 days later thinking there was a problem with that. A little bummed. It is a process to refresh the firmware on your printer. I think I had a faulty original 4.2.2 motherboard too which may have lead to the failure. Either way, not a bad price, but as for reducing leveling workload I think there is not a time savings just a different way of leveling, and I still don't trust 100%, as I like to level manually once in a while and use spacers instead of springs for a more stiff and level bed that is less likely to shift.
M**Y
Physical installation ok but instructions and Creality firmware problematic
I had previously upgraded my Creality Ender 3 Pro to the 4.2.7 control board so I already knew how to open up the control bottom plate. As a result of that experience and by watching several on-line videos about the CR Touch installation I found the physical installation of the CR Touch to be quite easy. Trouble begins soon after. I downloaded the correct firmware for the BLTouch (yes even though it's a CR Touch) and it loaded right up on the printer but I noticed Chinese characters on the bottom of the Info screen and fully Chinese on every other screen. This is a 2 year old printer so I have the original small display not the touch screen display. You have to press the button from the Info screen and scroll down to the next to last line and press to reveal the other language choices. After that, the screens don't agree with the small instruction booklet that came with the kit or it's bigger on-line version. So it takes some effort to find the various items that you'll need to access in order to calibrate the CR Touch. After alignment my initial impression of the performance is excellent. Remember to add the G29 command to your slicer and the printer will do a bed leveling prior to every print. It seems to work very well based on my 2 day experience. Sadly, the firmware regularly crashes. You know it crashed because you'll see some Chinese characters on the display. After a crash it forgets the language and it forgets the Z Offset that you entered. You will have to redo these two items. On-line research led me to the Marlin Firmware site where you can download their version of the firmware. You have to register on the site. They request a donation but I understand that you can enter zero. There are some minor differences between this firmware and the Creality firmware but I've been using it for another whole day and it has not crashed. When you use this new firmware or probably the Creality firmware as well, you must try the load filament feature. Sit down and enjoy.
A**.
Easy Installation, Beautiful Printing, Saves Time!
Before I was spending an insane amount of time leveling my bed manually, checking so many various spots… never again. I installed the CR Touch, leveled four corners manually, auto leveled, and conducted a test print. Everything came out perfect. I have my printer settings so it auto levels before every print now. The install was a breeze. Make sure you check your motherboard before purchasing and installing. If two hours of time is worth $38 dollars, this will pay itself off QUICKLY. Get your time back.
J**N
Does not work with Ender 3 Pro and Creality customer support is just terrible
I bought this because my Ender 3 E, which has one pre-installed, works really well. The auto bed leveling on that printer works great and. But when I got the CR touch for my Ender 3 Pro, that's when the disaster started. First of all, for those of you familiar with Creality products, you will know how terrible their instructions are and they often have incorrect information. And what's with the super tiny print! The CR touch instructions are not the worst, but they are full of inaccurate information. Next, the install is not super difficult, but you have to go online to find some pictures so you know the correct cable to unplug from your motherboard when you plug in the CR touch. Mounting it on the print head assembly is fairly easy. The firmware update process is straightforward, but don't look for CR touch firmware, there is none, you have to use the BL touch firmware. It's the calibration step where everything just went completely off the rails. After you install the CR touch and do the manual bed level, you have to set the Z axis offset so the CR touch knows exactly where the nozzle needs to be. The CR touch unit would never properly adjust for the Z axis offset. If I manually moved the Z axis to 0 with the offset applied, the nozzle is in the correct location, but when the CR touch went to do it's bed level, the print nozzle is too high and no matter what I set the Z axis offset to, the CR touch unit ignored it and had the exact same spacing between the nozzle and the bed, which was approximately 1.5 mm too high. The result was failed print after failed print because the CR touch was telling the print head that the proper Z axis position was wrong. I emailed Creality support, and in typical fashion they wanted photos and videos and all other manner of proof that the printer was doing exactly what I described. They never actaully address any failures, they just continue to ask for additional information until the customer gets frustrated and just gives up trying to get resolution. And how exactly am I supposed to send a 5 minute video showing the failed calibration? This is not my first 3D printer. I have several FDM printers and a resin printer. And my Ender 3 pro works very well with manual bed leveling. I was adding the CR touch module so I would have to adjust my bed level a little less often, but the CR touch is a complete failure on the Ender 3 pro. I don't know if it's the CR touch or something in the firmware, because the printer doesn't seem to take the home position offests either. But either way, Creality support seems unwilling to help resolve the issue so I am returning my CR touch and providing this warning: IF YOU HAVE AN ENDER 3 PRO, THE CR TOUCH WILL NOT WORK!
T**L
Stop reading, just get one
Probably the best upgrade for an Ender 3 Pro that you can make. I avoided getting one for a couple of years because my printer was working "well enough" and I didn't want to disturb it. Prints in most areas of the bed would be fine, but there were a few spots where I always seemed to have problems. Obviously the bed was warped, but it usually wasn't much of a problem. Eventually I had a major failure requiring replacing the bed surface and replacing the nozzle, so since I was going to have to recalibrate anyway I got the CR Touch to install at the same time. Installation was no big deal and doing the firmware upgrade was easier than I expected. Figuring out the UI changes was a bit annoying (all the old options are still there, but the menus are different), but running the calibration is simple. What I wasn't expecting was how much better my prints would end up. Post calibration the printer compensates for the bed warp by moving the Z axis to maintain a constant distance from the print bed to the nozzle anywhere on the build plate. Now everything is just press print and go instead of having to tweak the bed height based on where on the bed the print will be. Wish I would have bought one years ago.
D**Y
Bit of a hassle to install, but 100% WORTH the effort
So I've been printing with my Ender 3 for 6 months or so, and I've gotten decent at leveling the bed and dialing in the nozzle distance, but even still, my prints were coming out somewhat uneven or flawed more often than I'd like. I was getting frustrated with having to relevel the bed every single time and then finding that tiny variations in in the springs, temperature, etc. were messing up my prints, so I decided to invest in this auto-leveler. As others have noted, the installation process is a little involved. No step is particularly hard, but differences between different machine models and the somewhat vague instructions provided make it harder than it needs to be. There's some very good video tutorials available on Youtube that I'd recommend you use. After getting it attached to the machine, it took a few bed leveling test prints before I got the z-offset for the probe dialed in. Once dialed in though... I witnessed the best first layer I've ever printed. Picture shows one corner of the bed leveling test; a single layer (.2 height) square, with a perfectly uniform surface and thickness, and sturdy like a piece of cardstock. Beautiful! You might have to adjust the offset by a few points each time you print, but this is much easier than leveling manually. Even if you're a pro at bed leveling, I can't imagine the newfound ease provided by this tech wouldn't make you ecstatic. Buy it! I'm looking forward to printing new things more than ever. EDIT: My unit suddenly had a failure after about four months, where it would just fail to auto home or level. Contacted Creality and they quickly sent me a new unit for free. I just swapped out the probe and it was back to working perfectly! Great hassle-free customer service!
Trustpilot
Hace 1 semana
Hace 1 semana