💅 Elevate your nail game—strong, stylish, and salon-worthy at home!
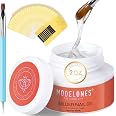
The Modelones Builder Nail Gel Kit features a 56g clear hard gel with a toxin-free, botanical formula for strong, flexible nail extensions lasting over 21 days. It includes 100 dual forms for versatile shaping and a premium dual-use acrylic brush with a dotting tool for detailed nail art. Designed for professional-quality manicures at home or on the go, this kit ensures long-lasting shine, durability, and a low-odor, safe application.
B**N
Takes time but worth it!!
I watched a utube video how to place stickers on nails I was able to get length I wanted it was very easy to do. If it's tacky use alcohol wipe. I thought it wasnt curing, it was. Then file Because first time it was all over place. I'm sure more I use the better I will be and they lasted 2 weeks came off easily. Didn't effect my nails at all as acrylics and press ons do. Worth it! If you want to protect your nails and have length this is it! Dip your brush in acetone often so it doesn't get hard. You can move it around more easily. If it's thin just add more to it.
W**M
Super Strong
As others have mentioned, this product is VERY sticky. If you have alcohol you can wipe down your brush and anything that gets sticky.I had tried soooo many products to find something that would make my natural nails stronger and LAST. I tried dip powder, gel polish, natural nail polish, and the list goes on. I had never used hard gel before this. It is a learning curve but once you get it holy cow!!!I watched a ton of modelone videos to make sure I was doing it properly.This cannot be emphasized more… you HAVE to properly prepare your nails or you won’t get a good result. I bought all the modelone products. The hydrator, the primer, base and top coat. You most definitely will need a nail drill for this product.My best friend used to be a master nail tech and I learned a few things from her. To get a good bond for nail tips, you need to rough up both your nail AND the underside of the tip. You also need to put nail glue on both your nail and underside of the nail tip. Hold in place for a few seconds and then use an orange stick to press the edges down for a few seconds. Then add another line of glue on the smile line of the tip. Once the glue dries, you can file it smooth before adding the gel. You do not need a base coat if doing builder gel. I actually think it holds better without.Something that people forget is to do a slip coat before putting on the larger gel layer. Just means you put a really thin layer on like you would put on polish. It makes all the difference in being able to manipulate the gel. Once you get the gel on, turn your nail over and let it hang down a bit. That will allow the shape to be natural and not be a flat mess. Use another smaller brush to clean the gel off the edges around the skin. Turn your nail over again and then quickly cure for 60 seconds. Look up YouTube tutorials on how to do this. You’ll thank me later. I’m to the point I can do my thumb first then all the rest of my fingers at the same time. As a beginner you may need to do one nail at a time to start.If you aren’t pleased with the smoothness of the gel coat, use alcohol to rub the nail, let dry a few seconds, then use a file and rough buffer to smooth. Then apply the top coat and cure another 60 seconds. If you want gel color over the tips, use the base coat, cure, two-three gel color coats, curing each coat, then top coat and cure.I have found not only do my gel nails and tips not pop off, but just like acrylic, I just grind down the hard gel and fill about every 3 weeks. This stuff is the final product I’ll ever use to do my own nails!!!! Be patient and practice. Definitely worth it if you love doing your own nails!!UPDATE: It’s now November 5th and my tips are still holding strong! I’ve done one fill since I initially did them and filed them back shorter. They look like they were just done.
S**R
It’s good but the packaging was terrible
The product itself is good. It does what it was meant to do which is be a hard gel/ builder gel. On the other hand though this is my first time trying out modelones and I’ve heard great things so I was excited to try out a product only to be super disappointed in the packaging … I opened the jar with difficulty due to what seemed like a stickyness just to find that there was product all along the lid and rim and inside of lid yet there was still a seal still on the actual product so I’m unsure how there was a mess of product if there was a seal. The product itself seemed not so full as well even though it was still sealed so I don’t know if somehow some product made a mess before it was sealed but it just made for a disappointing experience with the lack of gel and trying to clean up all the mess on the container before even being able to use it. And anyone who uses gel knows how much of a hassle it is to try and clean. Just wish it would have been better for such a well known and highly rated brand😔
C**L
The gel itself works well, I don’t love the forms
Everything about this product is sticky lol.I got three of these on accident, and one of them leaked during shipping, so I’m sending that one back. I put everything in an additional baggie and wrote a note for the people at the Amazon store to not handle it without gloves and to thoroughly clean with rubbing alcohol and then soap ASAP if they get it on their skin. You should do the same if you get any on your skin.All three items (gel, brush, forms) come in a little foil bubble mailer, which has very sticky adhesive. Honestly I would open it with gloves on, the adhesive for the mailer gets all over your hands and just in case yours leaks too.The brush: 2/3 of them came bent because the mailer is a little too small for the brush’s length. But it’s easy to fix this with hot water as another reviewer said. Another one came straight. I didn’t mind the curved brush though, it was kind of nice to scoop some product out, and it eventually relaxed on its own. I made a little tin foil brush cap for it while not in use, it remains a little sticky even with alcohol cleaning.The forms: I don’t love them, they require more precision than the other types of forms you typically see that have additional material on the bottom. So that forces you to pinch a pretty narrow nail. I tried a few out and it takes a little bit of fiddling, maybe it would be easier to use these if you’re doing someone else’s nails and can really get a good look and use both hands, but for DIY it’s finicky. They’re also pretty thin so definitely stick the cutout circle underneath for extra stiffness. I have narrow nails so I could make it work but I don’t really want or need to get used to it since I have plenty “regular” forms. If you’ve never used forms before you could probably learn how to use these and get used to them, but on the other hand if you’re having a hard time then try some regular forms and you should do better.The gel: I’ve never used gel before. I just started using polygel 3 weeks ago, and I got this gel because it was on sale. I much prefer this to polygel now even after only one use. I love to change my nails frequently, once a week if possible. This gel is more economical than polygel, and also will last longer since for me at least it’s easier to get a more precise extension that requires WAY less filing, so I’ll use less product overall.The gel is very clear, much more clear than any polygel can get. Its easy to get rid of bubbles if it’s warm. Cooling the gel down makes it stiffer (thus preserving bubbles in place), which would be good for textured nail art. It has a pretty thick consistency, and sticky. I don’t know how this one’s texture compares to other types of builder gels, but it was tolerable once I practiced a bit. It cured pretty well with the tiny Modelones lamp I got in a polygel set, but I have a feeling a stronger lamp would be better. I don’t have other builder gels to reference but the sticky layer on this was sticker and thicker than my polygel’s so that was interesting. The nails still cured though, and are very strong, I would say just as hard as polygel, so that’s good.My nail photo: the two on the left, the amethyst and the beach nails I did with this gel, my first time. It was super easy once I got the hang of it. The actual extensions were built with a very similar shape to the final result, which saved me time too. As you can see from the bottom of the amethyst nail that portion is very clear. I tinted it purple with some alcohol ink.The two nails on the right were done with polygel and dual forms. It may be my last polygel set, builder gel with paper forms is just so much easier and quicker for me. I don’t need my nails to last 4 weeks so I don’t need the longest lasting product.Removal: If you like to change your nails frequently, get some peel off base coat. It was easy to pop off some trial nails in one piece with that. On my left hand I removed a longer extension by soaking off (no peel off base coat). I have no experience soaking off, so o don’t know if it’s the gel or my acetone is too weak (probably), but it took longer than expected. For best results cut off as much length as possible, and file down as much as possible without filing the natural nail. The thinner the gel extension the less product the acetone has to dissolve. I used cotton pads soaked in acetone, then wrapped in plastic wrap to keep the acetone from evaporating. Applying heat also helps speed up the solvent action. I just sat on my hand but it would be easy to also get a dish of warm water to soak the wrapped finger in. Also be careful to only try to lift the the gel once it’s totally separated on its own. I accidentally caused some peeling of a top layer by removing a not totally softened patch of gel.
Trustpilot
Hace 2 meses
Hace 3 semanas