🏡 Elevate Your Entryway with Style!
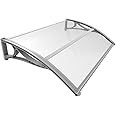
The VOUNOT® Front Door Canopy is a versatile outdoor awning designed to provide shelter from rain, snow, sun, and wind. Measuring 200 x 80 cm and weighing just 4.3 kg, it features durable polycarbonate sheets and a lightweight aluminum frame, ensuring both strength and aesthetic appeal. Ideal for various installations, this canopy combines functionality with modern design, making it a perfect addition to any home.
Product Dimensions | 80 x 200 x 23 cm; 3.5 kg |
Part number | 4442185695255 |
Item display length | 200 centimetres |
Item display width | 80 centimetres |
Material type | Polycarbonate Aluminum Acrylonitrile Butadiene Styrene |
Manufacturer | VOUNOT |
Item model number | 4442185695255 |
ASIN | B088ZYR1CW |
I**H
A good easy to install, fiddly to assemble, canopy great when fitted
This canopy is good value despite being all plastic construction the support frame is very rigid and light. Assembly is easy but here is the only problem I found especially if you don`t have an assistant to help you.I put up the centre support and assembled each of the end ones onto the perspex roof and secured them using the supplied screws in the ends, the plan was then to slide eachg side onto the already mounted centre support and secure in the holes I had already drilled, this was when the problem began. I bent the roofing material into the support but everytime I went to move the outer end it would pop back out again and again before I could secure the first bolt, so I took down the centre support assembled the whole canopy on the ground and drilled in 4 stainless steel self tapping screws (see photos) through the centre support to joint the two half together. After doing this the whole canopy was one piece and fairly strong, but a little bendy. I put the whole thing back up using the centre support first then each end in turn it was very easy once the canopy was in one and wasn`t constantly popping apart. Also the additional two screws I think will give added procetion to the joint in even the strongest of winds.The anchor bolts that come with it are sturdy but I was fixing into a timber structure so opted for coach bolts instead but the supplied fixings look like quality anchor bolts.As for strength well winter is coming and so will the winds I shall have to see how it fairs, that being said I think it will stand a pounding by strong winds - will let you know next summer.All in all for the price a sturdy, well made peice of kit.It is December now and we have had some 70mph plus gale force winds and the canopy has with stood them no problem at all.
H**O
Patio Door canopy that is very good quality and reasonably priced.
I am very impressed with this door canopy as it covers my patio doors and it was relatively easy to assemble too. I paid just under £60 and I believe it is very good value for money.It is very sturdy once installed properly on the wall with provided anchors. I used my Bosch GBH 2 26F SDS drill machine and Bosch Expert SDS 10mm bit and it was easy to drill into bricks. I did have a piece of wooden batten length leftover from my Trellis so I marked the holes on wood while the assembled canopy stayed on ground and then drilled through the wooden batten to create a template. Once all the holes lined up on Batten, it was easy to mark up the exact location of 6 holes needed to mount it on the wall.Used a mallet to drive the anchors in the wall starting from the middle bar of the canopy. I used my Amazon Umi Spanner rachet set to tighten the bolts. After that just put those plastic caps provided to hide the bolts. Job done in an hour not including the hour for assembly. So for two hours of DIY, I have a very stylish and sturdy canopy sheltering my patio doors from rain and snow, what more you want.I would definitely buy more for my windows in few weeks time.
M**J
Easy to fit for anyone with DIY skils
It was easy to fit. I didn't need the instructions. It was slightly too big for what I needed but ordered it anyway. It was easy to trim down to size as long as you have some tools and a bit of knowledge.Only comes with brick fittings but I guess that's the most common use.Cheap quality as expected for the price but it seems ok and decent value
D**Y
Relatively straightforward to install depending on your DIY experience.
Excellent door canopy with heavy duty metal masonry anchor bolt fixings. 10mm diameter hole 80mm deep/long is required to be drilled to accommodate the fixings.
T**H
Looks great sprayed anthracite + fitting tips (2hrs)
Needed a cover down the side of the house this was the perfect width and height. Fitting it together is pretty straightforward but weirdly there are no fitting instructions, only assembly instructions. Took me approx 2hrs in total and I am not a prolific DIYer by any means. You need: a half-decent drill, 6mm bit (ideally), 10mm bit, spirit level, marker pen, hammer, ratchet spannerBut here are some tips:1. Spray the light grey brackets an anthracite colour. Then obviously let it dry before assembling. Personally I think they look much better than light grey (black may be fine but possibly too dark).2. Assemble the whole thing first before even thinking of fitting the brackets on to the wall.3. It definitely helps having an extra pair of hands to hold the last bracket as you fit the curved roof section onto it as you’ll need two hands to bend the roof.3. Fitted on a brick wall I used the mortar lines to see if it looked horizontal4. With another person holding it mark all the lower holes with a marker pen5. I found the width of the instructions the exact vertical distance to the upper hole so marked them using a spirit level6. Use fellow buyer Martypants’ advice of WD40 on the screws to prevent any chance kf them threading or getting stuck7. Screw the end fitting to the bolt - if you don’t thee is a chance you will lose it in the wall8. Hammer a nail in the wall first to make an accurate drilling mark9. Use a 6mm masonry bit to drill the hole depths (the lower holes are shorter than the upper holes)10. Then use a 10mm bit to drill out. Try not to go over 10mm (see below)11. Place all the bolts through the bracket holes and position them in (another person helps here)12. Push the bolts in and then gently tap them in13. Screw all the bolts in with a ratchet spanner - the middle one is a pain as you don’t have a huge angle to work with but persevere! The end fitting slowly moves up through the bolt casing inside the wall pushing it outwards thereby ensuring a good firm grip so try not to drill any more than 10mm wide!14. When sprayed anthracite I didn’t put the plastic bolt covers on as the bronze bolt covers looked auite good against the dark grey.15. For a complete finish add a non-removable wall anchor if securing bikes and solar-powered security lights
Trustpilot
Hace 1 día
Hace 2 semanas