We remain fully operational. Our teams are working around the clock to ensure your deliveries continue safely.

Descargar la aplicación


Servicios al cliente
Sobre nosotros
Copyright © 2025 Desertcart Holdings Limited
Descargar la aplicación


🔥 Keep Your Cool, Stay Ahead!
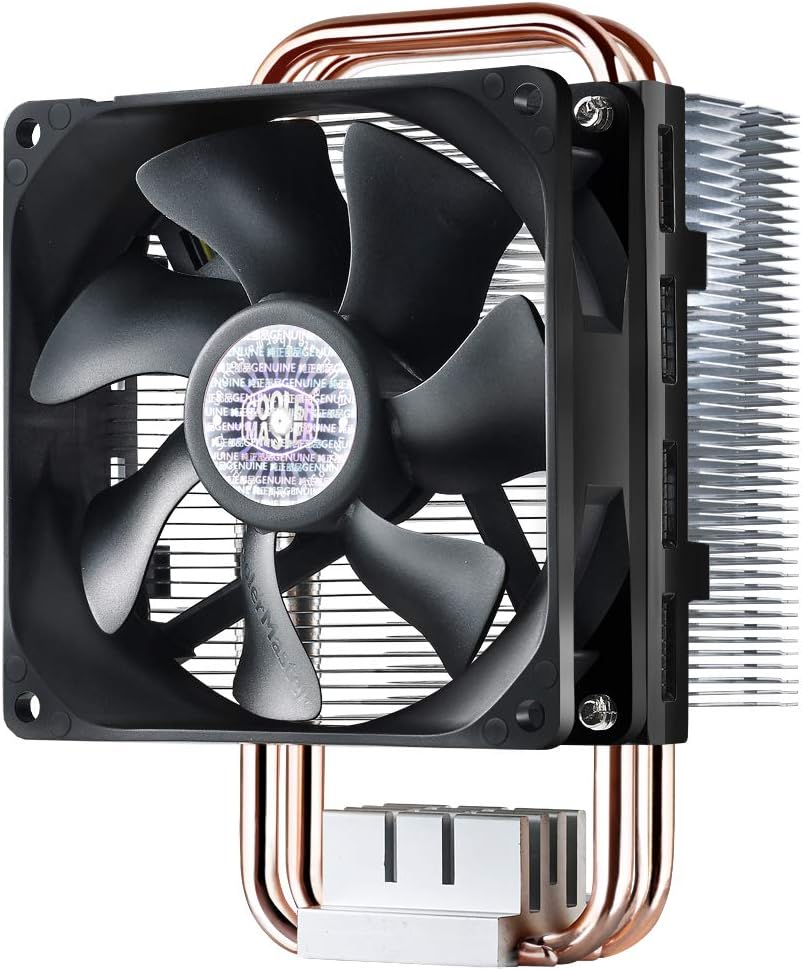
The Cooler Master Hyper T2 is a compact CPU cooler designed for optimal performance with a patented dual loop heat pipe system, ensuring efficient cooling for both AMD Ryzen and Intel LGA1151 platforms. With a noise level of just 35 dB and an airflow capacity of 54.8 CFM, it combines power and tranquility, making it the perfect choice for professionals seeking reliability in their desktop setups.


| Product Dimensions | 3.7"L x 2.36"W |
| Brand | Cooler Master |
| Power Connector Type | 4-Pin |
| Voltage | 12 Volts |
| Wattage | 3.12 watts |
| Cooling Method | Fan |
| Compatible Devices | Desktop |
| Noise Level | 35 dB |
| Material | Aluminum |
| Maximum Rotational Speed | 2800 RPM |
| Air Flow Capacity | 54.8 Cubic Feet Per Minute |
| UPC | 884102026317 |
| Global Trade Identification Number | 00884102026317 |
| Manufacturer | Cooler Master USA, Inc. |
| Number of Items | 1 |
| Item model number | RR-HT2-28PK-R1 |
| Item Weight | 12 ounces |
| Item Dimensions LxWxH | 3.7 x 3.1 x 5.5 inches |
| Color | Non Led |
| ASIN | B00K7809O2 |
| Is Discontinued By Manufacturer | No |
| Date First Available | May 8, 2014 |
D**H
Very nice fan, installation instructions are not for the first-timer, though.
OK, so it's kind of stupid to review something the day you install it, so take this with a grain of salt.My review will simply be about the installation process.Cooler Master's "instructions" for installing this fan are basically a bunch of pictures... not photos, just diagrams / drawings. If you have NO experience in dealing with or installing motherboards, then you probably will need help installing this fan onto the motherboard. Thankfully, there's Google and Youtube.I have installed mothboards / built computers three or four times, so I was pretty confident I could do the job. However, I'd never upgraded a CPU fan before, certainly not with one this massive.At one point, while following the instructions, I was confused by a photo. It seemed to suggest I should be using 4 screws to screw a bracket onto the board. The screws were supposed to come up from below the board, but it did not indicate which included screws those were. They didn't seem to be included at all. I thought perhaps they came from the current / old bracket that the old fan connected to on the motherboard, since I'd had to remove that earlier.It was only when I googled for instructions that I realized that a nearby photo that I thought I understood and kind of ignored.... showed that I was supposed to be installing a different bracket on the BACK of the motherboard first and I needed to attach that piece with the four screws I already had associated with it. So, it was partly my own fault, but it was also the fact that one or two drawings were unclear. A few words would have helped.But once I got past that hurdle, there was another one that had me scared at first: Would the RAM I was using "be in the way" of the fan, when I tried to install this fan inside my new Cooler Master Mastercase 5 on an MSI AM3 motherboard? I had asked questions here on Amazon about this. It was suggested that I measure the available space inside my case carefully. Well, I would have had to use a caliper to measure in order to predict how close this was going to be!First, I removed my RAM and finished adding the fan to the front of the heat sink. Then, I tried putting the first / closest RAM chip back. And, honestly, it was such a tight squeeze, I wasn't certain that the chip would be able to go into the slot. It seemed like I would need to bend the chip away during installation... that the fan was jutting out that far. However, with a bit of care, the chip went in. But, literally, THERE WAS NO WIGGLE ROOM. The RAM chip is basically AGAINST the front of the fan. I'm slightly concerned that if the fan ever starts vibrating, for whatever reason, the RAM will be vibrating too. But honestly, I don't see big odds of that happening.I'm including some photos of just how close the fan is to the RAM. Note that my RAM is a bit taller than most, because it seems like the RAM manufacturers put some sort of fins on it, probably to help with heat dispersion.Anyways, despite these minor issues, I'm still giving this fan a 5 star rating... because I'm very pleased with the price vs. value that I believe I am receiving. Initial stats suggest my PC is running about 10 degree Celsius cooler than before. And I've got a pretty LED too to go with my new Cooler Master Case (which, by the way, also came with drawings / diagrams-only instructions.)Thank you to all previous purchasers and their reviews! It's nice to buy with confidence!
J**.
Hyper T2 Specs and Review -- great value for the price!
I just got this and installed it today, but I wanted to write this review to answer all of the questions I had in mind before I purchased a fan, just in case there are other people wondering the same things but struggling to get a good answer. I'll update this review if, after some time and use, I feel it deserves less stars.First, I will list the specifications of the Hyper T2 fan that came on the box.Fits the following CPU sockets:-Intel Socket LGA 1156/1155/1150/775-AMD Socket FM2+/FM2/FM1/AM3+/AM3/AM2+/AM2Dimensions: 93 x 80 x 140mm (3.7 x 3.1 x 5.5 inch)Heat Sink Dimensions 90 x 51 x 140mm (3.5 x 2.0 x 5.5 inch)-- From the bottom flat pipes that adhere to to the CPU to the top 2 pipes of the fan, this is 140mm tall. (Something I wish I had known beforehand. Luckily this fit in my case just fine, but it's likely that some of the 4 pipe fans would not have).Heat Sink Material: 2 Direct Contact Heatpipes/ Aluminum FinsHeat Sink Weight: 248g/ 0.55lbHeat Pipe Dimensions: Ø6mmFan Dimensions: 92 x 92 x 25mm (3.6 x 3.6 x 1 inch)Fan Speed: 800 - 2800 RPM (PWM)Fan Air Flow 15.7 - 54.8 CFMFan Air Pressure: 0.35 - 4.27 mm H2OFan Life Expectancy: 40,000 hoursNoise level: 17-35 dBA (I find it to be silent when I'm not gaming, but still pretty quiet when I am)Bearing Type: Long Life SleeveConnector: 4 PinRated Voltage: 12 VDCSafety Current: 0.6 ARated Current: 0.26 APower Consumption: 3.12 W Max.Fan Weight: 91 g / 0.20 lbsWeight: 340 g / 0.75 lbSo far the only con to this fan is that installation was a bit tricky. It has 4 push pins just like the stock coolers you will get from Intel (thought it also comes with some sort of clip for AMD mobos... wouldn't know about that since I'm using Intel products), so it seems like things should be relatively simple. They are, but only after you figure out which way to rotate all the pins before pushing them into the holes. The directions are just pictures with no explanation, which is why I struggled at first. I did eventually figure things out, but it would be nice if they updated the directions to have some written instruction.As for the the fan, it's perceptibly better than a stock cooler. When doing very simple things (like writing this review) you shouldn't be experiencing high temperatures anyway, but the cooler has dropped things a few degrees C. However, there seems to be a relatively decent difference while playing games. The highest I've noticed the stock cooler at was 55 C, which is kind of pushing it since apparently you don't want to get any hotter than 60. Doing a quick test run of a solo dungeon in the game, Tera, at max graphics, most of my cores are staying near 40-43 C. Again, I'll come back and update this review once I've used the fan for longer or tried it with different games.I bought this fan for essentially $5.50. The list price was 9.99 (10.50 with tax) and there was a 5$ mail in rebate. I highly doubt I could find a better fan for 5$. Stock coolers on Amazon are listed for around 8. For the price, this is a pretty damn good value.
Trustpilot
Hace 2 meses
Hace 2 semanas