🚲 Elevate Your Ride: Store Smart, Ride Hard!
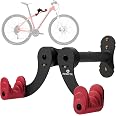
The PRO BIKE TOOL Bike Wall Mount is a robust and stylish solution for indoor bike storage, designed to hold up to 48.5 lbs. Its durable steel construction features a scratch-proof coating and adjustable arm angles, making it suitable for various bike types. With easy installation and protective cradles, this bike rack is perfect for keeping your garage organized while ensuring your bike remains in pristine condition.


| Material | Alloy Steel Aluminium Wood |
| Color | Red |
| Special Feature | Holder |
| Product Dimensions | 3.23"D x 12.6"W x 8.66"H |
| Shelf Type | Floating Shelf |
| Number of Shelves | 12 |
| Room Type | Garage |
| Finish Type | Powder Coated |
| Assembly Required | Yes |
| Mounting Type | Wall Mount |
| Recommended Uses For Product | Bicycle,bike |
| Included Components | Mounting Screws |
| Item Weight | 1 Grams |
| Brand | PRO BIKE TOOL |
| Style | Wall Mount |
| Shelf Weight Capacity | 22 Kilograms |
| Pre-printed | PRO BIKE TOOL logo |
| Is Customizable | No |
| UPC | 787099882600 |
| Indoor/Outdoor Usage | Indoor |
| Manufacturer | Pro-Bike Tool |
| Part Number | BWH-01 |
| Item Weight | 0.035 ounces |
| Item model number | BWH-01 |
| Finish | Powder Coated |
| Item Package Quantity | 1 |
| Special Features | Holder |
| Batteries Included? | No |
| Batteries Required? | No |
R**N
Good quality. Screw it into a stud!
This really seems well-made. I’ve just installed it, so I can’t speak to its long-term durability, but the steel is nice and thick, both on the base plate and the pipe coming out from the wall. I was afraid that maybe the rubber pads would not be large enough for the aluminum tubing on my Trek Emonda ALR, but they fit very well. Also, it seems to me that many of the 1 and 2-star reviews have come when people have tried to install this on drywall without a stud behind it. People have complained about the “drywall anchors,” apparently not noticing in the instructions that those anchors are meant to be used when attaching the stand to a concrete or masonry wall, not drywall. You’d be asking a lot from drywall to hold up under the torque any bike would produce when hung like this. Like some other people, I used lag screws instead of the screws that were provided. I used 1/4 x 2-inch, which are only a little longer, but they’re also a bit beefier. I just had to enlarge the holes in the base plate a tiny amount, using a 1/4 drill bit. I used a 5/32 drill bit in the stud and tightened the screws with a socket wrench. At this point, I’m very satisfied with this product.
D**D
Secure rack
Fantastic bike hanger
D**N
Truth in Advertising
Easy to install, works as advertised.
A**A
if you want to hang your bike horizontally, this works
Very sturdy mounting product for putting a bike on a wall. If you have the room and need to mount the bike horizontally, this is the product to get. It's not very expensive and it's really well-made.
O**R
Not very stable for larger bikes. Should be ok for smaller bikes.
My bicycle weighs around 30 pounds and the small screws provided by the company do not appear to provide adequate support. I purchased 2 Structural lag screws for a couple of dollars (3 1/2 in. long, 5/16 in. diameter). I had to drill the holes bigger for the screws to fit through the opening. I installed on drywall, but used a stud finder to make sure I hit a stud when I drilled the holes. Mark the wall with a pencil and then drill holes slightly smaller than the screws. The strap to hold the front wheel from turning is a piece of crap and broke the first time I tried to use it. So I do not use a strap although I could possibly use a bungy cord. I just stabilize the bike by having the handle grip against the wall as shown in the last pic. This bike holder serves the purpose after my modifications, but it is not worth the money for what you get. It should be priced around $20-25.08/31/2020 I am updating my review to 4 stars due to the exceptional customer support. I emailed customer support due to the strap that broke on the first use. They are not only sending me a new one from Great Britain, but also, they credited my charge card for $10.00! And there response was in a timely manner as well.
L**L
Reliability and sturdiness
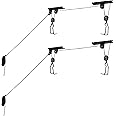
These are great bike racks for our garage. They keep our bikes up and out of the way while saving space. These racks make our bikes more available to be able to reach verse being in a shed. Definitely recommend these to any cyclists looking for a rack that is strong, easy to pu lt up and allows your bike to be out of the way.
R**I
Great system, here’s how I mounted mine.
This is a great bike storage system, highly recommend. Ok, enough about how great it is. For me, I want to know tips how to install it and you probably do too. As you can see, I installed 3 holders. First step was to find the studs behind the sheet rock. I used a quality stud finder but to double check the studs exact location I used a finishing nail and hammer to find the exact sides of the stud. Glad I did because some of the stud finders locations for the center of the stud were not right.You can use longer screws than those that come with the kit (3) and mount the 3 holes of the bracket into one stud. I read where some have said this works. Didn’t seem it would be real stable so I decided to mount a 2x6 across two studs. A 2x4 is not wide enough for the bracket. I cut the 2x6’s 22” long so they overlapped the end of each stud by 3”. I attached the 2x6’s to the studs using 5/16 x 4” lag screws. I used 4 lag screws per 2x6, two on each end.You’ll need a impact driver to get the lag screws thru the board and into the stud. A regular drill won’t do it. If you don’t have an impact driver you could always muscle a socket wrench. After I drove the lag screws in as far as they would go I did have to use a socket (1/2 for the 5/16 lag screw) to finish tightening them down.I measured the bikes with the holder/ bracket to get the spacing between bikes. My measurements resulted in a spacing of 40” from the top of one board to the top of next board. For my bikes it was perfect. Your bikes may require different spacing.These type of wall mounts are perfect. Unlike other systems that are one position, usually horizontal, these allow you to adjust the arms to fit the different types of cross members as not all bikes are alike. They’re pricey, but I think they’re well worth the money. The 2x6x8 was $12.00 and the 12 lag screws were $9.00.I hope this helps if you decide to purchase these.
S**S
Easy Installation - Bike Rack
Love these bike racks. I purchased two and will need a third. Super easy to mount on the wall. The only help I needed was lifting the bike to place on the rack. Only three screws to insert into the stud. A tap tap then screw into the stud. You will not regret this purchase.
Trustpilot
Hace 2 semanas
Hace 1 día